Setup Step-by-Step

Editors note: These directions refer to version 2.0 of our VoiceElements for Teams product.  Version 2.0 is in pre-release and includes single sign on support and tighter teams integration.  If you need setup instructions for version 1.0 please click here.

These steps will help you setup direct routing for the VoiceElements Teams Calling plan.

Click on an image to enlarge it.


Questions?
Call Us
Email Us
Step 1

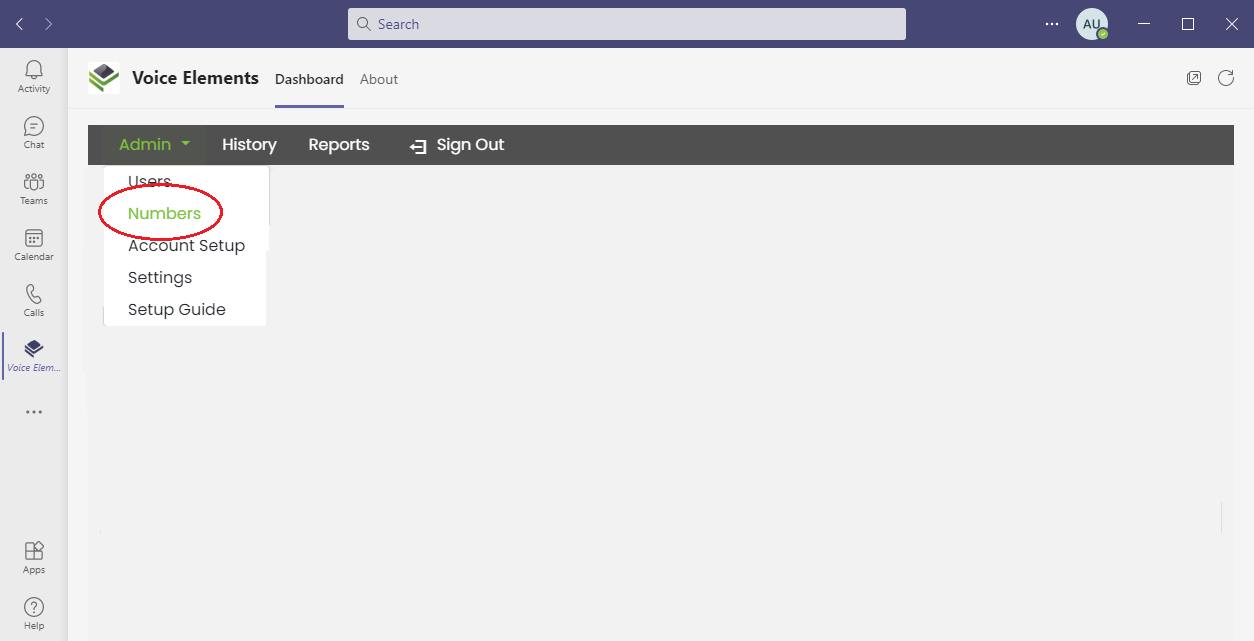
To begin, select Numbers from the Admin drop-down menu item as shown.

Select Admin - Numbers
Step 2

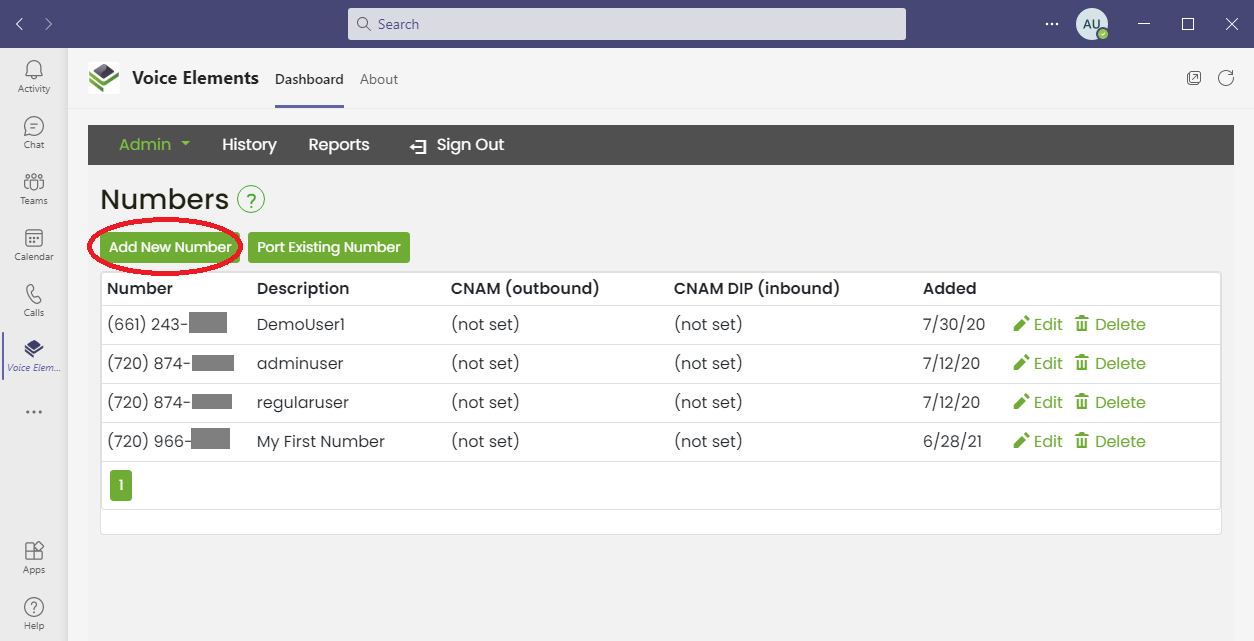
Next, select Add New Number. This will allow you to select numbers for each of your users in the specific area codes that you require.

If you would like to use existing phone numbers that you already own please contact support@voiceelements.com for help with this.

Numbers - Add New Number
Step 3

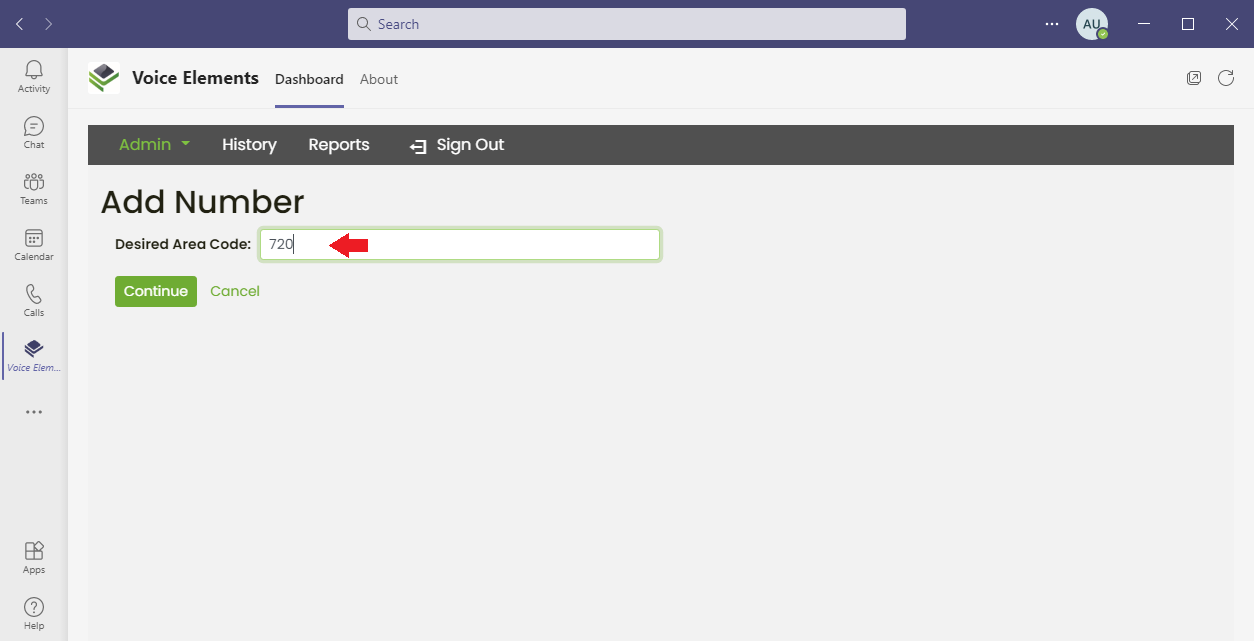
Enter the US or Canada area code that you would like your new number assigned from.

In this example we are looking for a Denver, CO number in area code 720.

Add Number - Select Area Code
Step 4

If a phone number cannot be found, you will see a message.

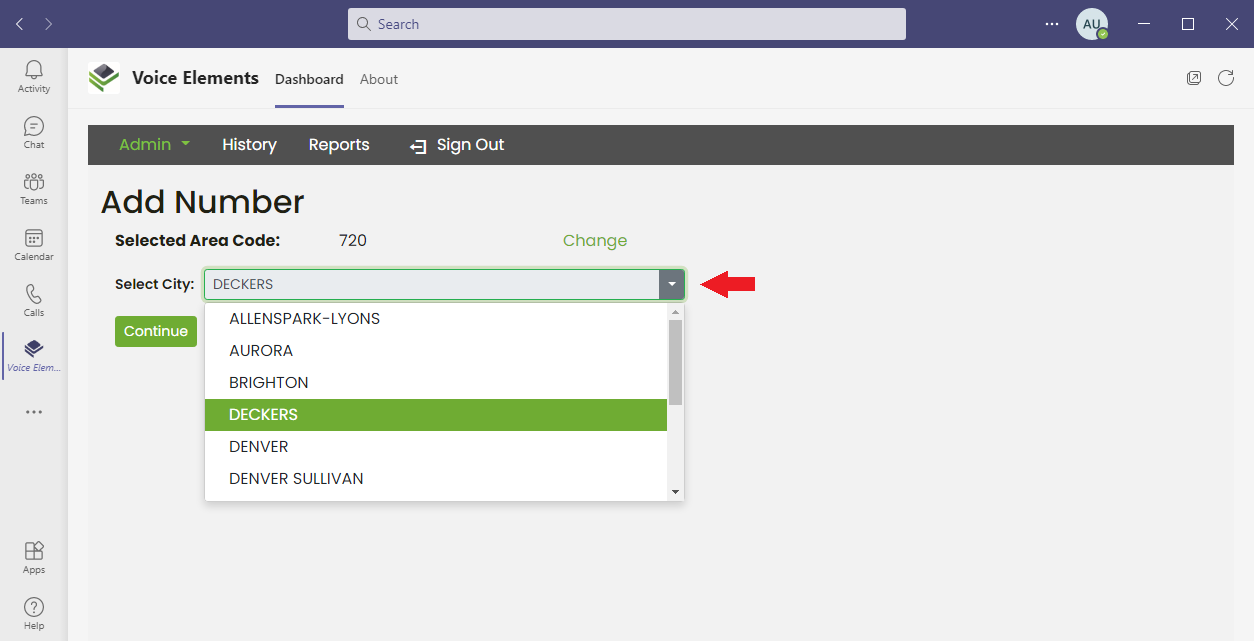
Otherwise, click the drop down to select a city.

If you cannot find a number close to what you want, please contact us, we can help. support@voiceelements.com

Add Number - Select City
Step 5

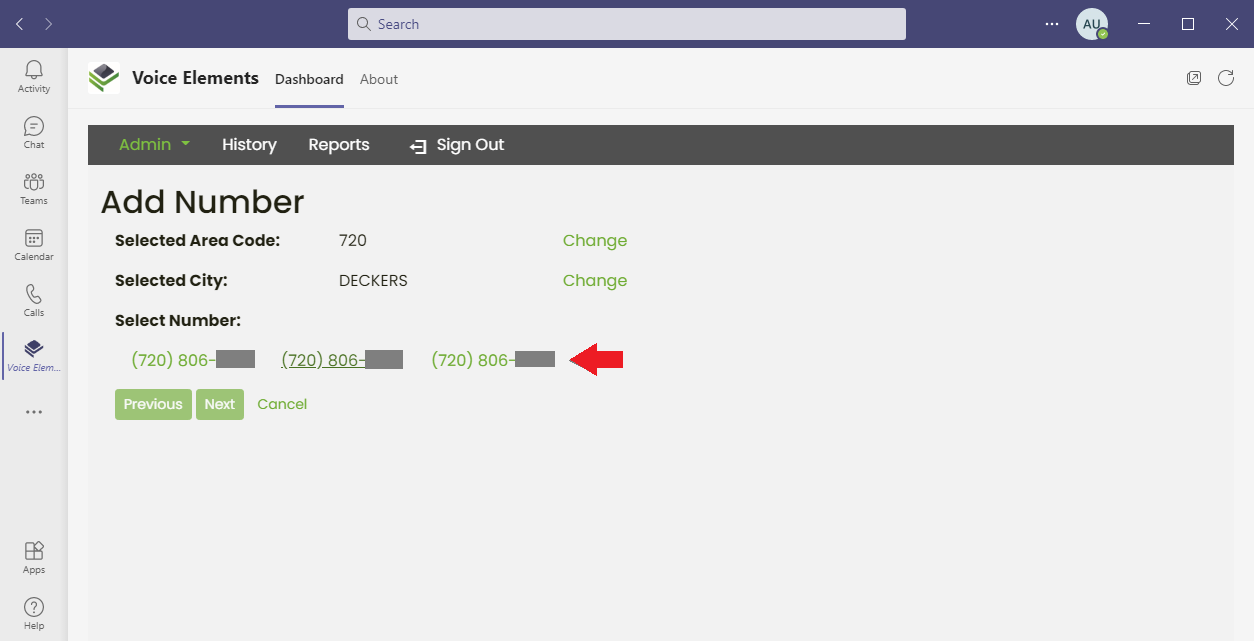
Select a number from the list provided.

Numbers - Select Number
Step 6

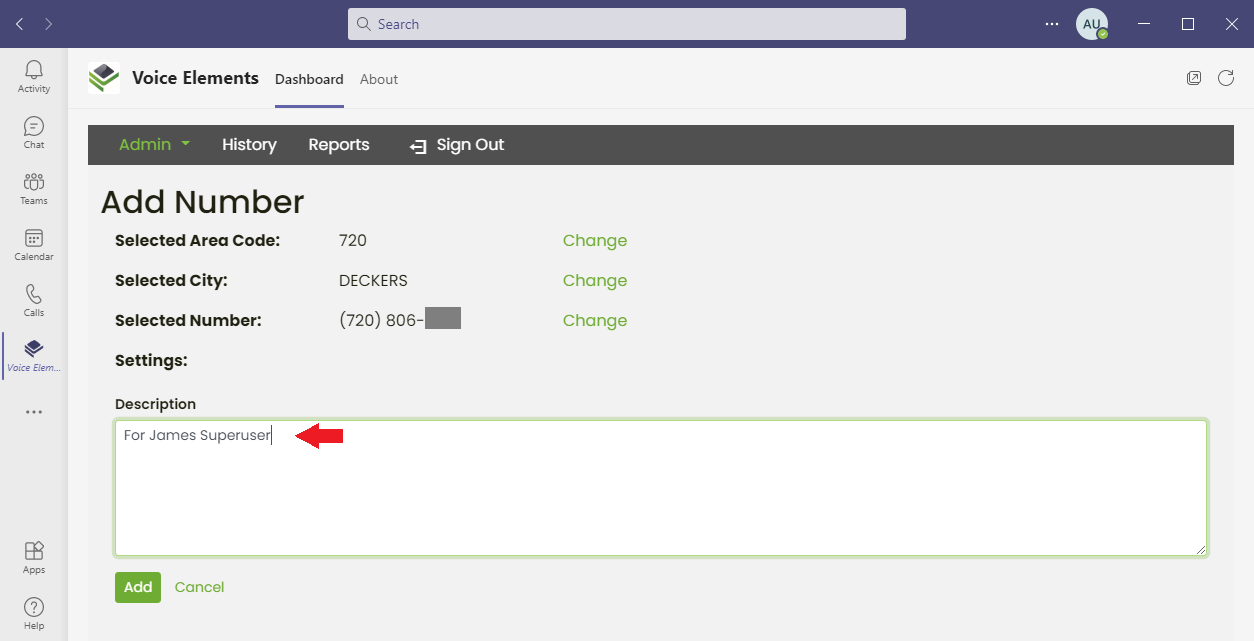
Provide a description such as the name of the user that this number will be assigned to.  Then press the Add button to complete the number selection.

Repeat step 2 through 6 for any additional phone numbers you need for your users.

Numbers - Provide Description
Step 7

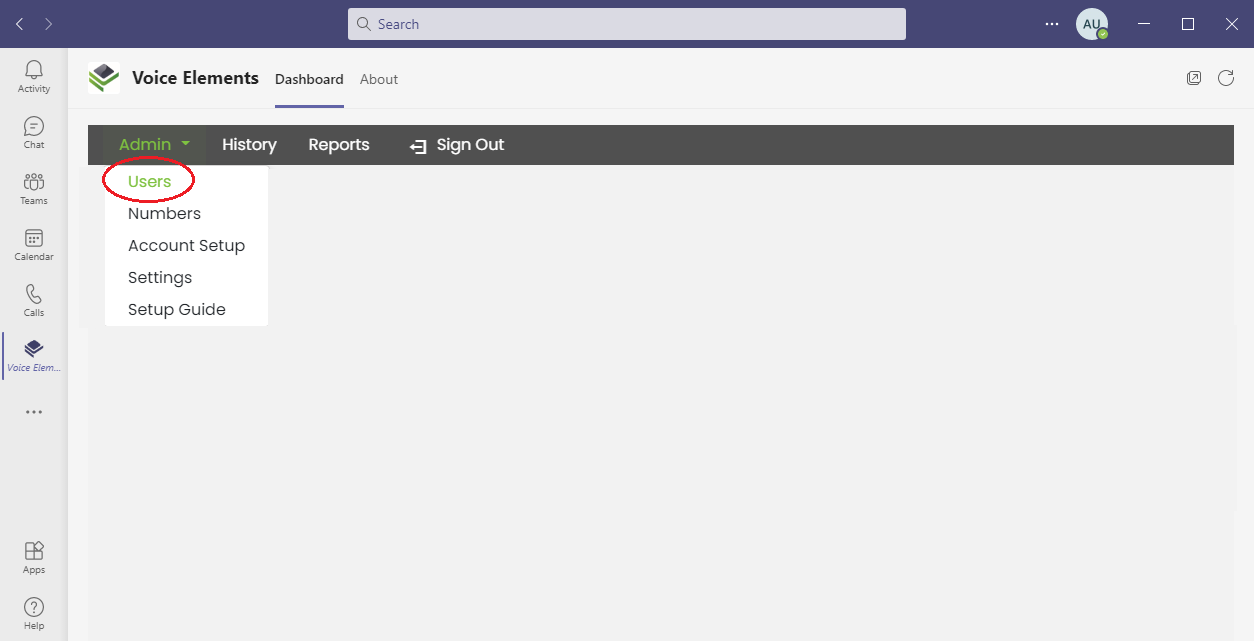
Next, select Users from the Admin drop-down menu item as shown.

Select Admin - Users
Step 8

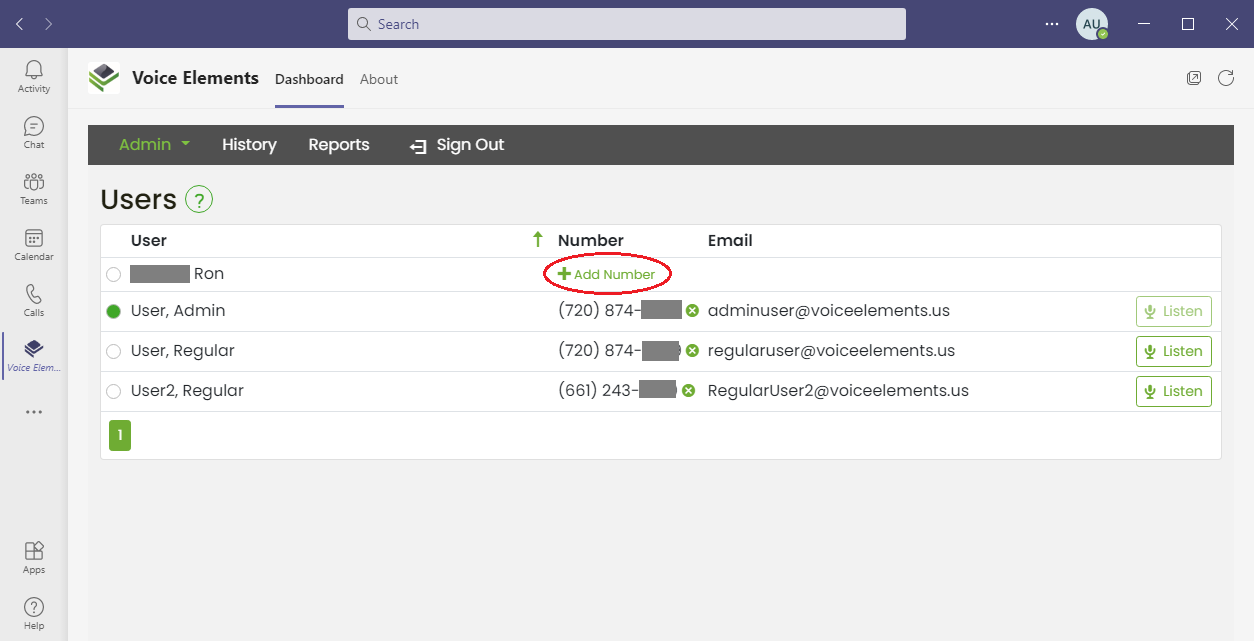
For any user in your organization that you wish to assign a number, click on Add Number.

Users - Assign Number
Step 9

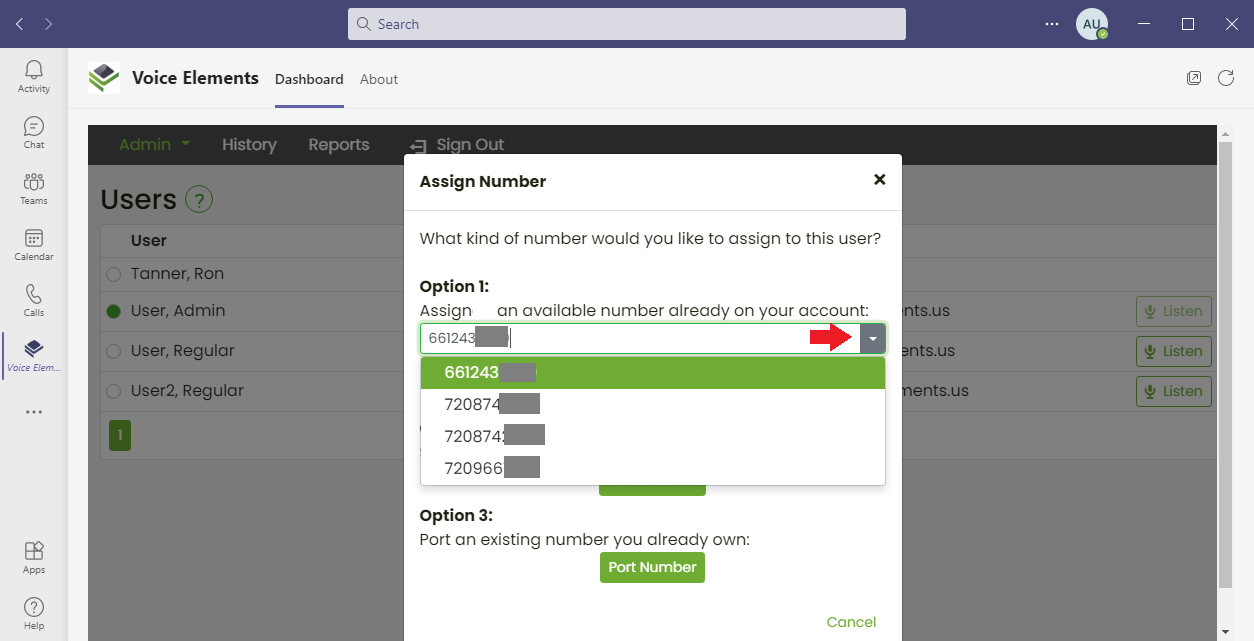
Click the drop-down to select one of the numbers you provisioned in the previous steps.  Then press Assign Number.

Users - Select number
Step 10

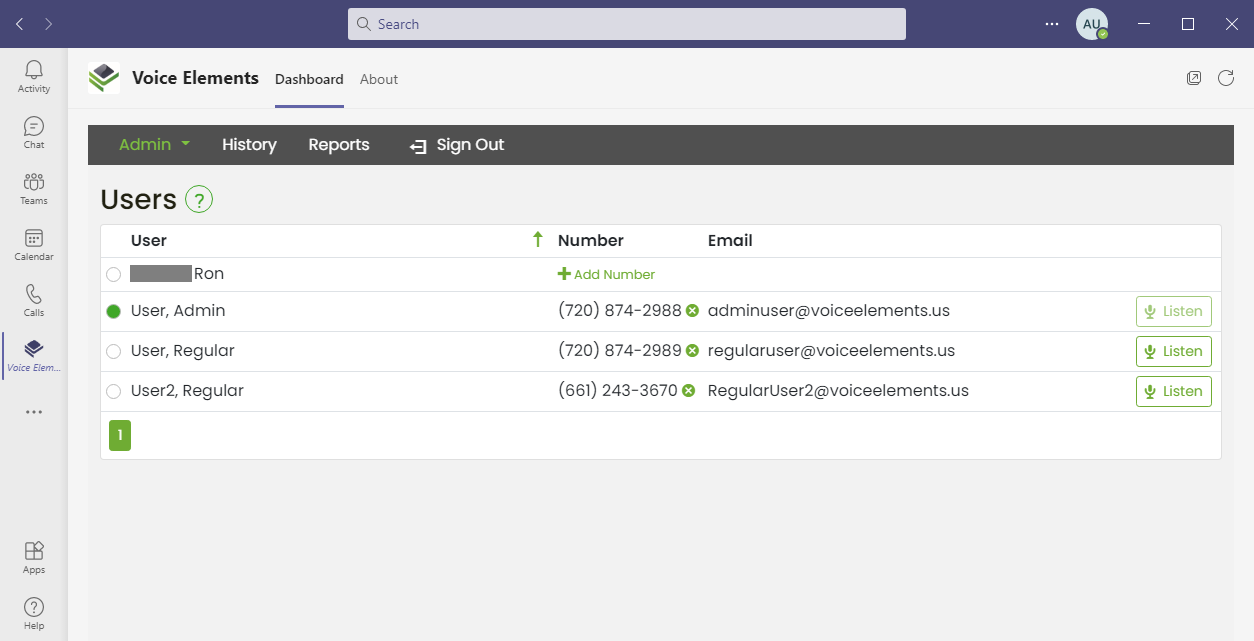
Leave your teams application open to the Users page so that you can refer back to it for the next steps.

Admin Users Page
Step 11

It is time to jump into the Microsoft Teams Admin System.  This is the part where you are going to need the Teams Admin Role.

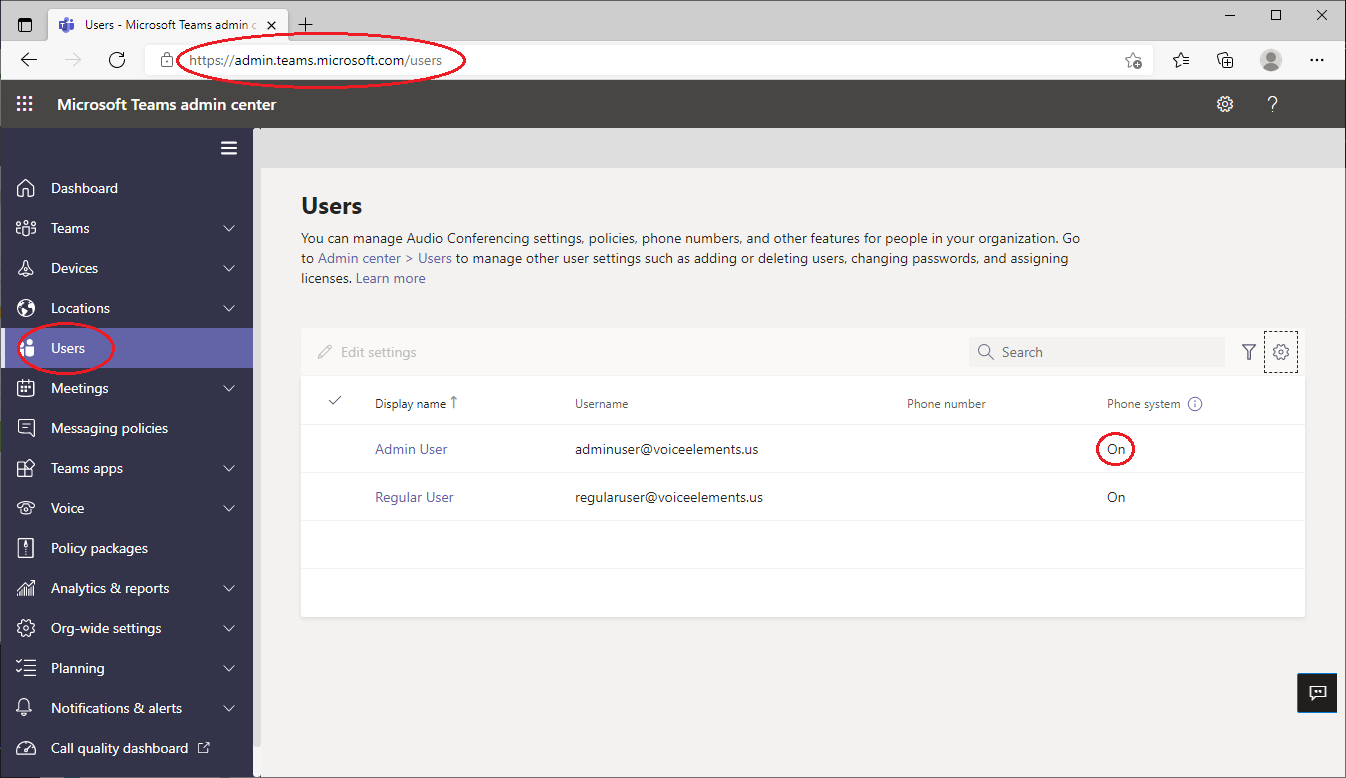
Open a browser window and navigate to https://admin.teams.microsoft.com

Select Users on the left menu.  Then before you proceed to the next step, make sure the users that you wish to use direct routing have the Phone System column set to “On”. If not, you will need to add a Microsoft “phone system” license to that user.  ( What is this? )

If you don’t see the Phone System column on your screen, locate the horizontal scroll bar and drag it over.  You can also click the gear icon to configure the columns to only show Display Name, Username, Phone number and Phone system.


Teams - Admin - Users
Step 12

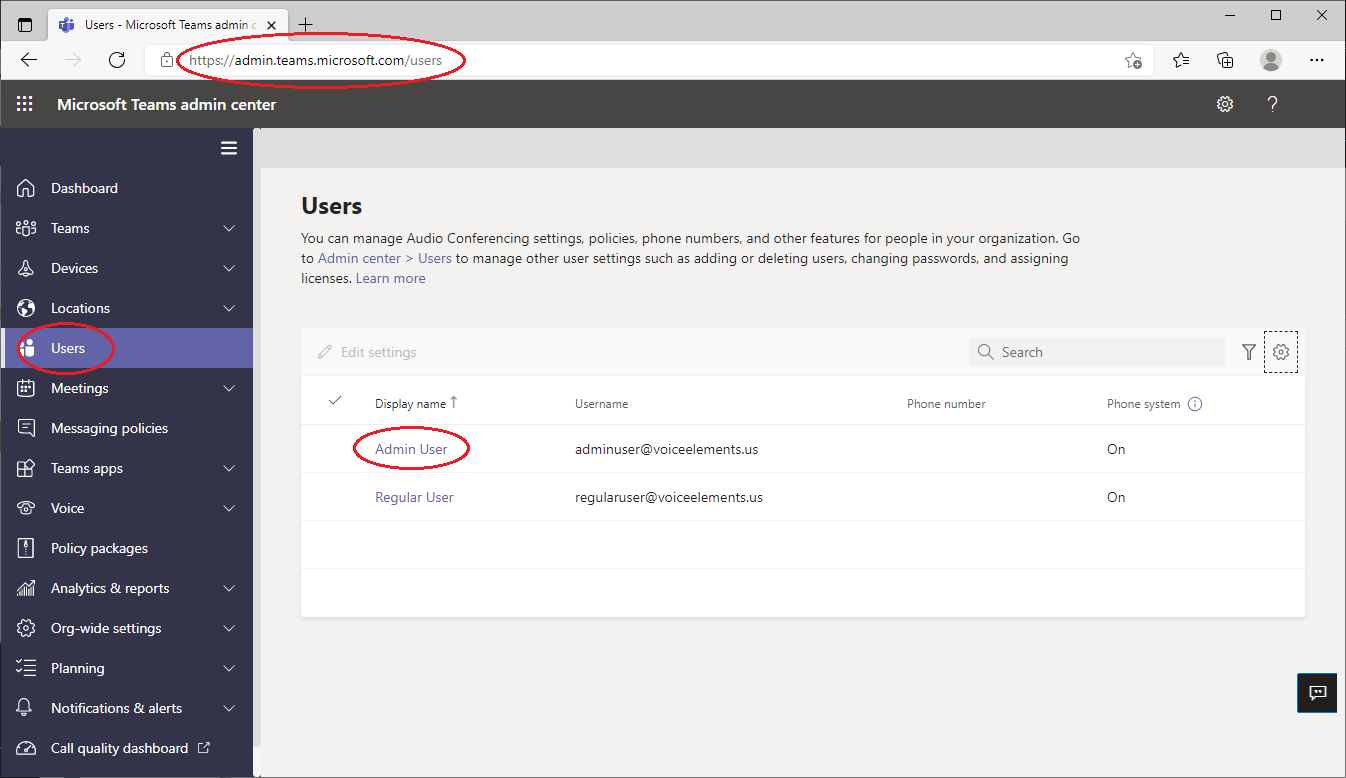
To assign the direct routing phone number to each user, select each user one by one as shown.

How to Unblock a File
Step 13

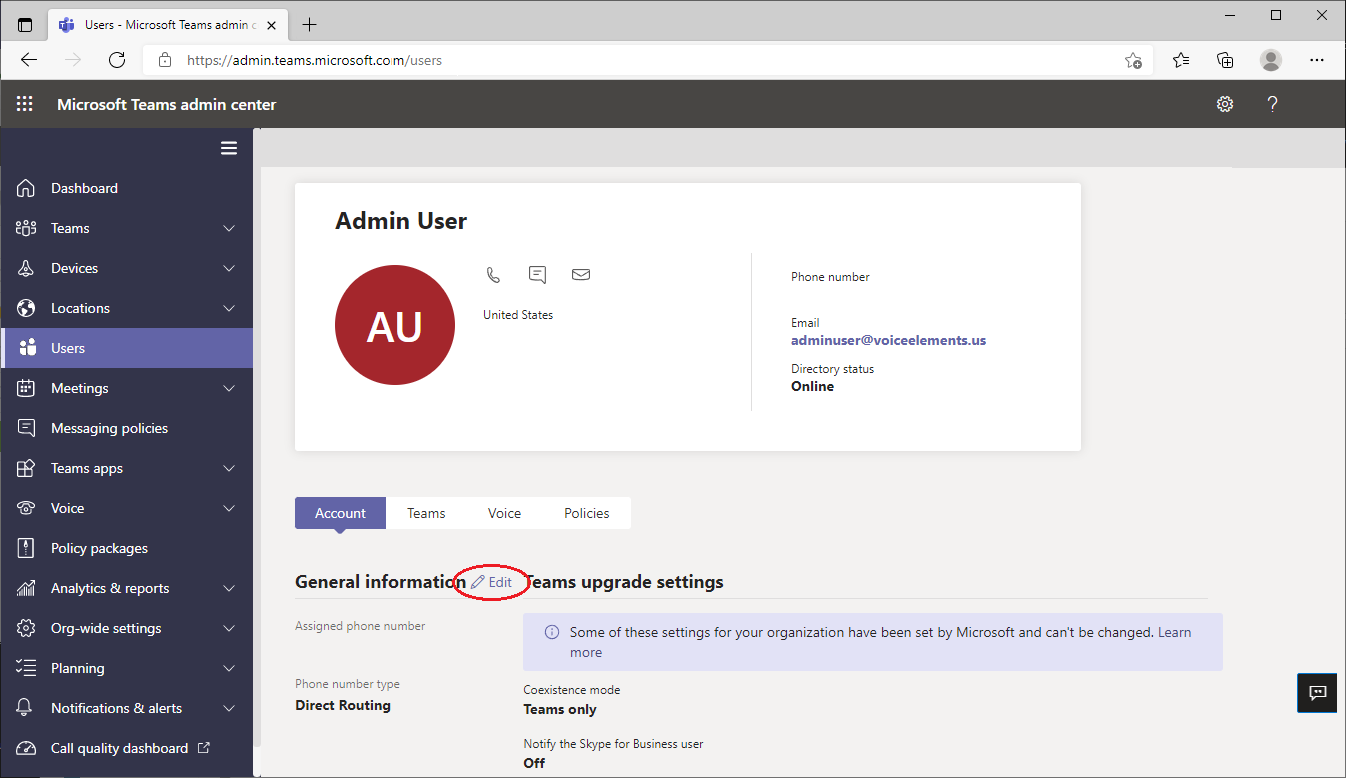
After selecting a user, click the edit link just to the right of General Information.

StartHere is Run as Administrator
Step 14

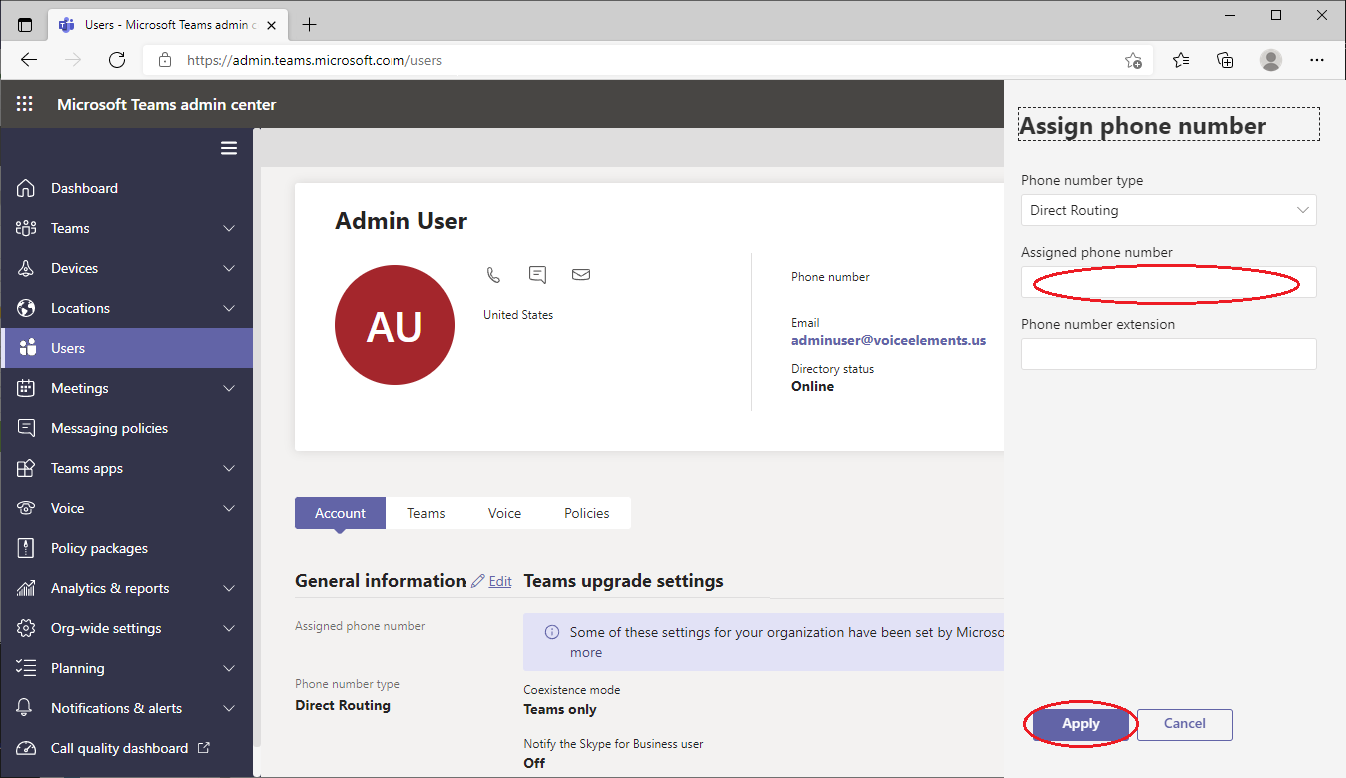
Enter the assigned phone number for the user. Note that you MUST precede the new phone number with a +1 at the beginning. For example, if the new number is 3035551212, you would enter +13035551212. Click the Apply button to complete the number assignment.

Enter A to accept All
Step 15

Repeat the number assignment process for all other users.

Step 16

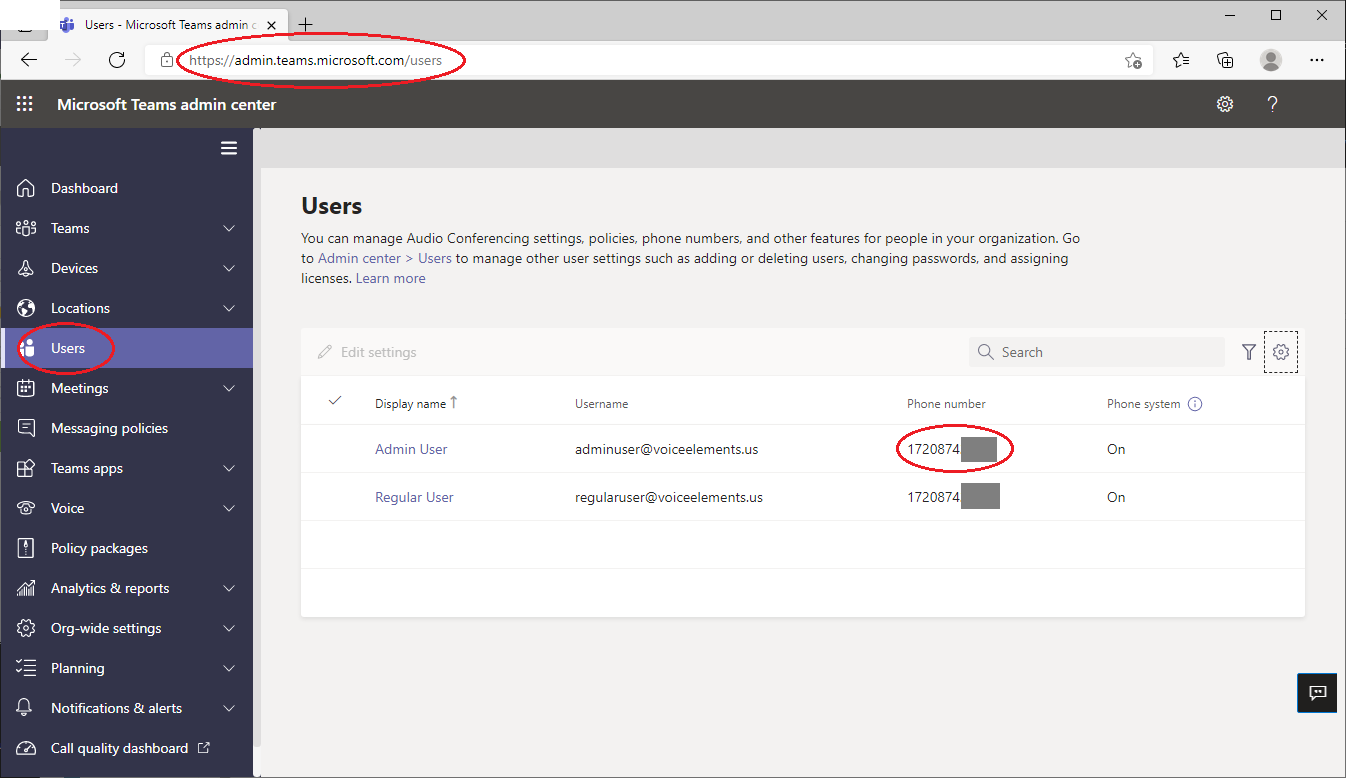
Refresh the Users page.

Ensure the correct phone numbers are assigned to each user.

Teams - Admin - Users - NumberVerify
Step 17

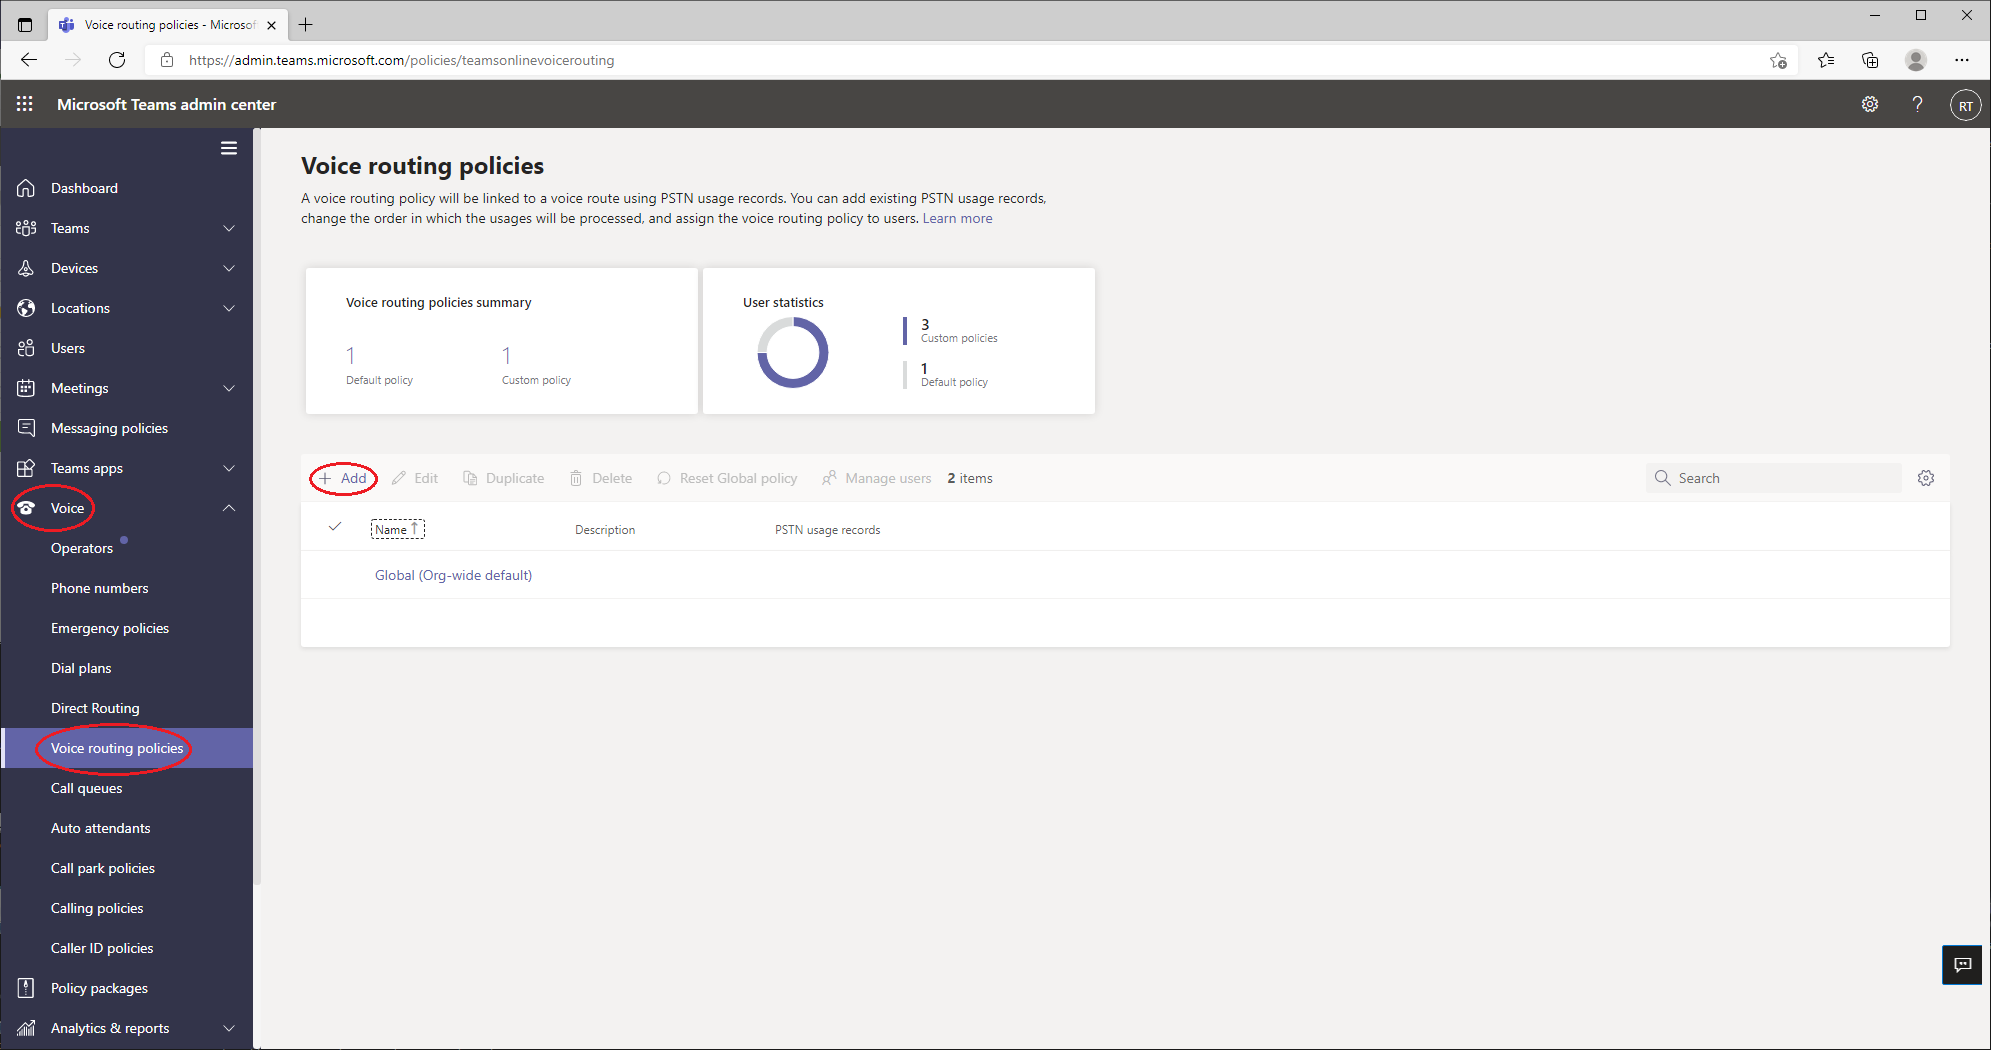
Now we need to set up a Voice routing policy and assign that policy to each user.

Select Voice / Voice routing policies.

Then click Add.

Teams - VRPolicies - Add
Step 18

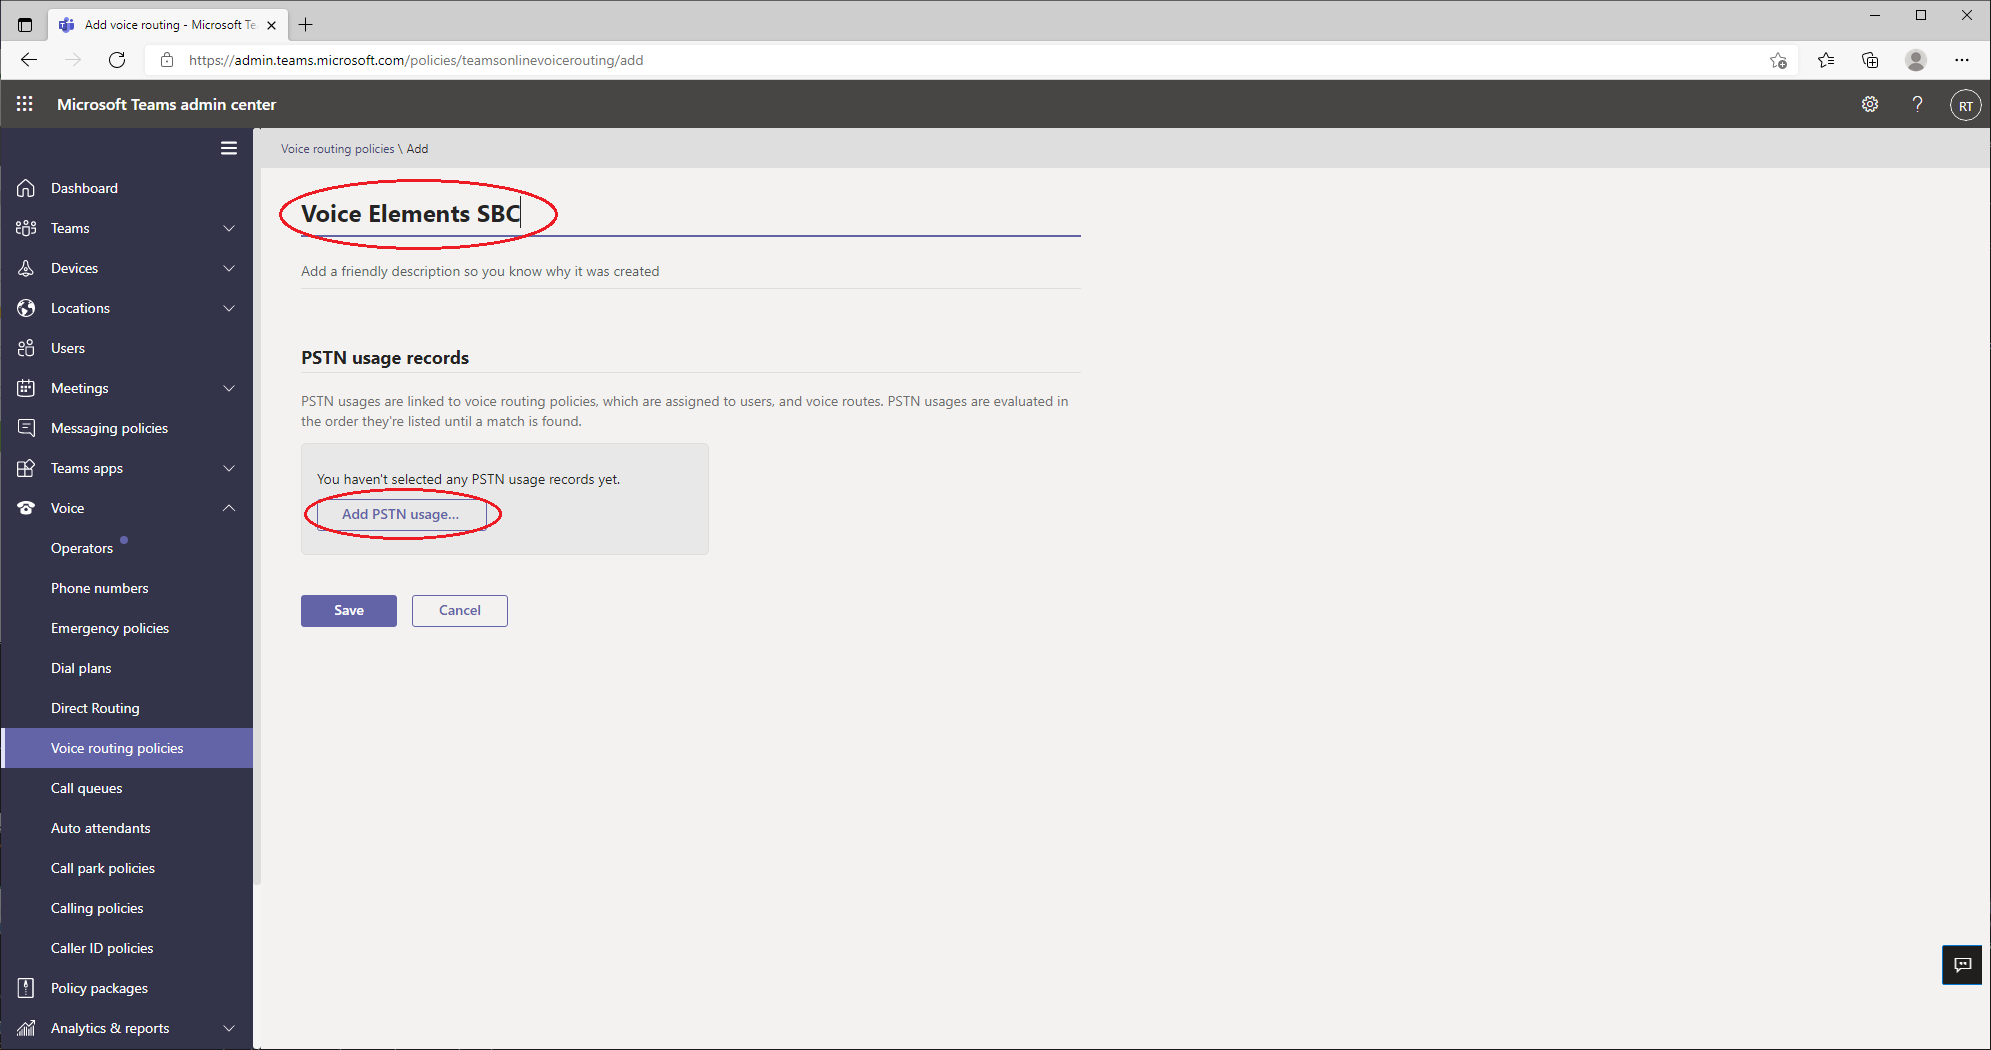
Key in “Voice Elements SBC” (Or description you prefer) at the top.

Click Add PSTN usage.

Teams - VRP - Add1
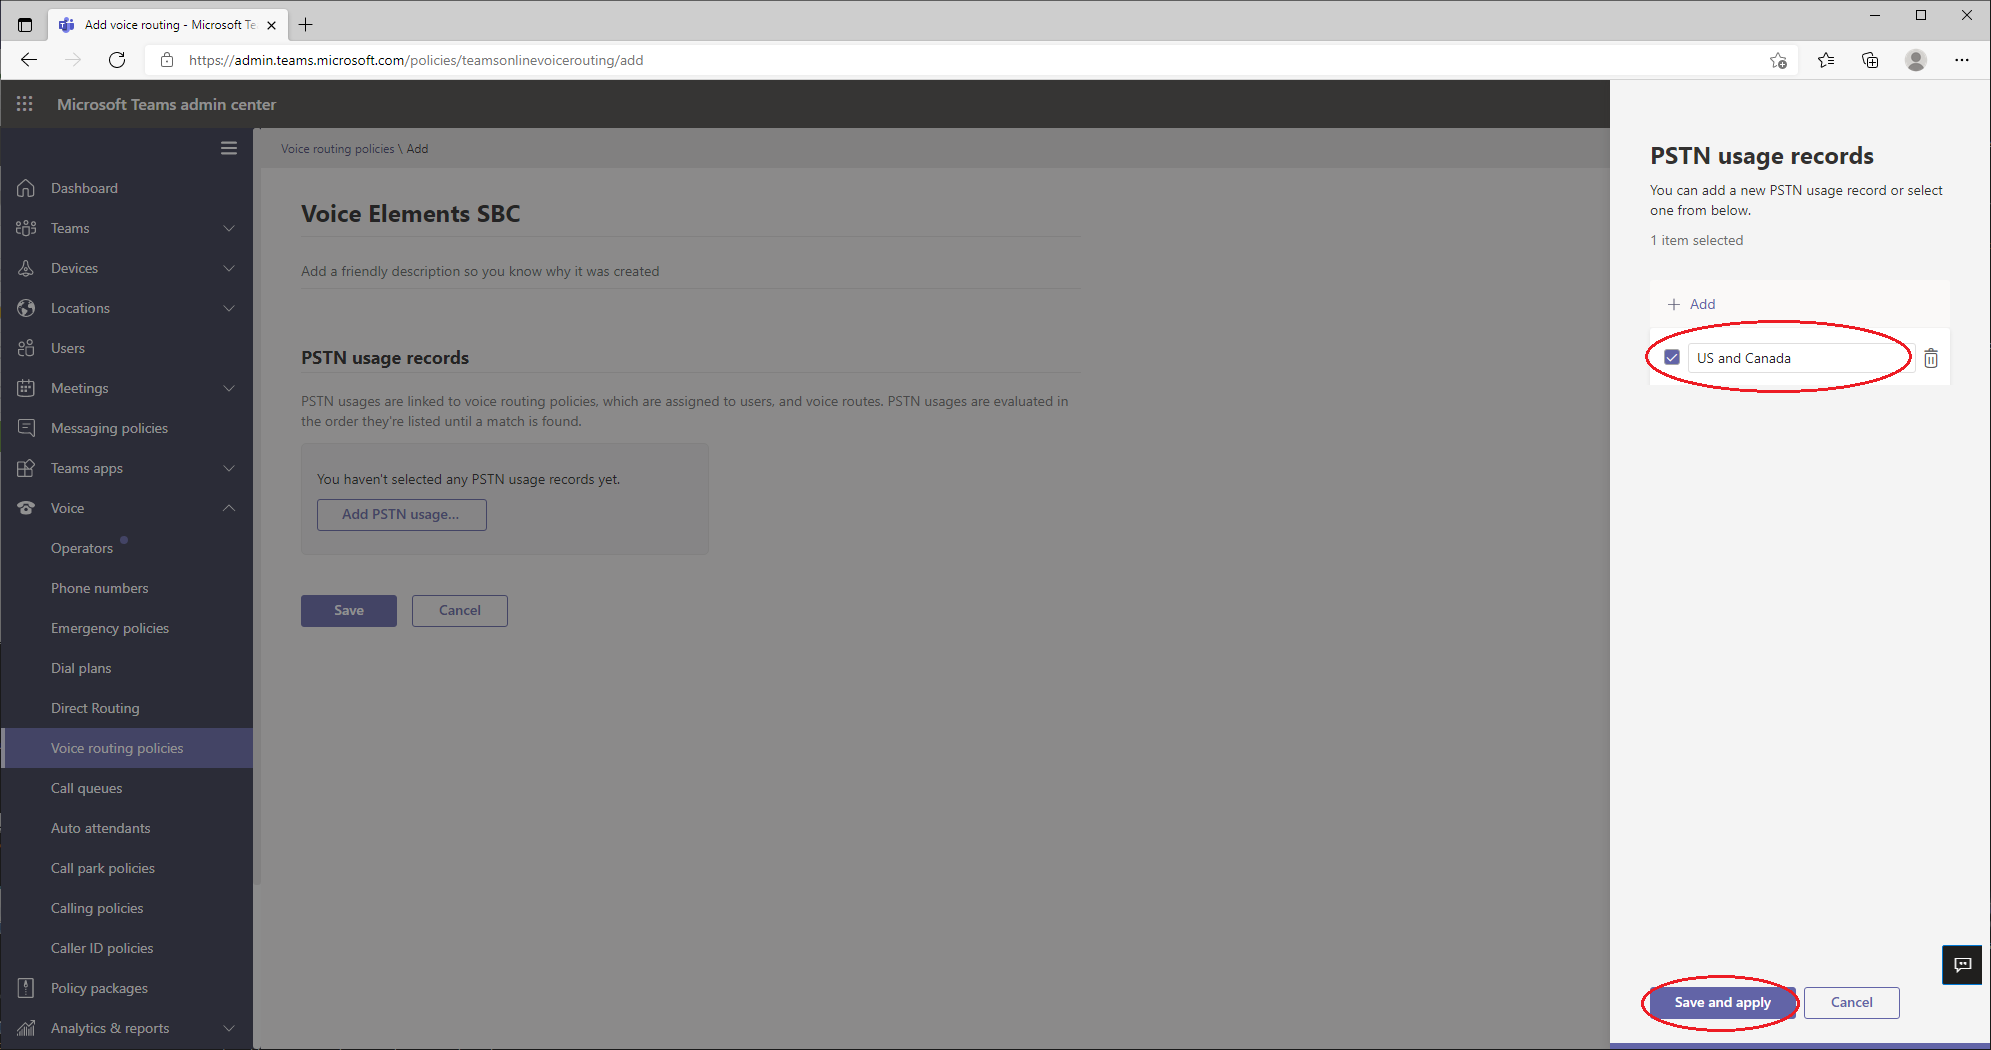
Step 19

Click Add.

Type in US and Canada.

Check the box.

Click Save and apply.

Teams - VRP - Add2
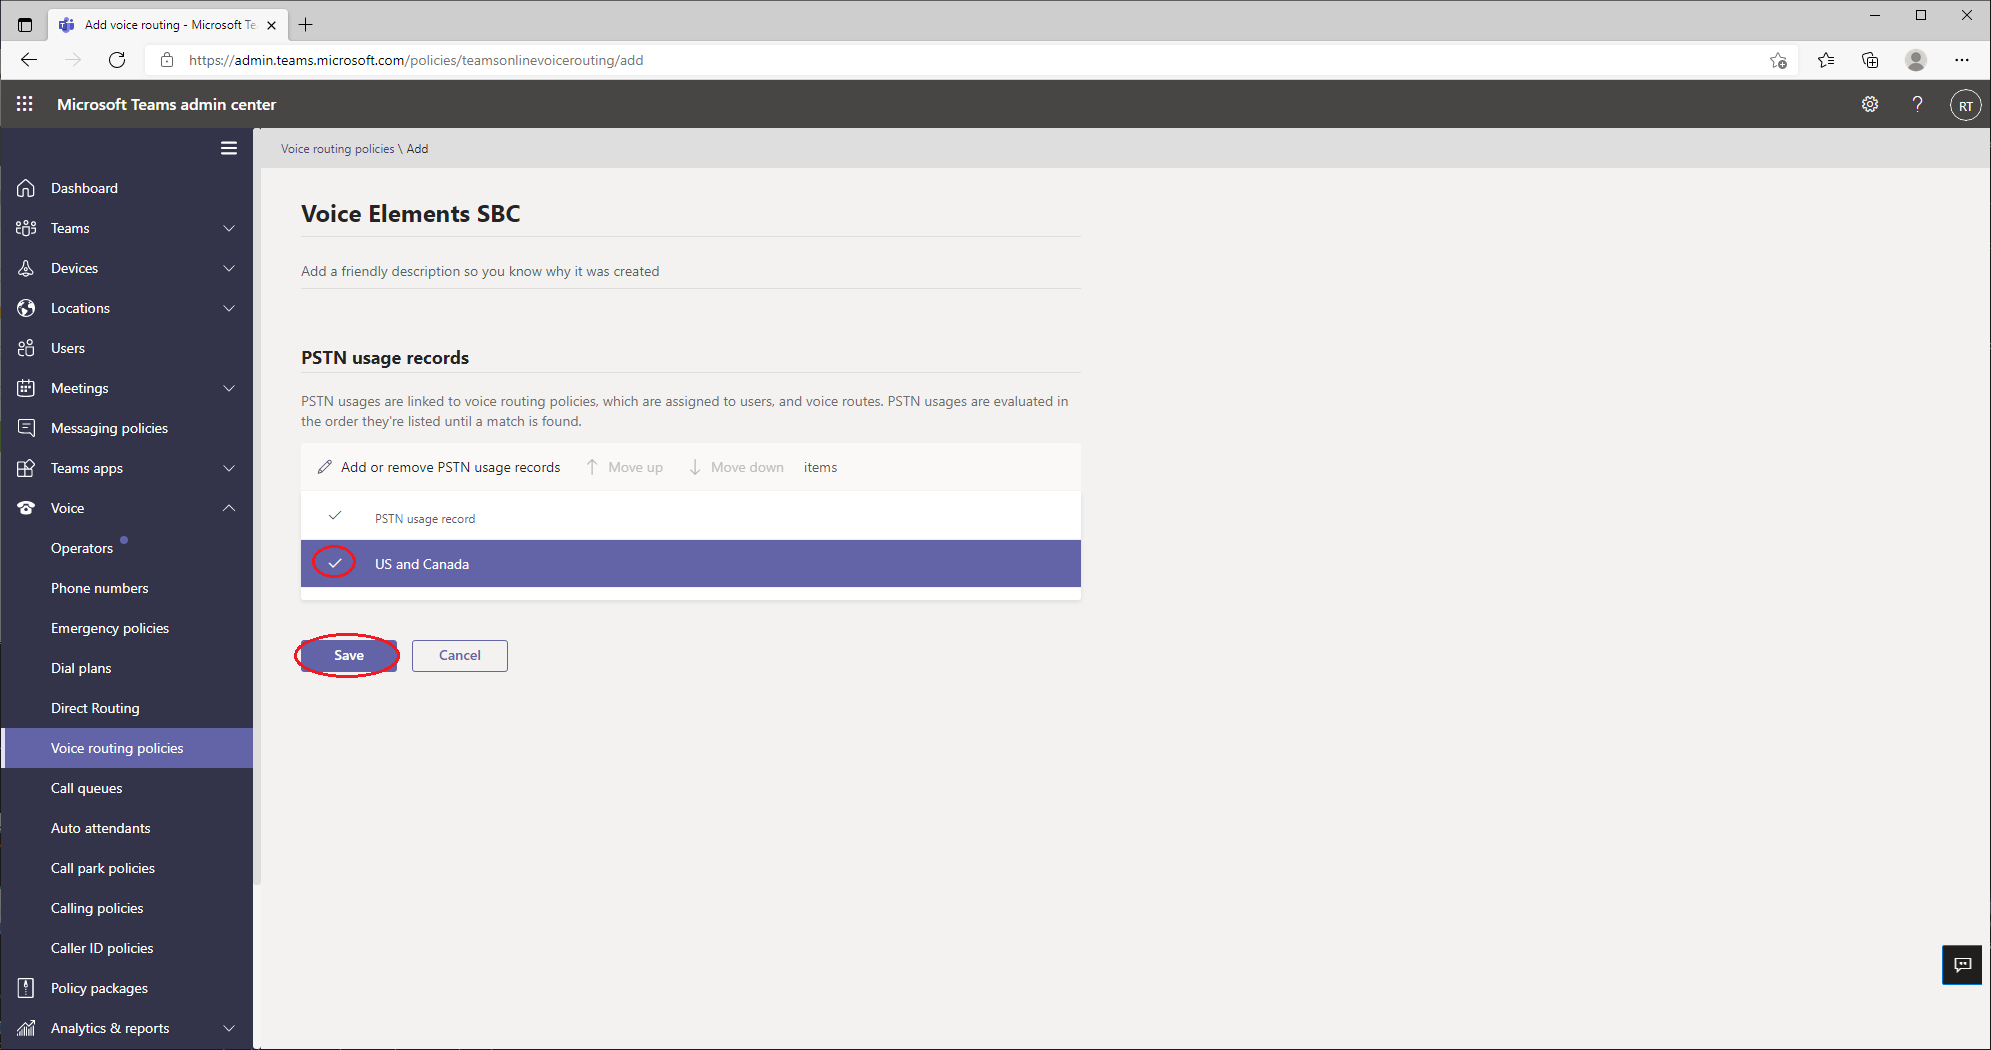
Step 20

Check US and Canada.

Click Save to save the Voice Elements SBC routing policy.

Teams - VRP - Add3
Step 21

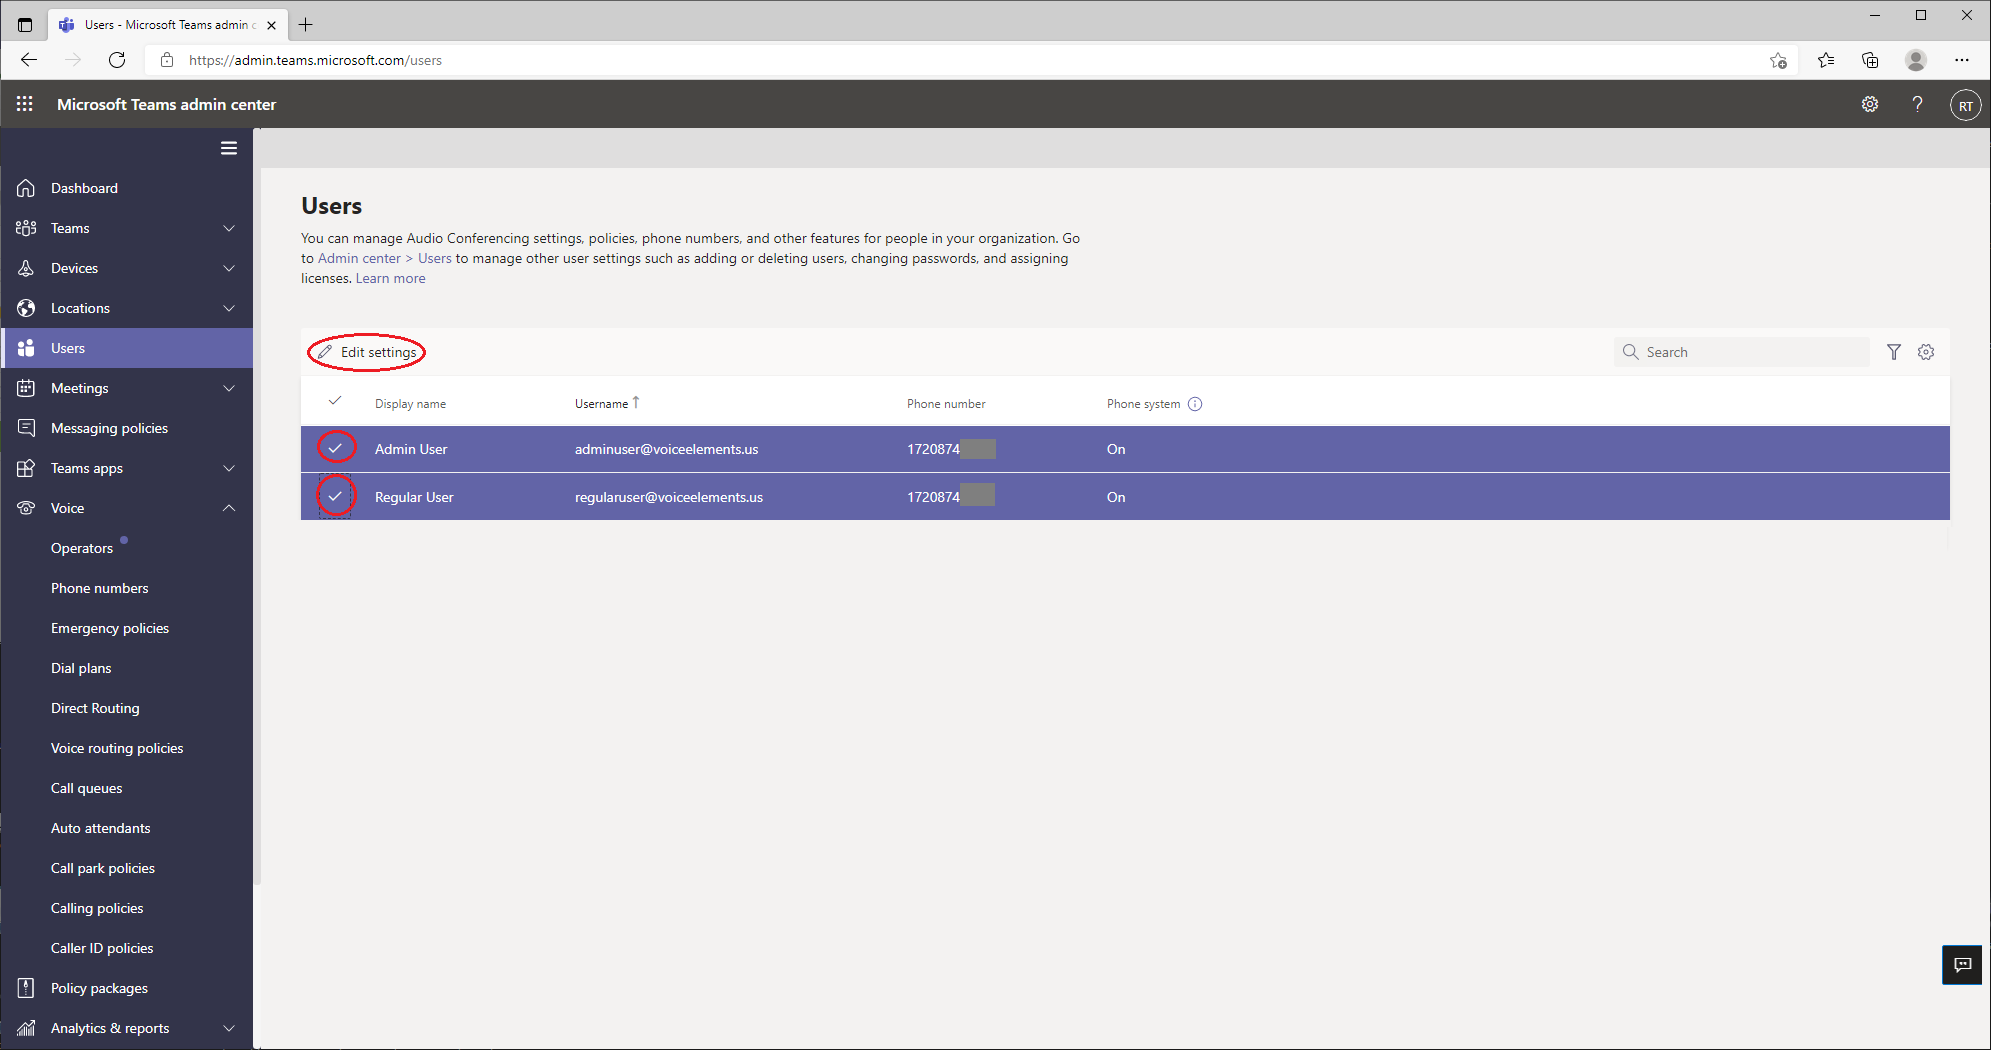
Now you need to apply this policy to your direct routing users.

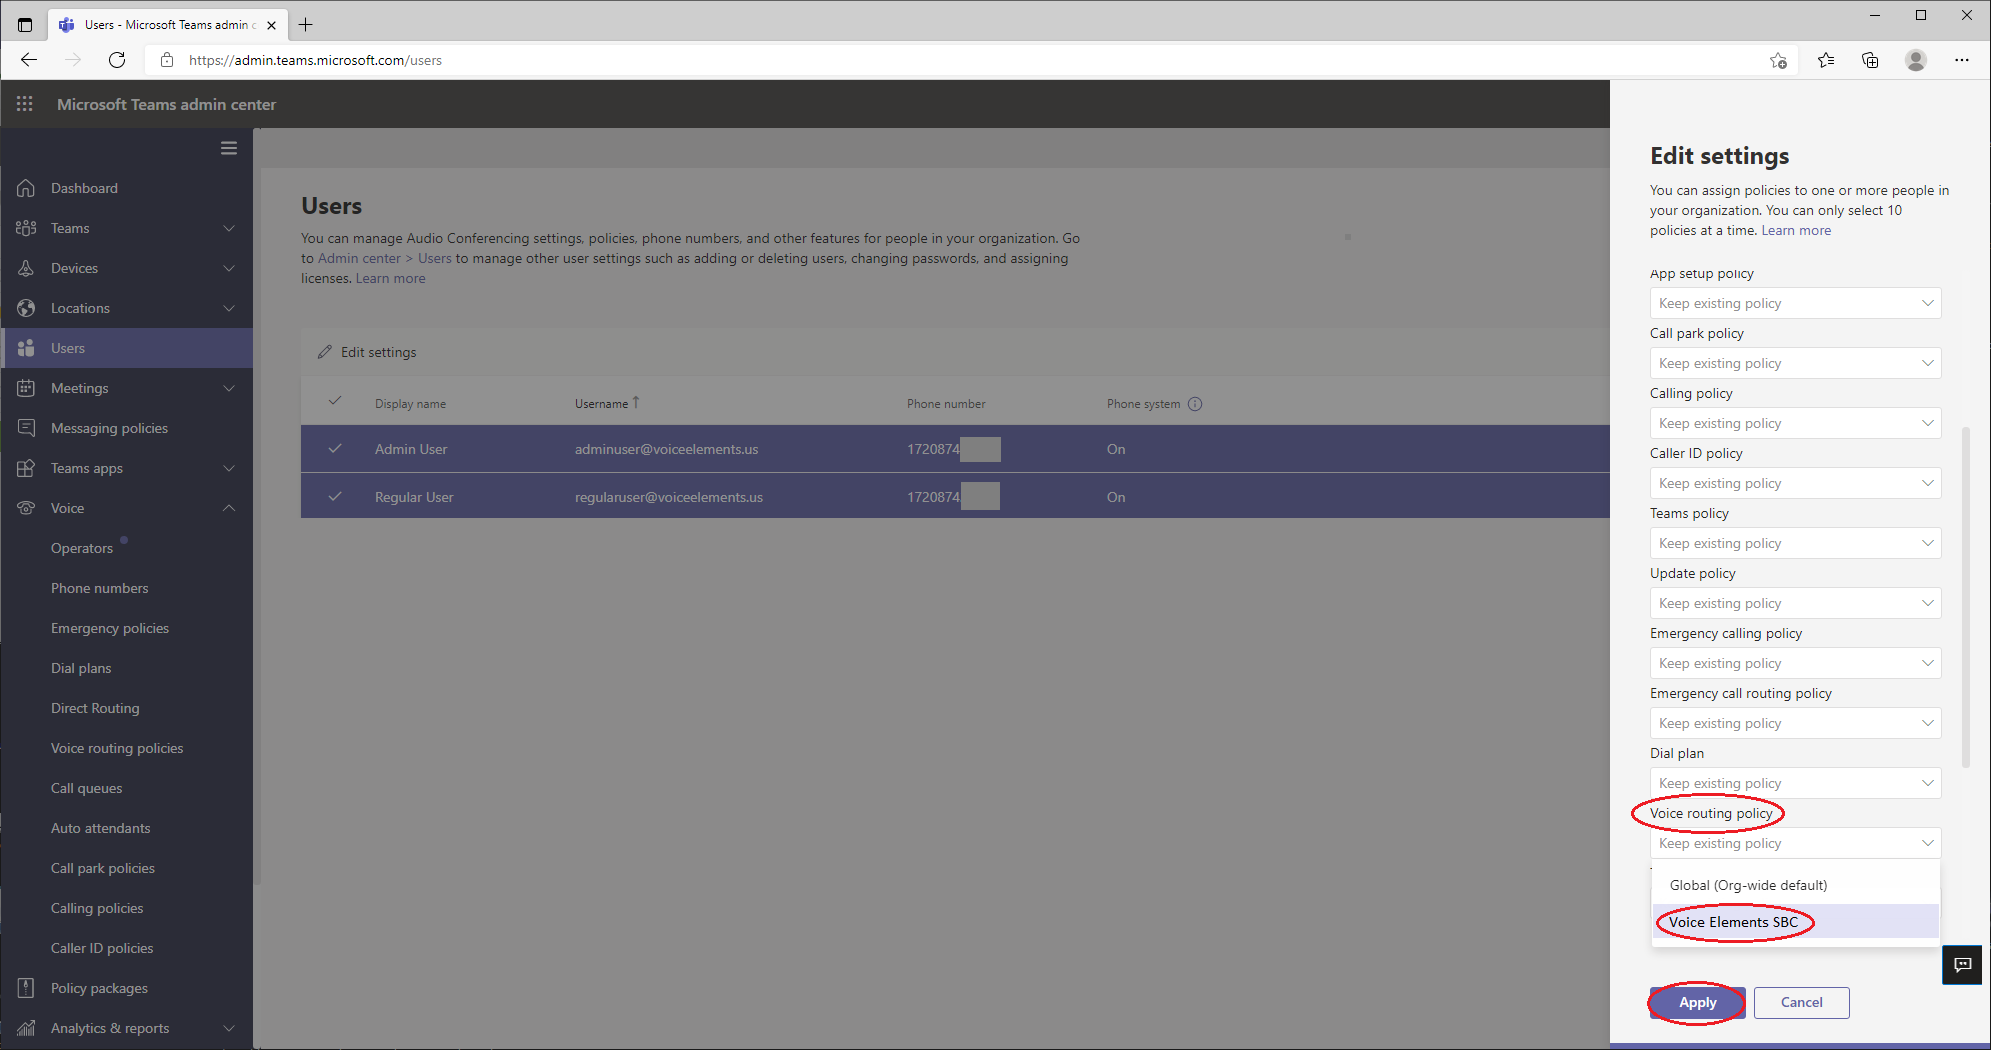
On the Teams Users tab, select each user one at a time or multiple users and click Edit Settings.

Teams - Users - Edit1
Step 22

On the right you will see Edit Settings. You will need to scroll the window down to Voice Routing Policy.

Click the drop down and select Voice Elements SBC or the name of the policy you created.

Then Click Apply.

When you are done, leave this tab open, we will come back to it in a few minutes.

Teams - Users - Edit2
Step 23

The last step you need to set up in the Microsoft Teams Admin Center is to create a Direct Routing SBC. But before you do that, there are a few more things to set up on the Voice Elements Teams Page.

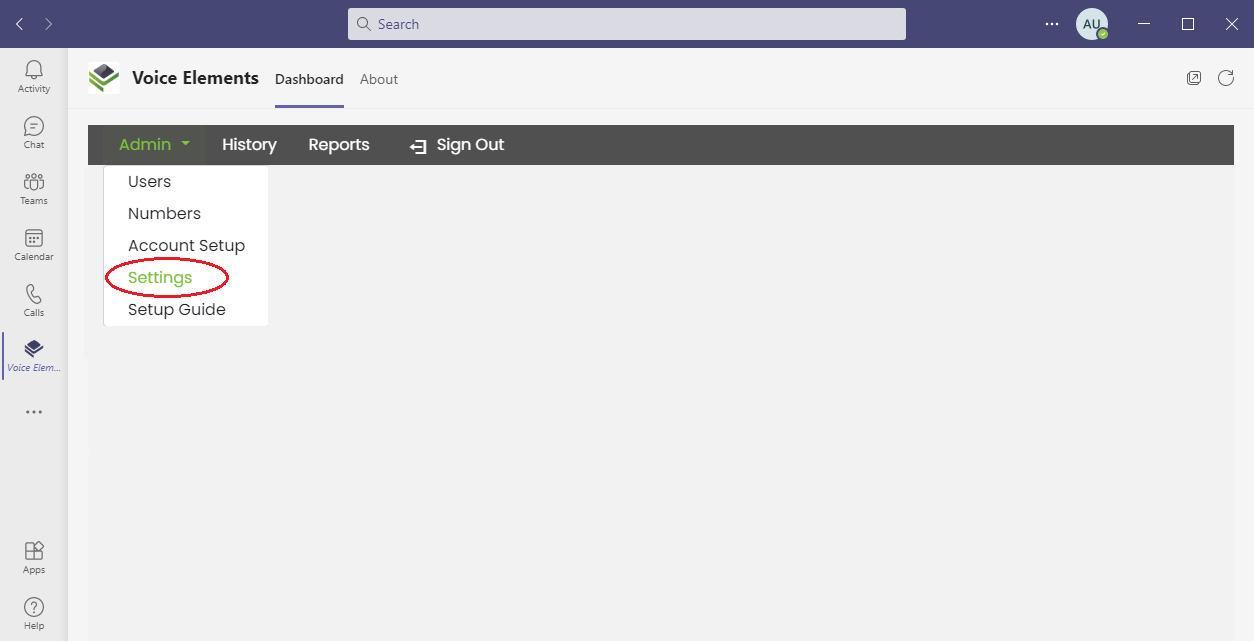
Please return to the Voice Elements Teams Page. Select Settings from the Admin drop-down as shown.

Admin - Settings
Step 24

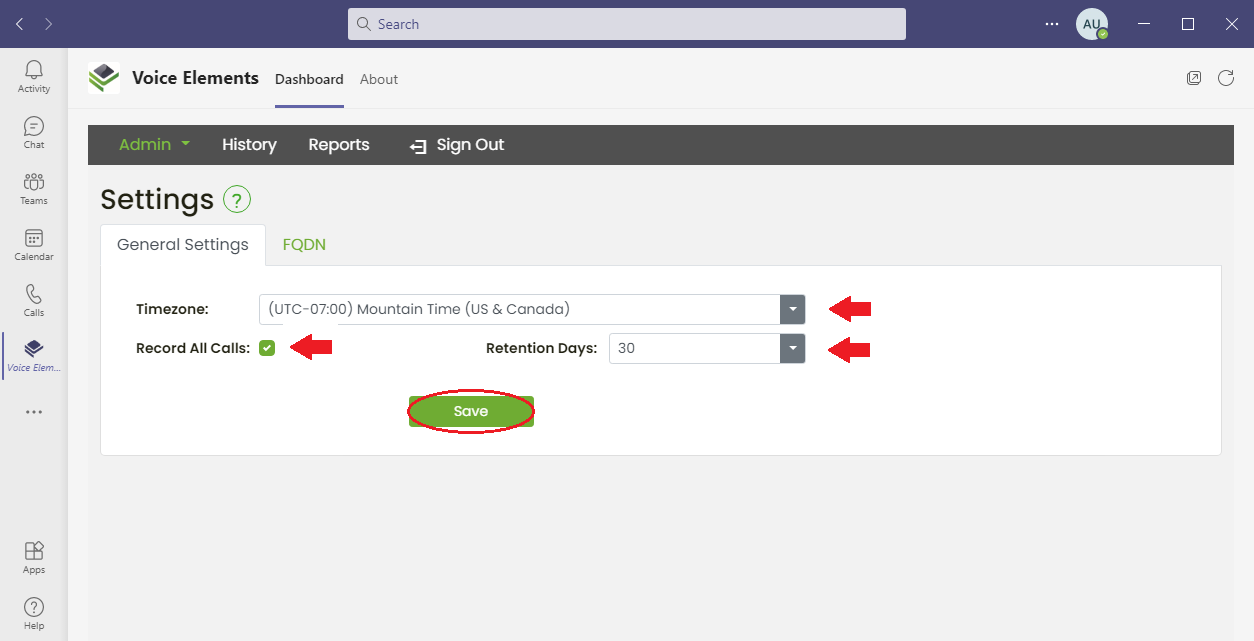
Select the main time zone for your organization, and if you wish to record your calls including how long you wish to keep them.  Press Save.

Admin - Settings - General
Step 25

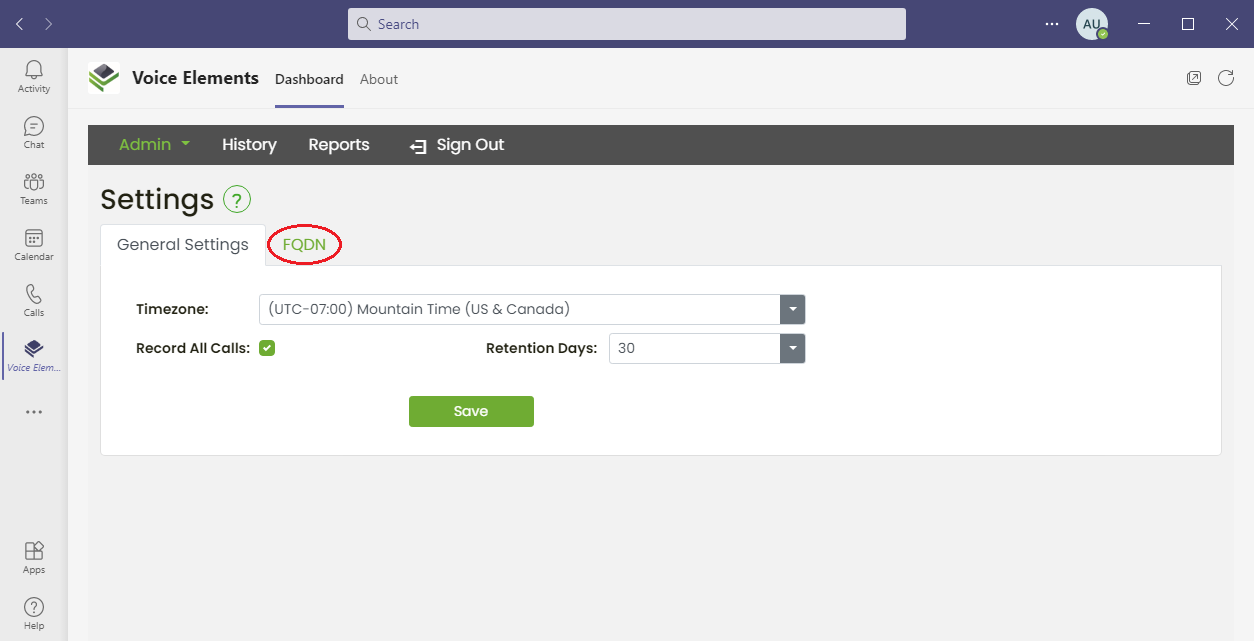
Next select the FQDN tab on the Settings screen as shown.

Admin - Settings - SelectFQDN
Step 26

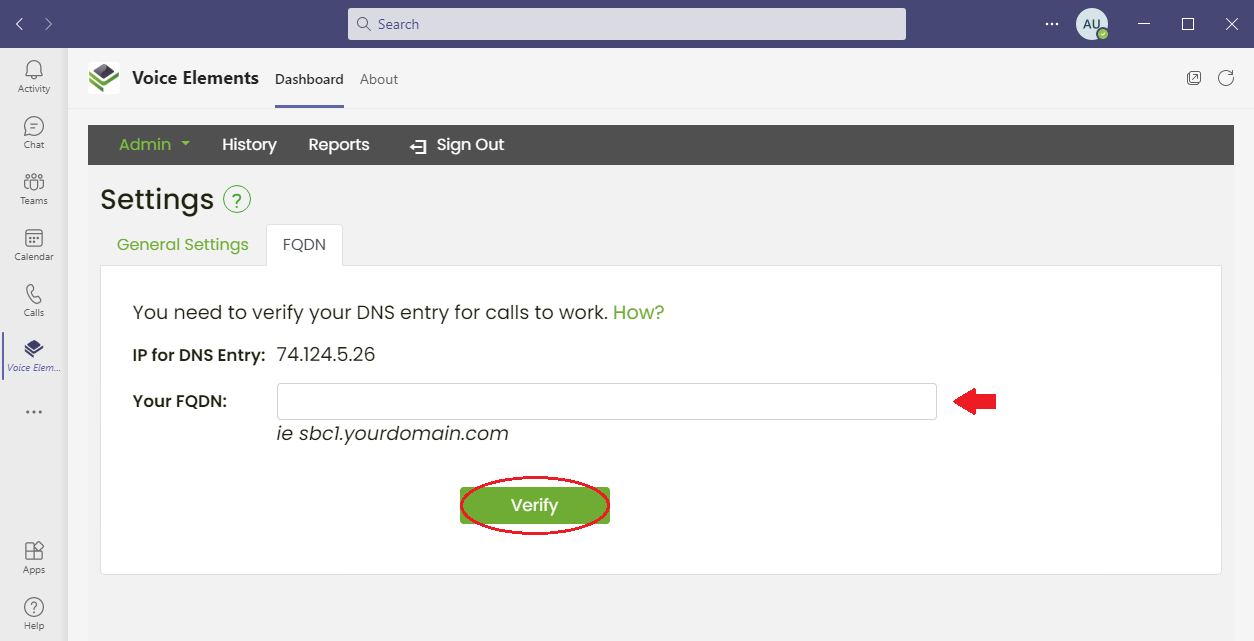
For MS Teams to talk to our system you will need to make a DNS entry to point to the IP address shown on this screen.

You create the FQDN. Many customers call it sbc1.yourdomain.com (substituting your company’s domain name), but you can name it anything that works for your organization.

In your DNS, Enter an A record for your FQDN and point it to the IP address. DNS Instructions

Once you have the DNS setup with your DNS provider/server, key in the new FQDN and press Verify.

Admin - Settings - FQDN1
Step 27

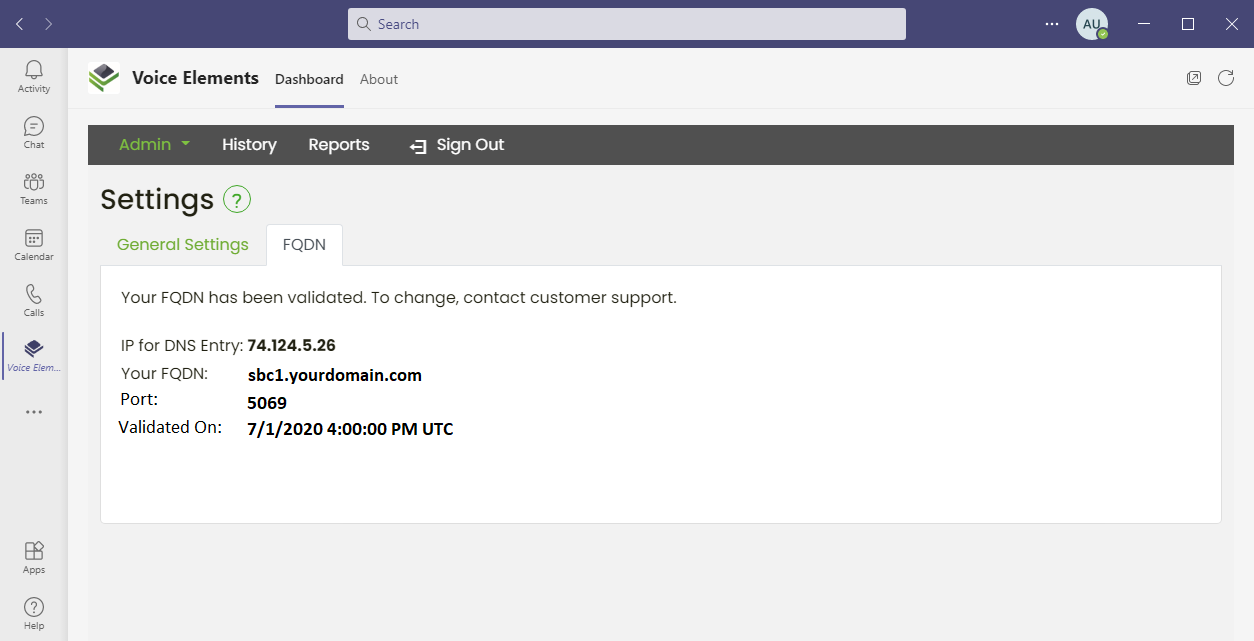
Once your DNS has been validated it returns some important information.

You will need the FQDN and Sip Signaling Port to create the SBC in the Teams Admin.

If you have trouble feel free to contact our support staff at support@voiceelements.com.

Admin - Settings - FQDN2
Step 28

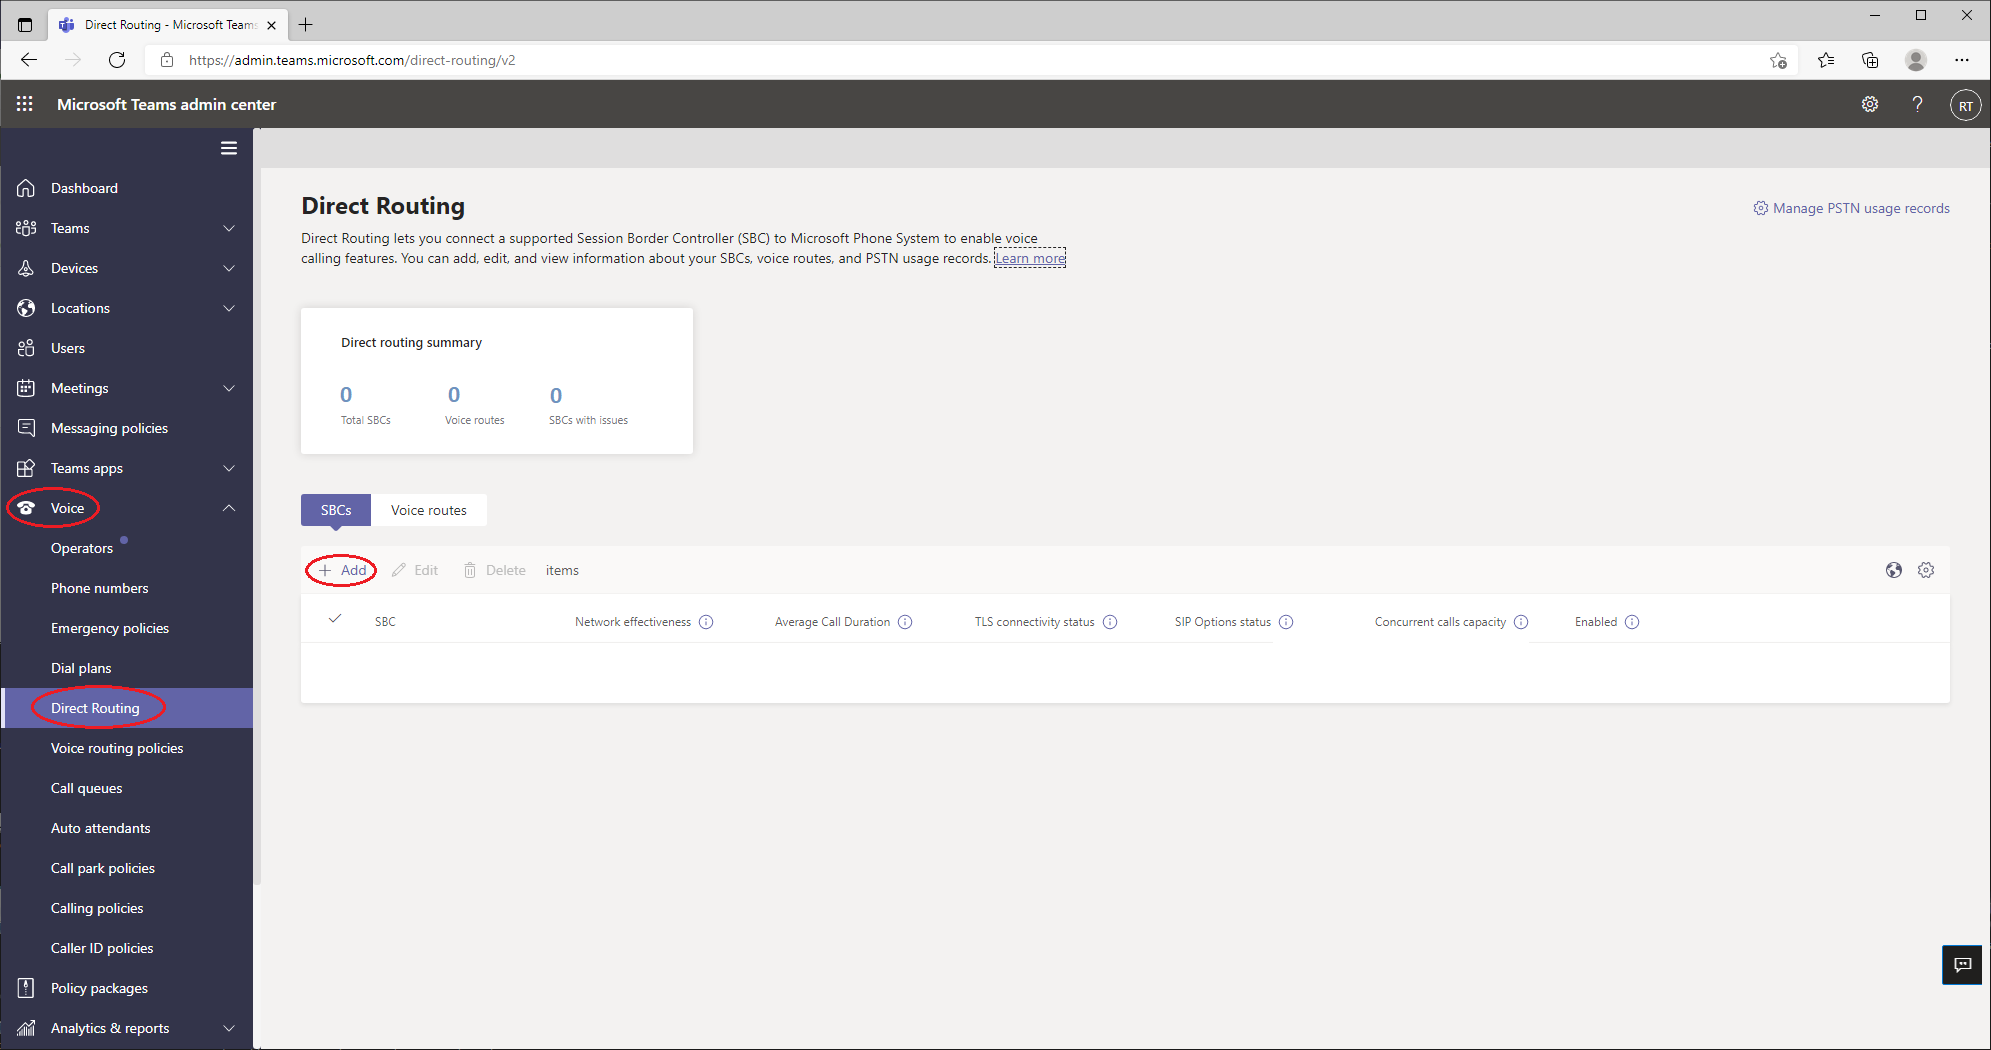
Please return to the Teams Admin Center in your browser window.

Select Voice then Direct Routing.

Then Click +Add.

Teams - DirectRoutingAdd
Step 29

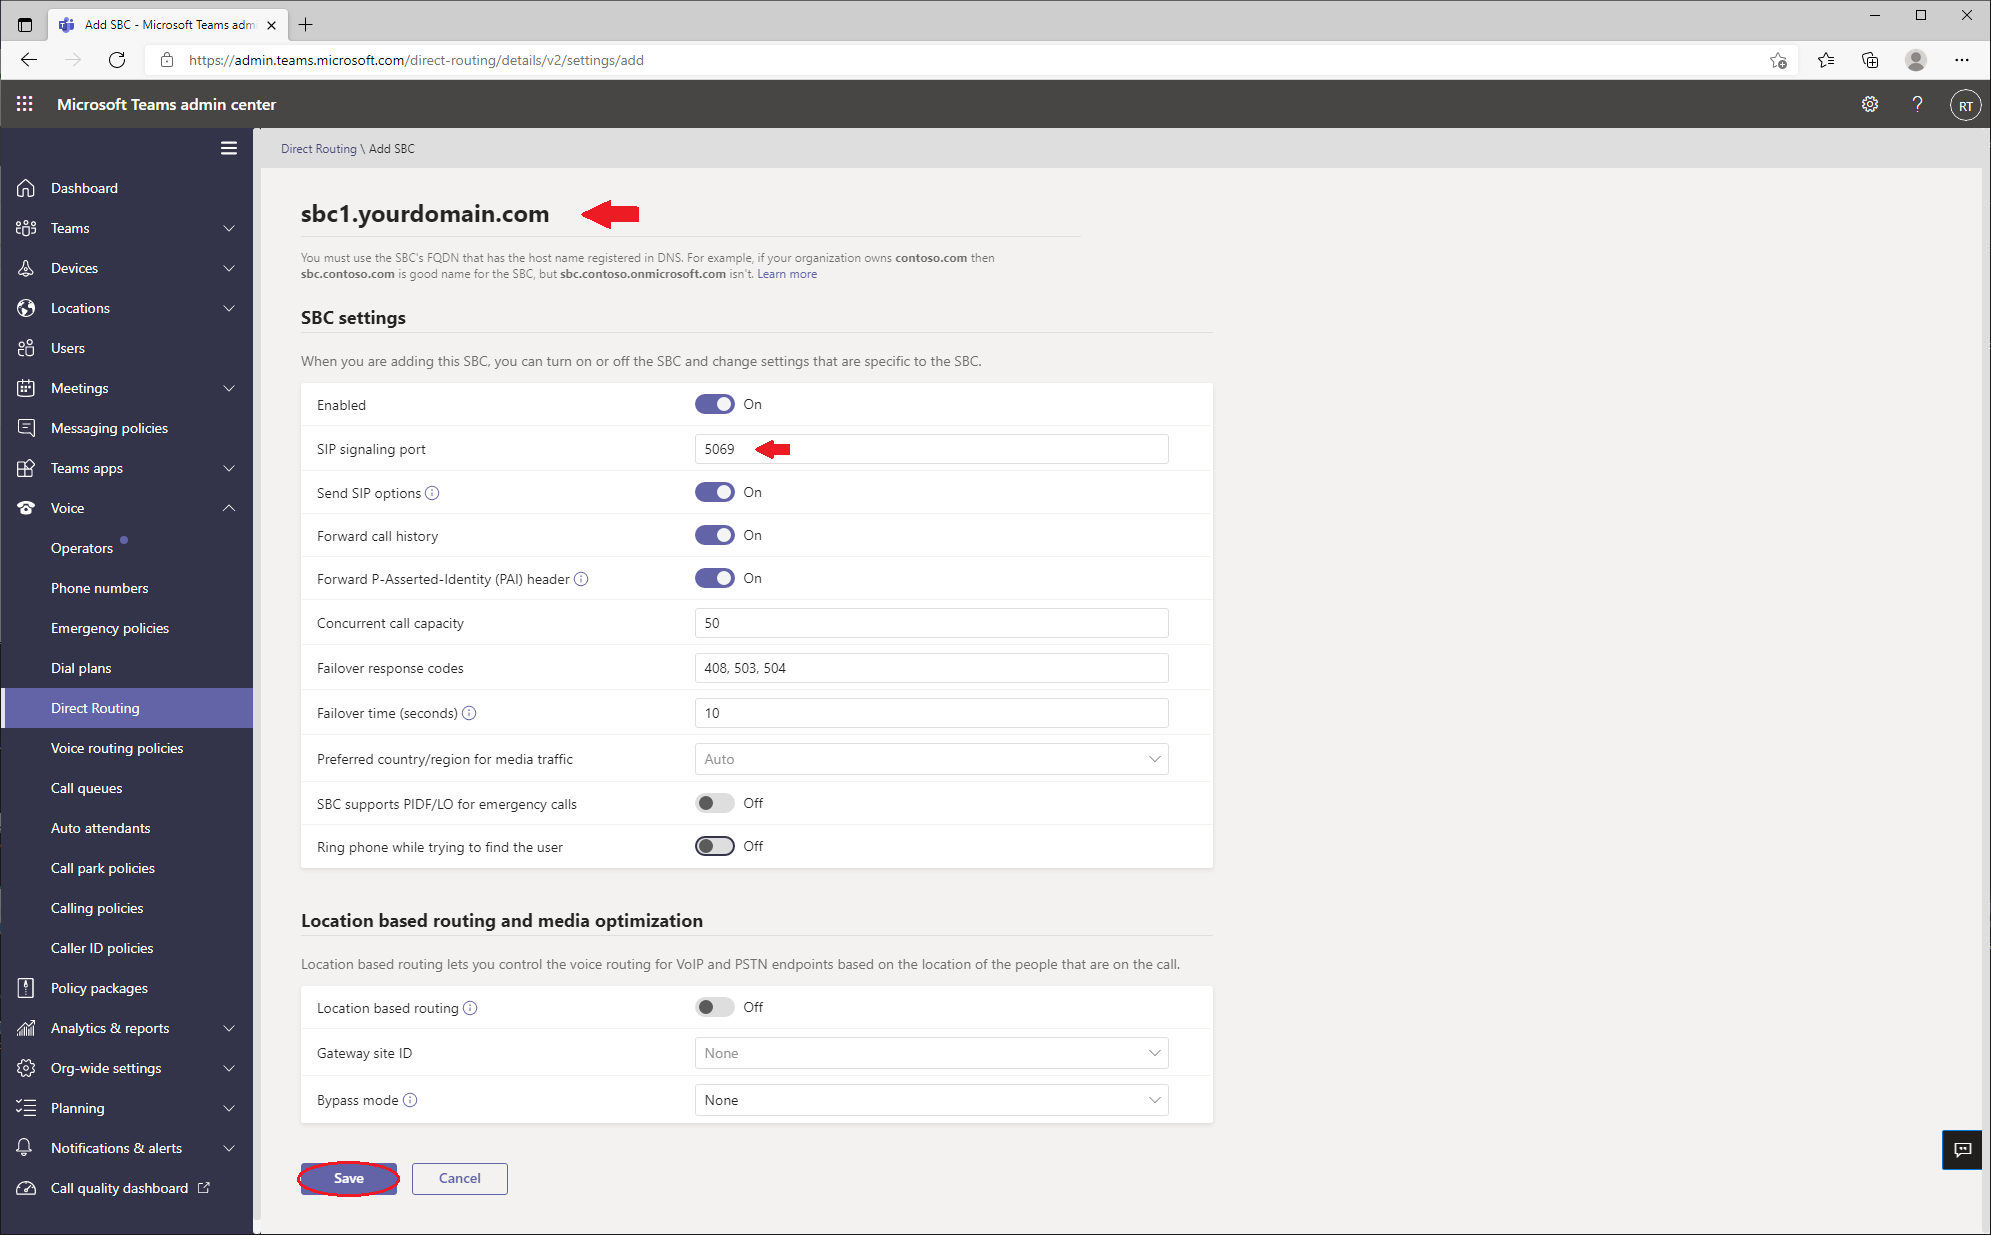
Type your newly created FQDN at the top.

Enter the SIP Signaling port (assigned from the precious Voice Elements screen).

Set the rest of the screen as you see in the example.

Click Save.

Teams - DR - Add1
Step 30

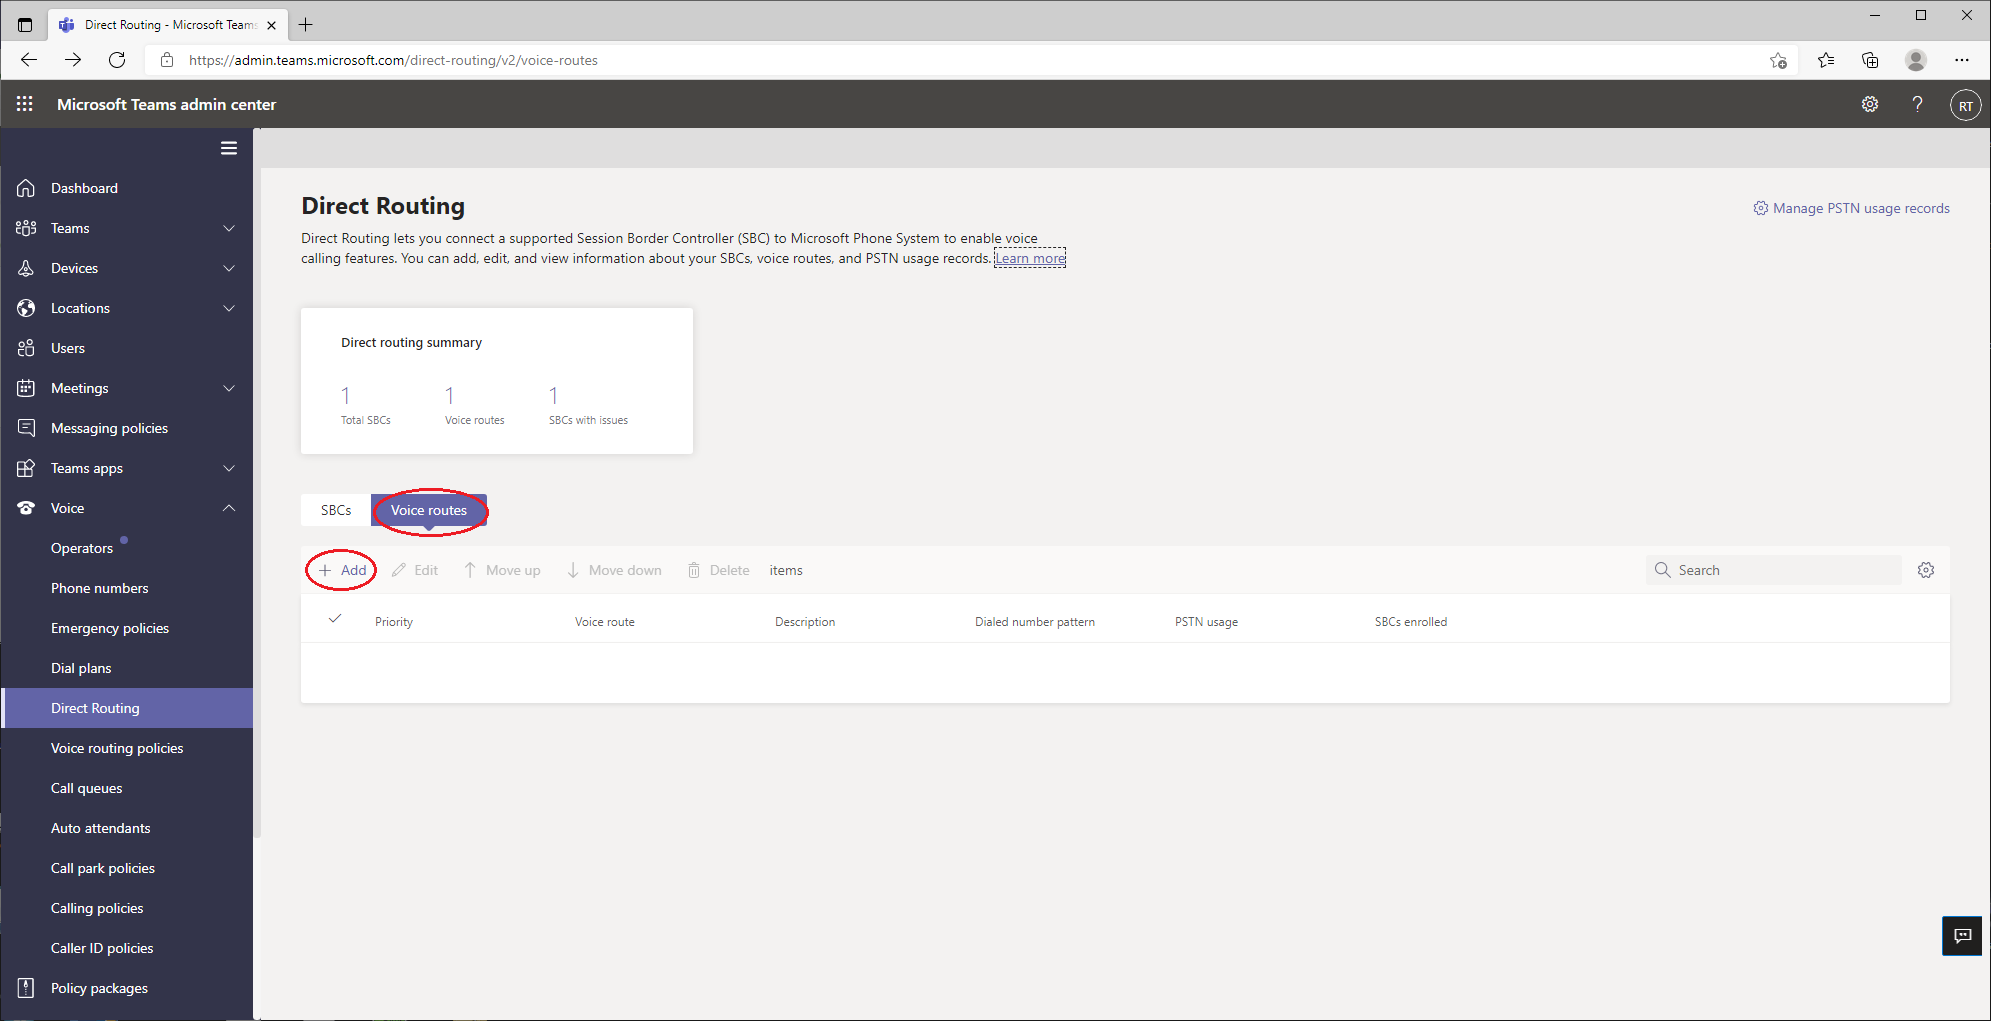
Now click on the Voice Routes tab and click +Add.

Teams - DirectRouting - VRAdd
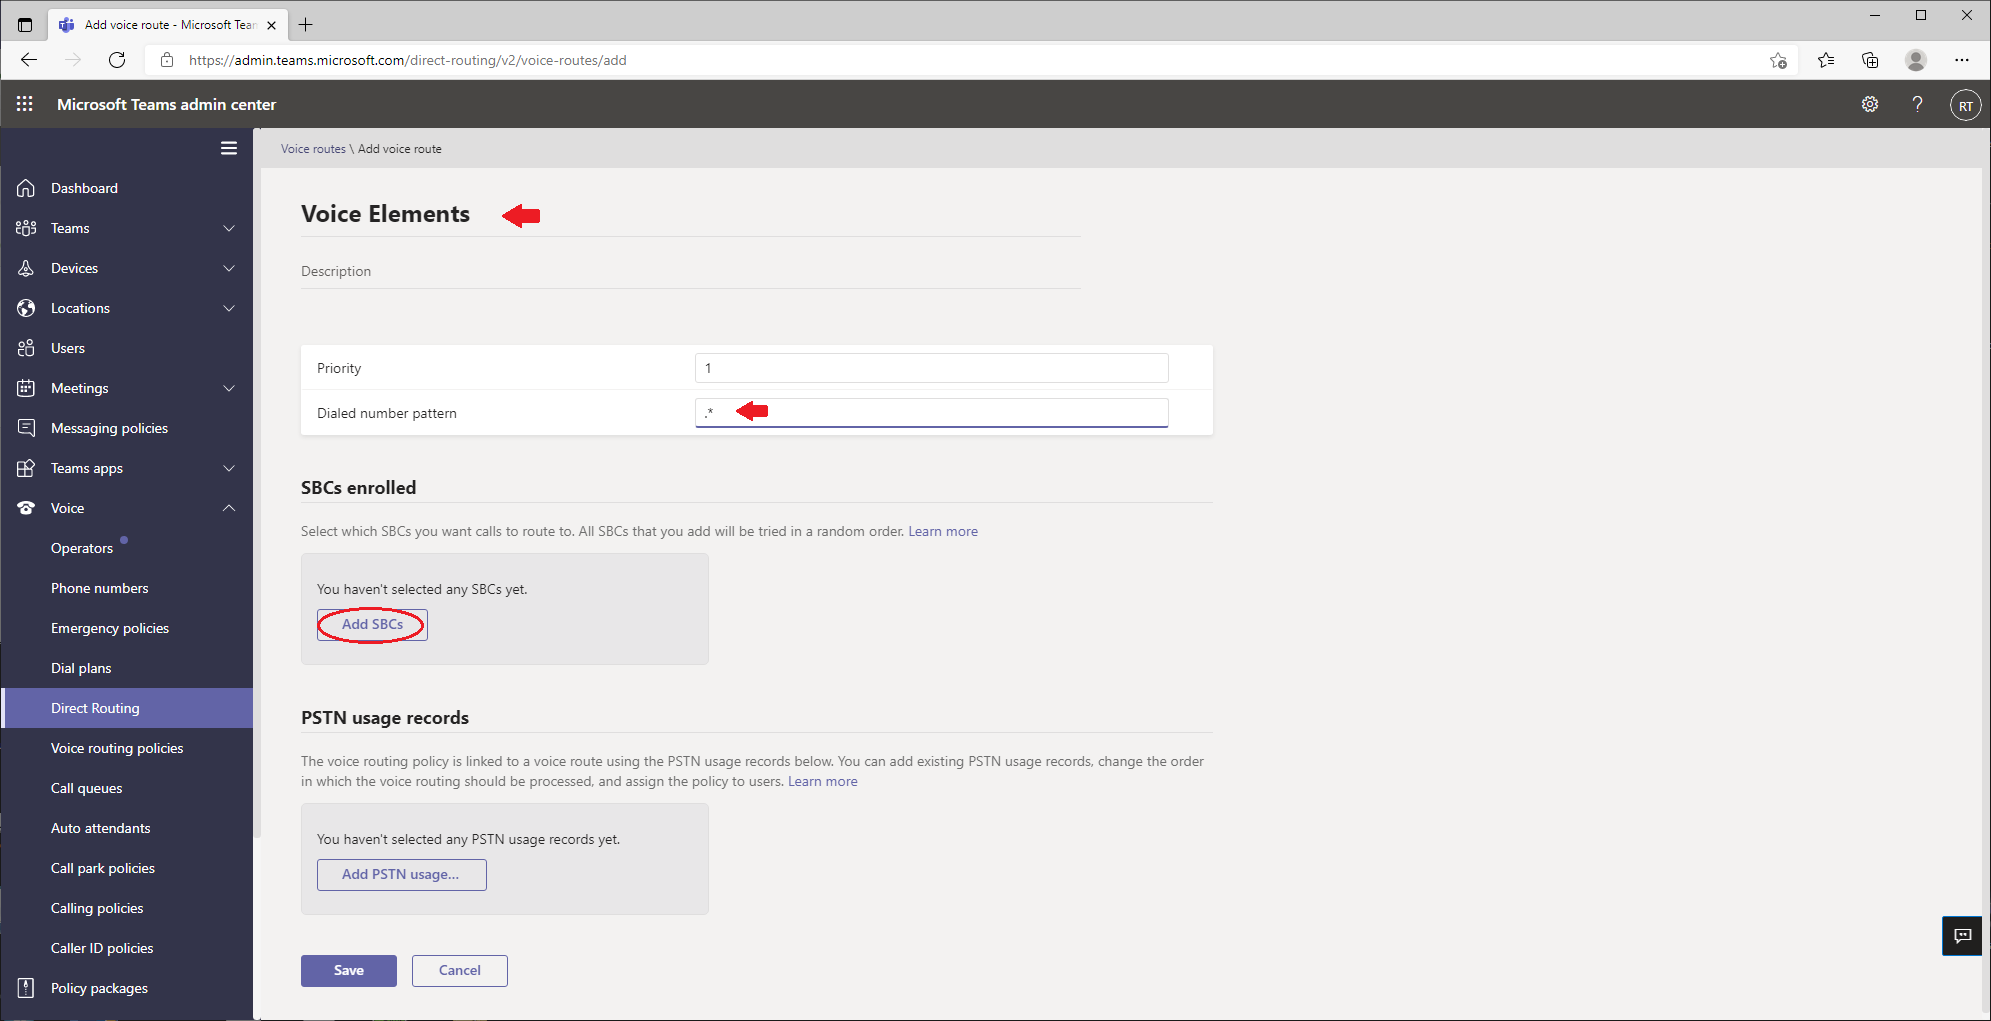
Step 31

Type Voice Elements at the top.

Type .* in the Dialed number pattern.

Click Add SBCs.

Teams - DR - VRAdd1
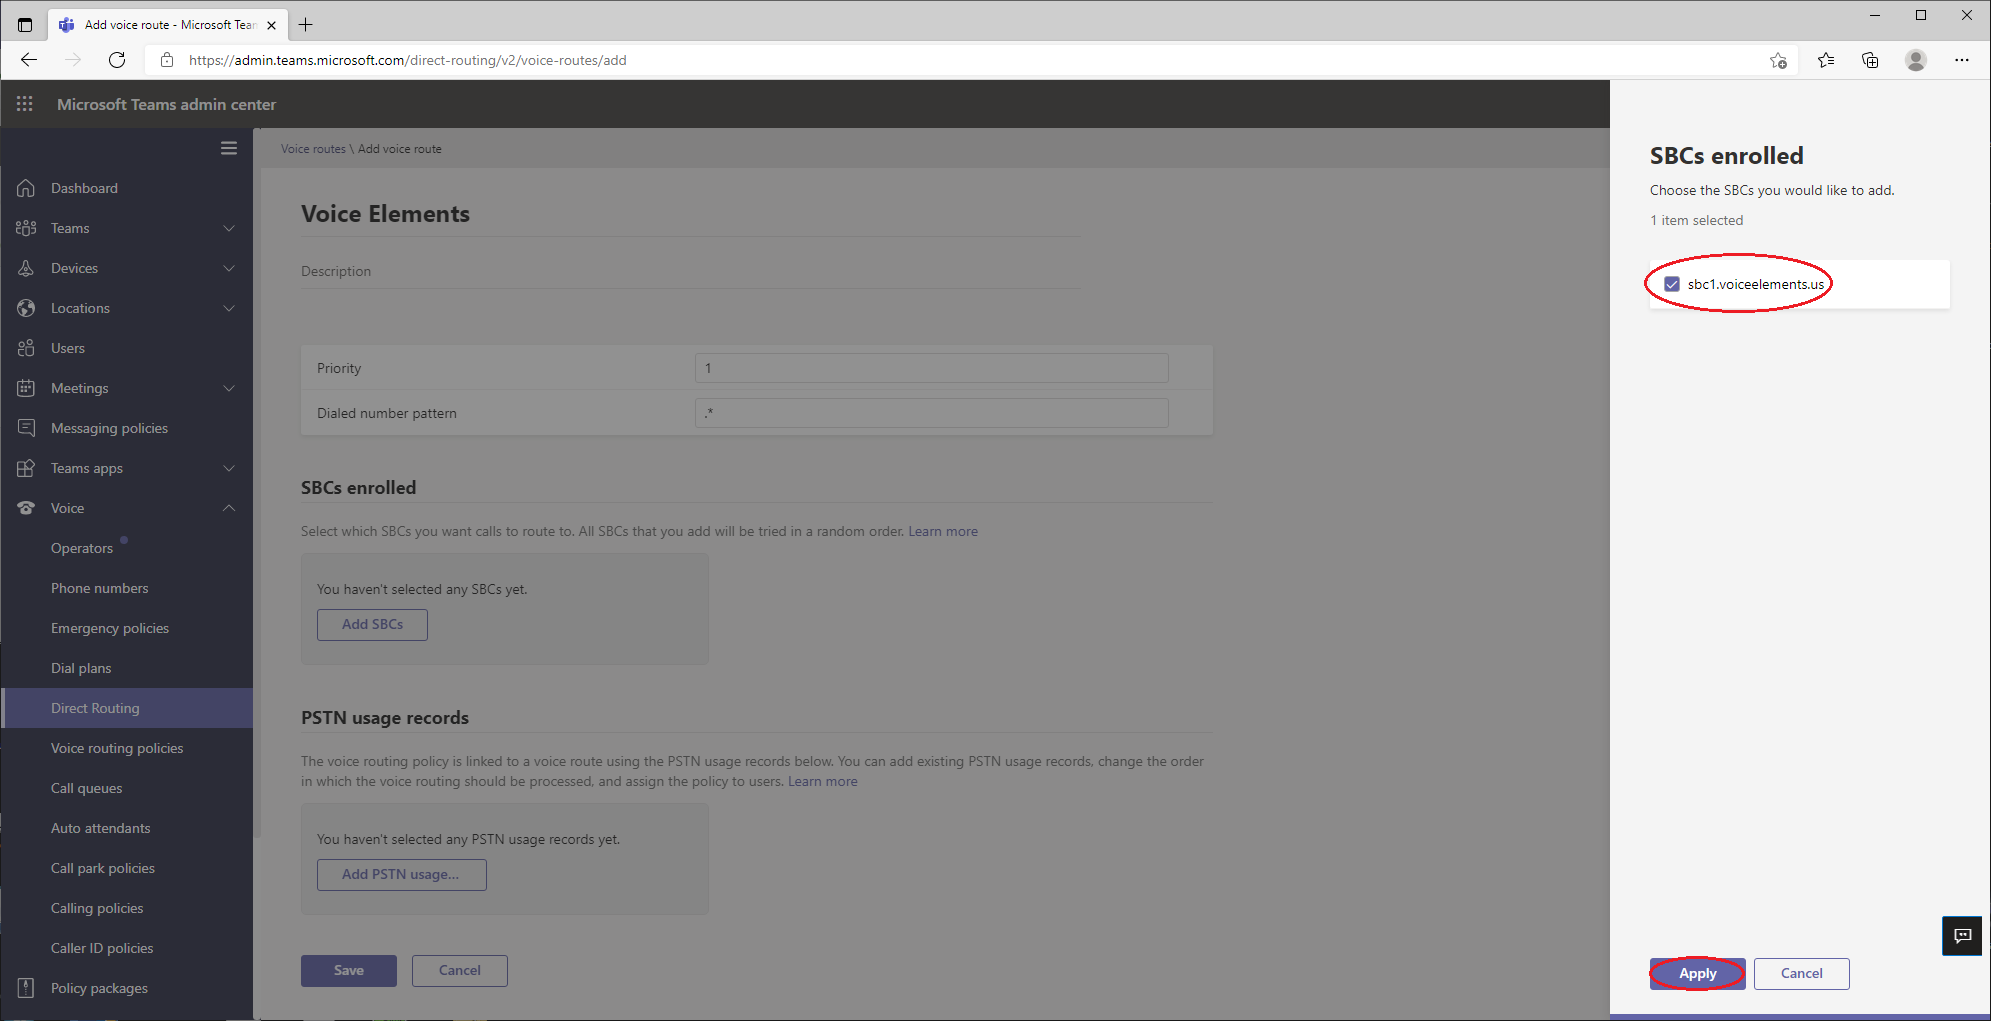
Step 32

Check the box by your FQDN.

Click Apply.

Click Add PSTN Usage.

Teams - DR - VRAdd2
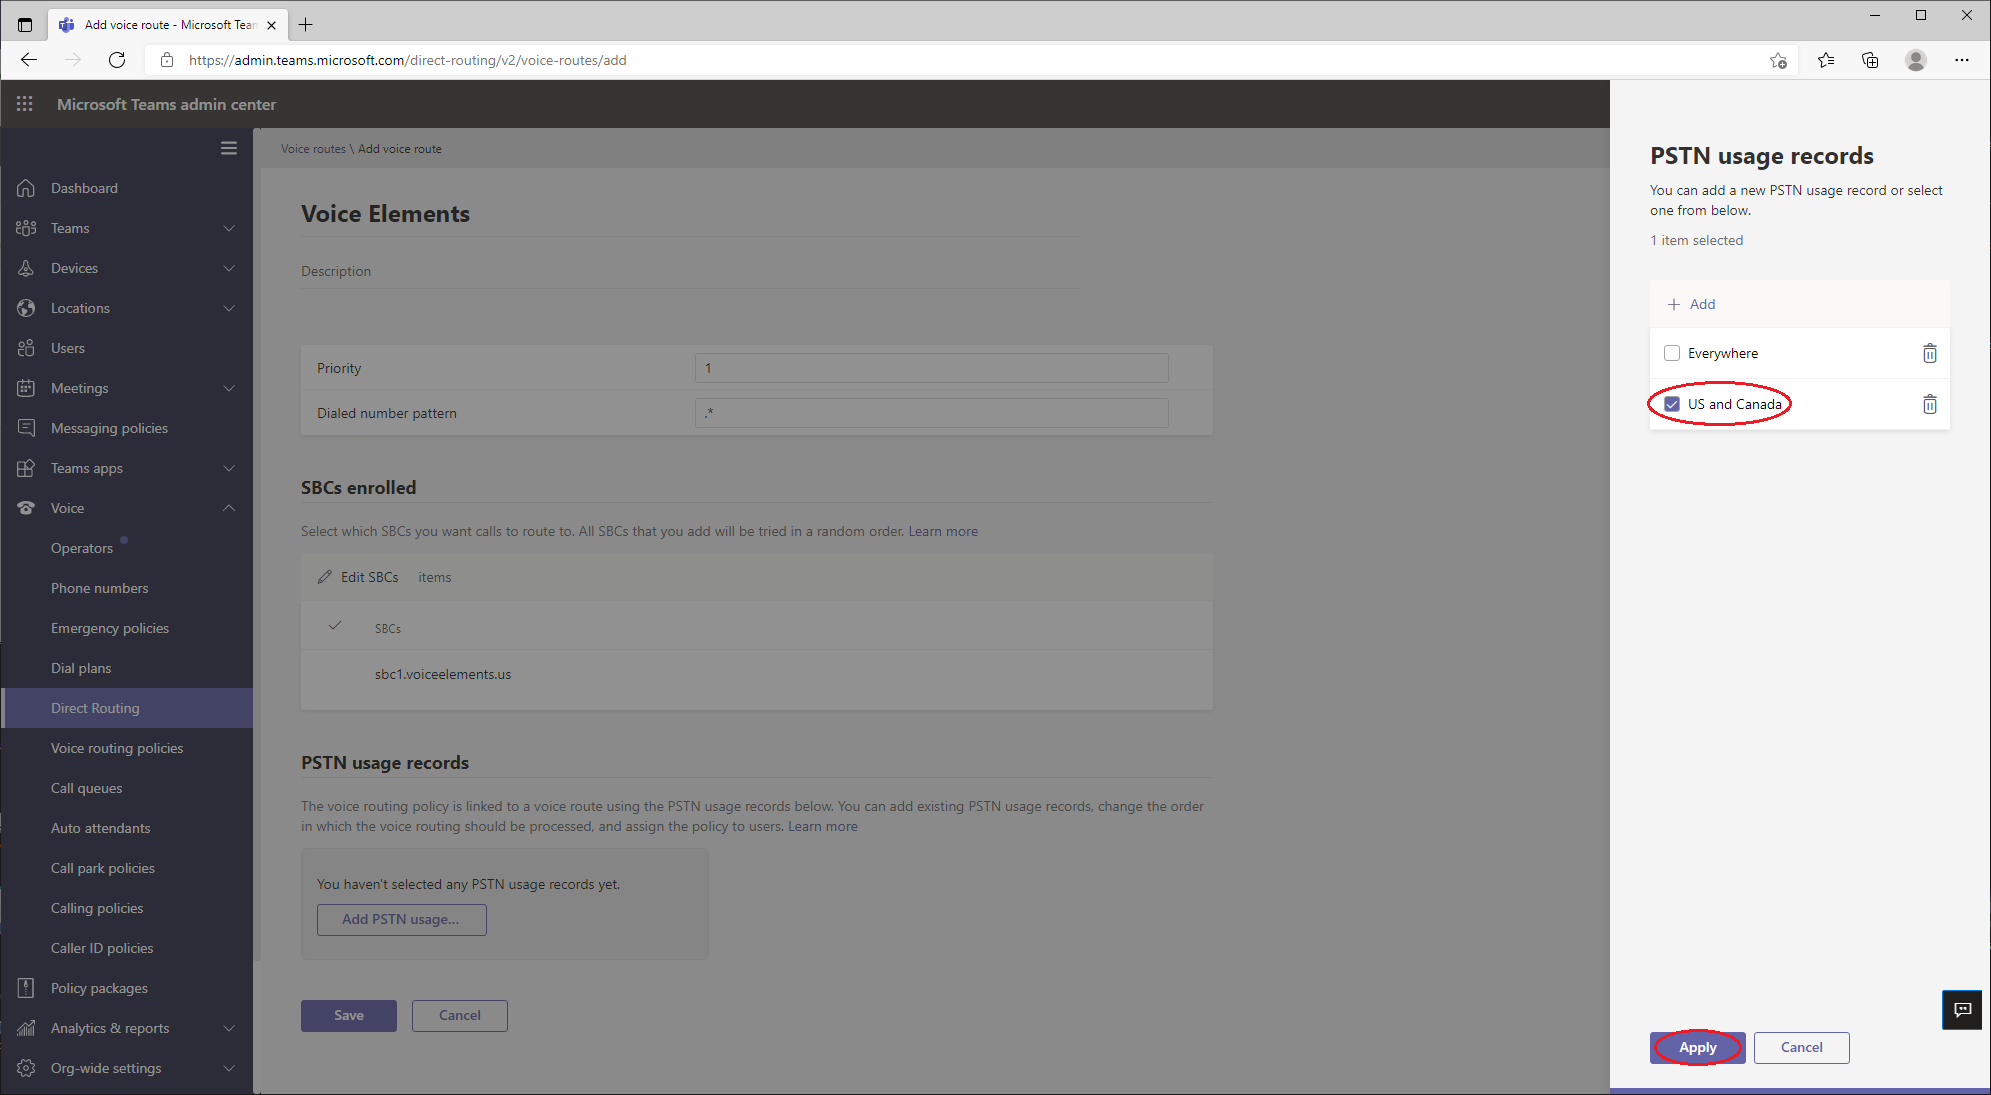
Step 33

Check the US and Canada box.

Click Apply.

Teams - DR - VRAdd3
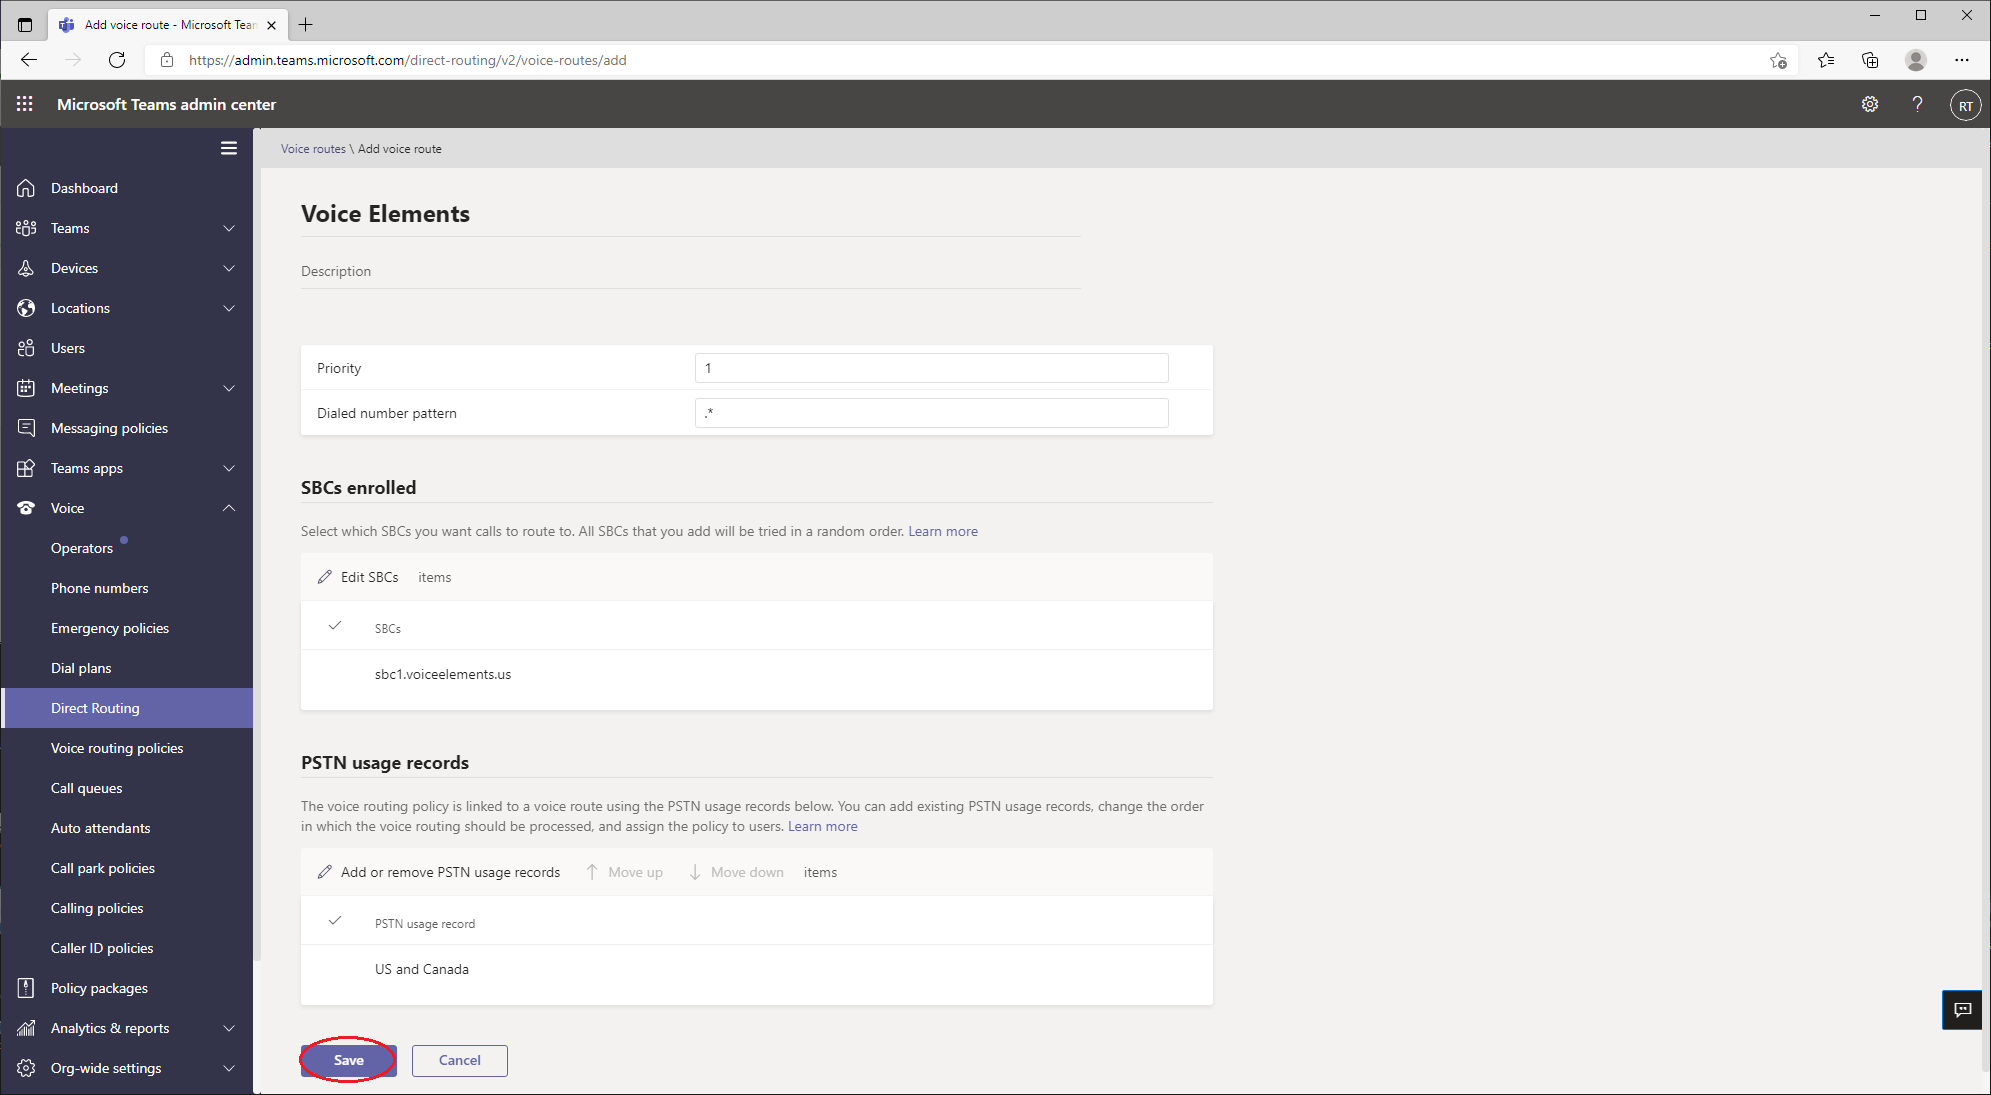
Step 34

Press Save.

Teams - DR - VRAdd4
Step 35

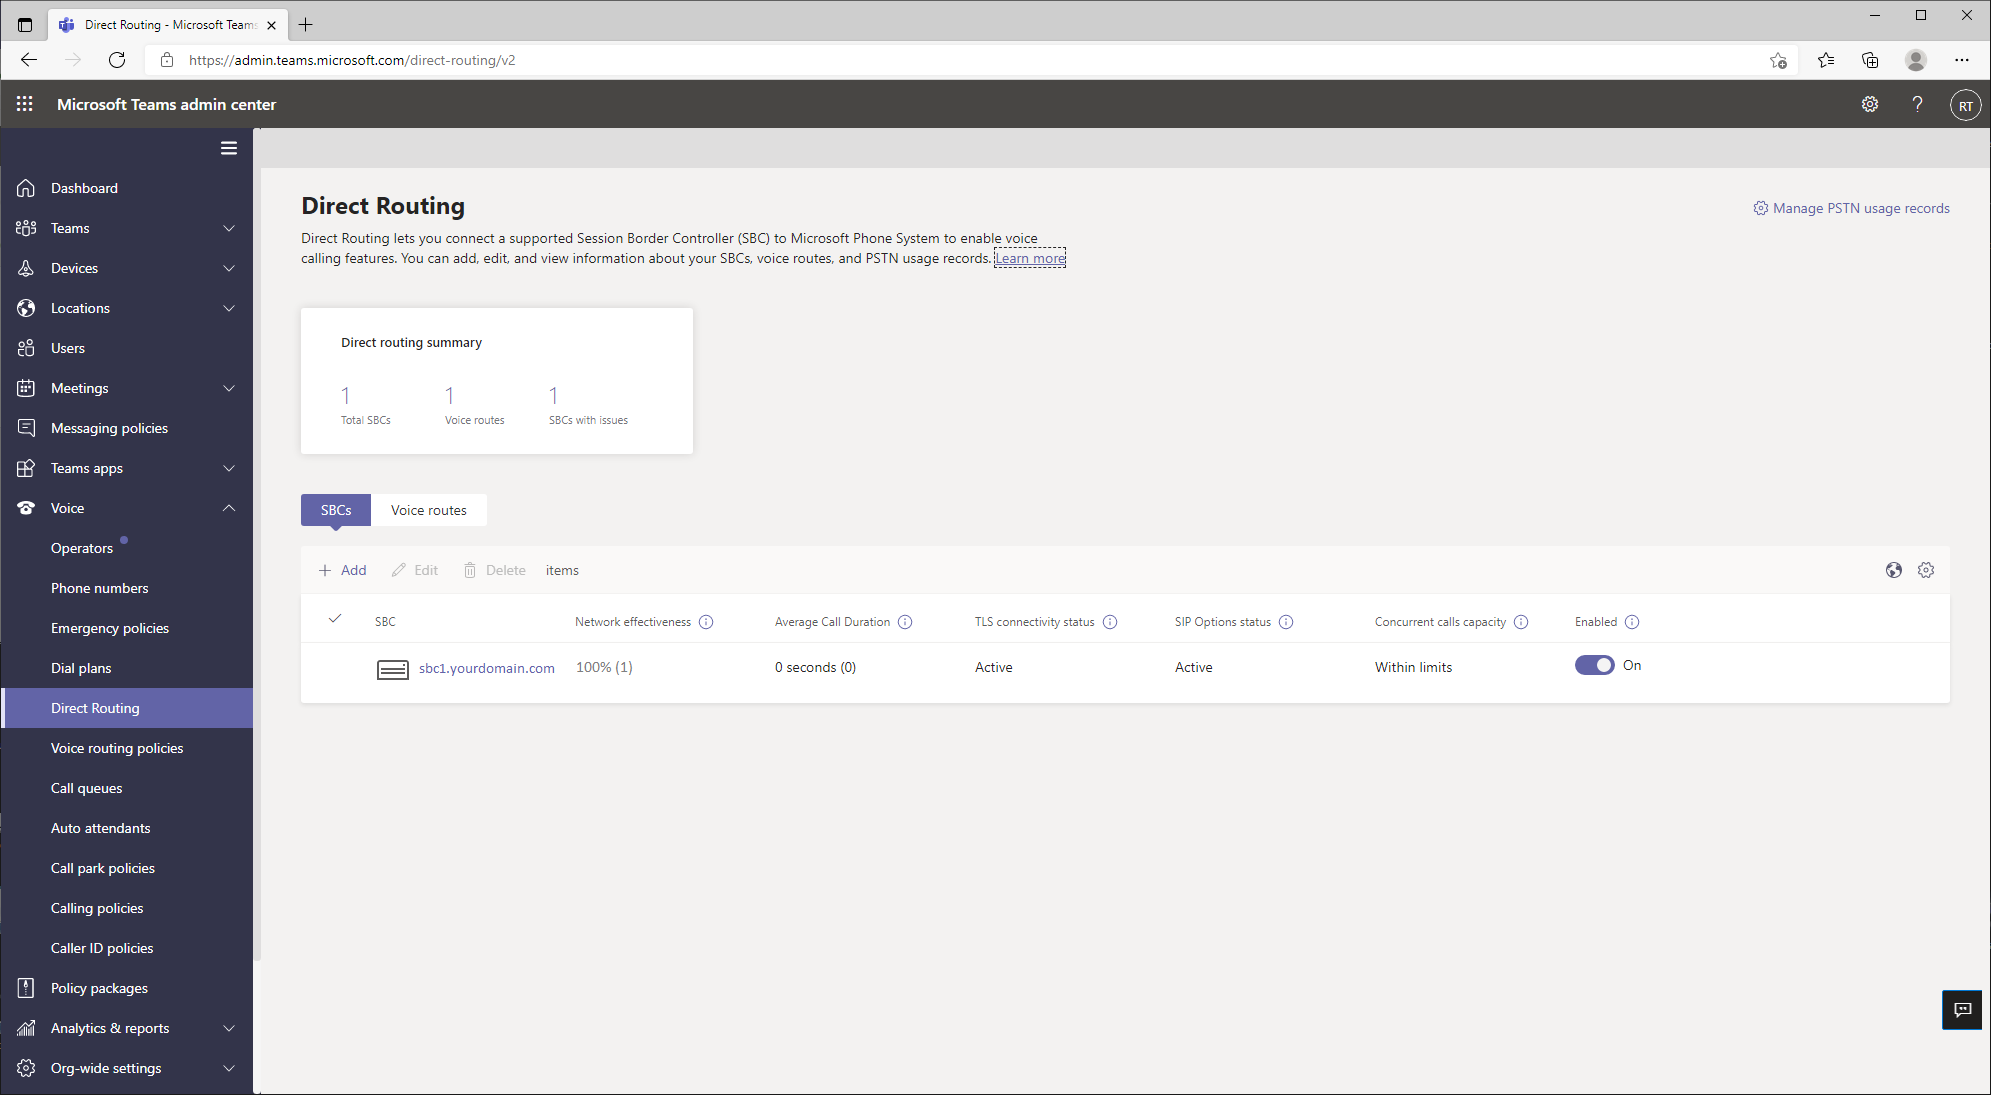
You may have to wait a few minutes for your changes to take effect.  Once Microsoft Teams and Voice Elements start to communicate, you will be able to take and place calls. 

You can click on the FQDN to check on the SBC status.

Teams - DirectRouting - Verify1
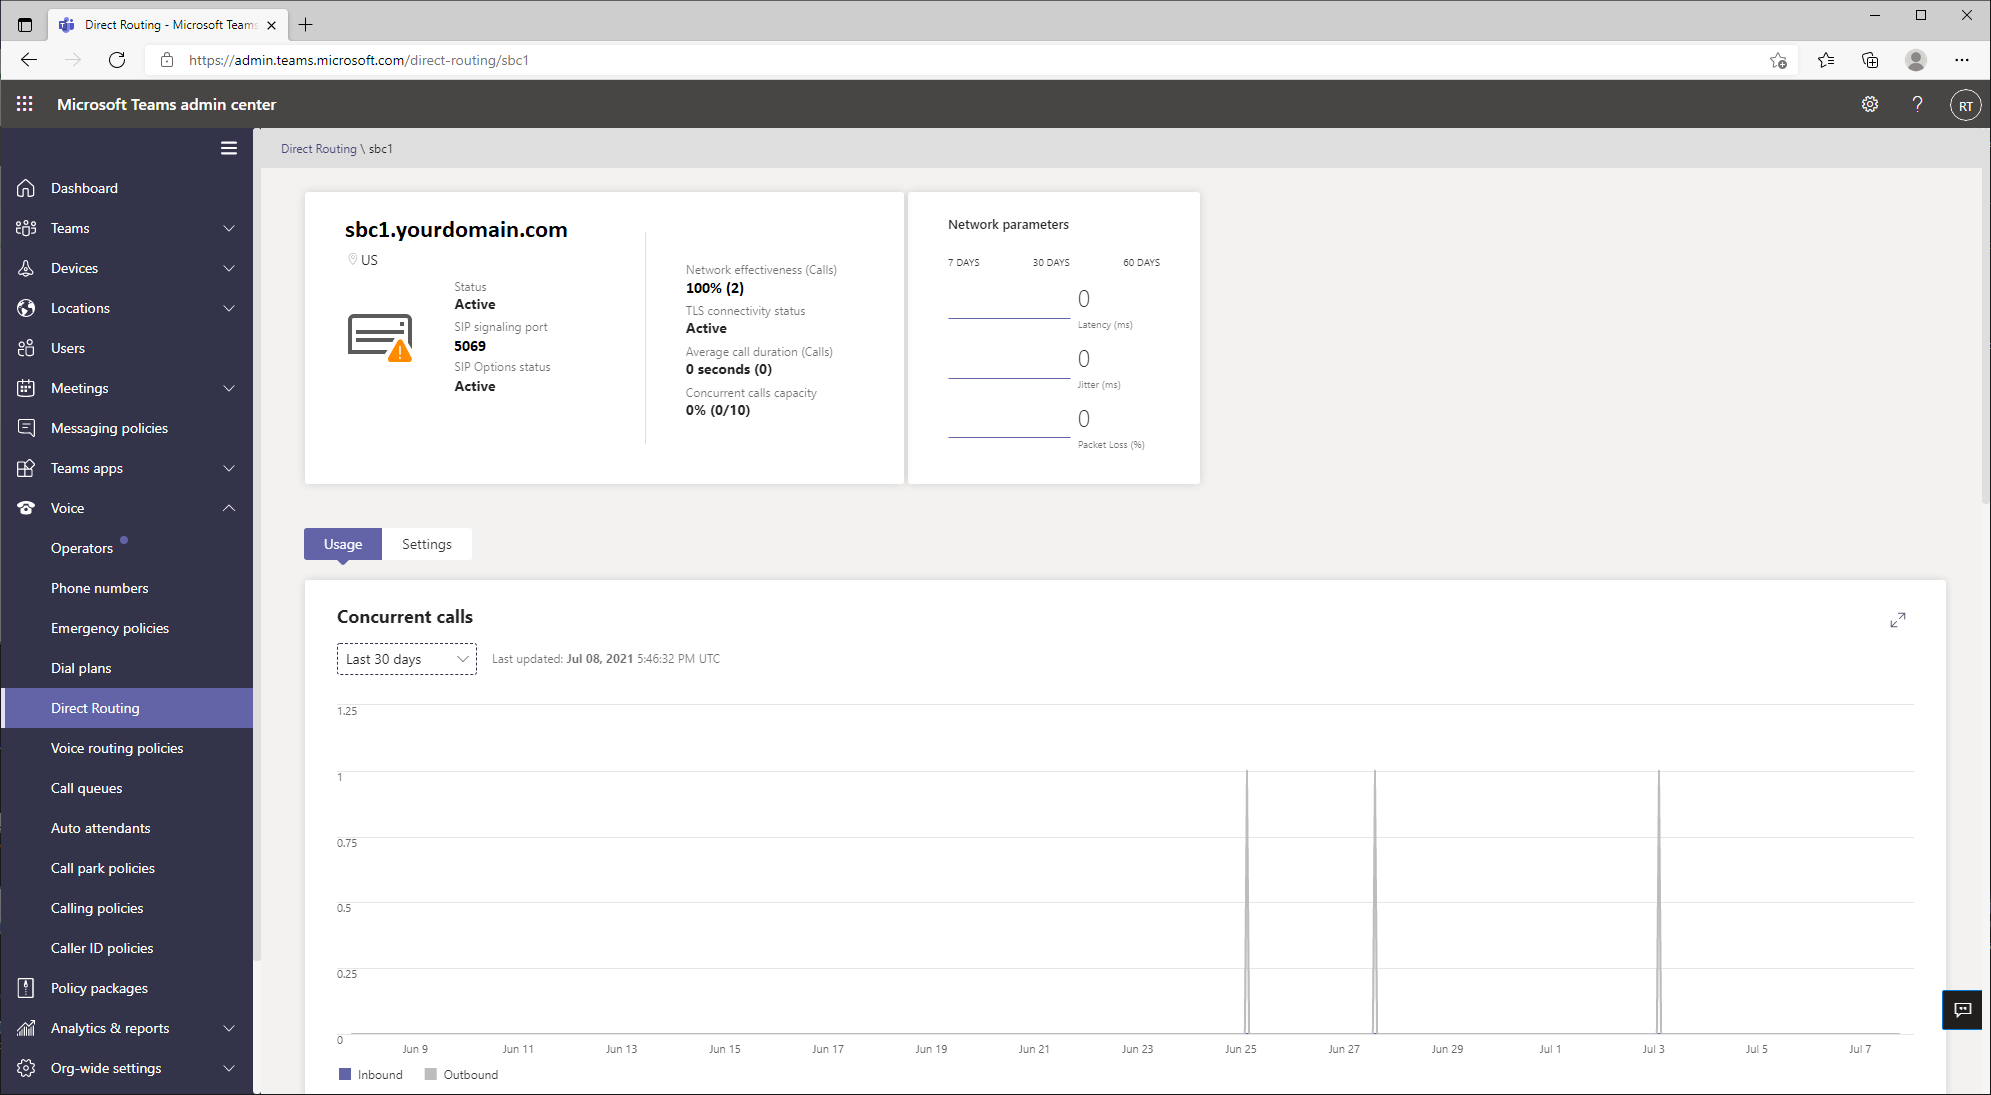
Step 36

This is the Direct Routing status screen when everything is working correctly.

Teams - DirectRouting - Verify2
Step 37

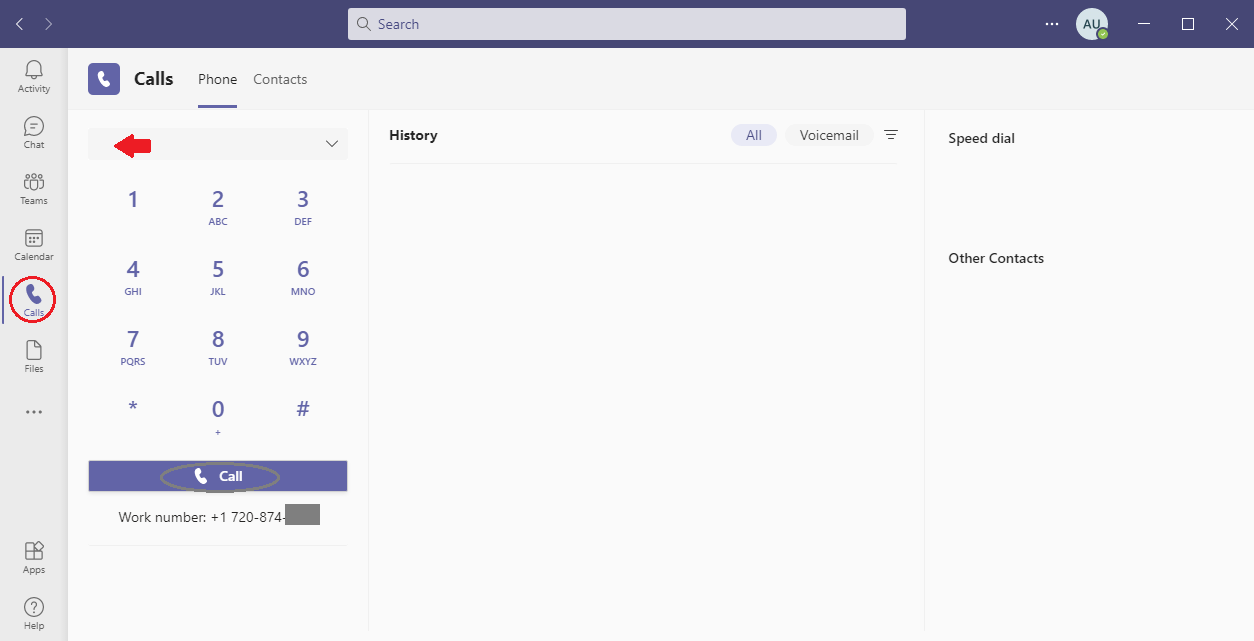
Congratuations! You have setup your first direct routing interface with VoiceElements!

You can now try dialing out.  Select Calls on the left hand panel of teams.  Then enter a number you wish to dial and press the Call button.

Then try calling in to your number.

Teams - CallsTest

Questions? Need Help?

Call Us
Email Us

Go Beyond Traditional Phone Systems
With Voice Elements for Microsoft Teams