
HMP Elements incorporates an advanced call analysis engine within the core of its signal processing engine. This is also known as Call Progress Analysis or CPA.
To provide the most accurate call analysis, HMP Elements uses a locale specific template. This aids in improving our overall accuracy as compared with our competitors.
Experience has shown that a one-size-fits-all approach to call progress is unacceptable. Part of our mission is to provide you with the tools to maximize your call analysis accuracy rate. One of the ways we do this is to provide you, the end user, the ability to make adjustments to the engine on a per call basis.
Note that for some applications (where distinguishing between human and answering machine is most important), the Voice Elements Beep Detector could provide even better accuracy. Instead of attempting to detect whether a call was answered by a human, or a voice mail, by examining the initial audio for voice audio and length of greeting, the Beep Detector instead listens for an answering machine beep. The application can start playing its “human detected” message immediately when the call is connected; if a voice mail beep is subsequently detected, it can cancel that playback and play its voice mail-specific message instead. For more information, please see: Use The Beep Detector
What is Call Analysis?
Call Analysis is the process whereby a HMP Elements determines the outcome of a dialed call. Did the call result in a busy signal? Or did you reach an answering machine?
Within HMP Elements, the following are some typical call results for any dialed number:
- Human Detected
- Machine Detected
- Busy
- No Answer
- No Ringback
- Operator Intercept
- Cadence Break
Once the call analysis is complete, you may then proceed with the call as your business logic directs. Our job is to make sure if the call is labeled “Human Detected” that it is in fact a person on the other end of the line.
How is Call Analysis Accomplished?
To achieve accurate call progress results, the audio stream of the dialed number must be analyzed mathematically. This process is called Signal Processing.
Audio signal processing involves distinguishing between voice activity and tone activity. In addition to the audio information other call setup information is provided to augment the call analysis. HMP Elements takes into account all possible information to get a complete picture of what the call’s profile will be.
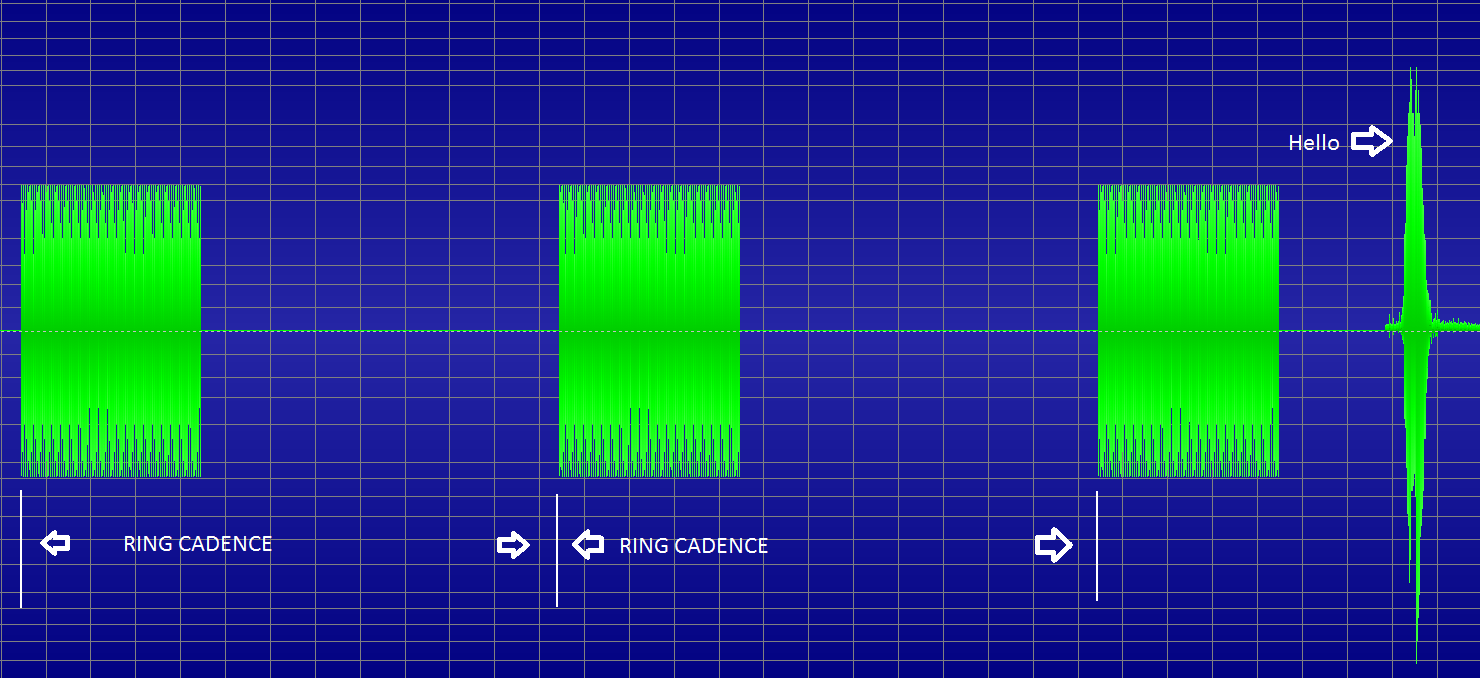
This graphic shows an ideal call (in the United States region) that rings three times followed by a human answering and simply saying “Hello.”
The call analysis must detect and track the frequencies of the ring tone (in this case the blending of a 440Hz and a 480Hz tone) and its cadence (2 seconds of ring and 4 seconds of silence). It must then be able to differentiate between what is voice and what is a tone; reliably making the distinction.
Pure tones do not have significant overtones (2nd Harmonic). Voice on the other has a broad spectrum of frequencies and overtones. Periods of silence also assist in analysis and therefore are likewise tracked.
By combining all of the signal information and external call control data, HMP Elements is able to accurately determine the call profile for any calls placed by your application.
How Can I Control Call Analysis?
The Basics
To begin, you must inform HMP Elements that the call you are about to place requires CallAnalysis. To place a call using the ‘default’ template settings from the HMPElementsServer.exe.config file, use one of the following two options. The ‘default’ template will cover most of your call analysis needs:
If you are using VoiceElements:
public void MyMethod()
{
...
    m_ChannelResource.CallProgress = CallProgress.AnalyzeCall;  // Analyze This Call
    m_ChannelResource.Dial(numberToDial);
...
}
If you are using CTI32:
public void MyMethod()
{
...
   int call_analysis = 2; // 2 is the value to initiate call analysis.
   DialResult dialResult = cti.Dial(dev, dialstr, call_analysis, maxtime, originating_phone_number);
...
}
To Change the Template
To change the template for the next call you wish to place you may:
If you are using VoiceElements:
public void MyMethod()
{
...
    m_ChannelResource.CallProgress = CallProgress.AnalyzeCall;    // Analyze This Call
    m_ChannelResource.CallProgressTemplate = "UK-Default";        // Select the United Kingdom Default Template
    m_ChannelResource.Dial(numberToDial);
...
}
If you are using CTI32:
public void MyMethod()
{
...
    cti.SetCallProgressTemplate(dev, "UK-Default", null);
    int call_analysis = 2; // 2 is the value to initiate call analysis.
    DialResult dialResult = cti.Dial(dev, dialstr, call_analysis, maxtime, originating_phone_number);
...
}
To Override Specifics of a Template
Finally, you also have the ability to override one or more settings of a template on a per call basis:
If you are using VoiceElements:
public void MyMethod()
{
...
    Dictionary<string, string> myOverrides = new Dictionary<string, string>();
    myOverrides.Add("VAD_MinimumLevelDB", "-28");       // Set the Minimum DB level required to consider a sample 'voice'.
    myOverrides.Add("VAD_DebounceOn", "4");             // Set the Debouncer to 4 samples.

    m_ChannelResource.CallProgress = CallProgress.AnalyzeCall;    // Analyze This Call
    m_ChannelResource.CallProgressTemplate = "UK-Default";        // Select the United Kingdom Default Template
    m_ChannelResource.CallProgressOverrides = myOverrides;        // Override the United Kingdom Default Template with my own settings
    m_ChannelResource.Dial(numberToDial);
...
}
If you are using CTI32:
public void MyMethod()
{
...
    Dictionary<string, string> myOverrides = new Dictionary<string, string>();
    myOverrides.Add("VAD_MinimumLevelDB", "-28");       // Set the Minimum DB level required to consider a sample 'voice'.
    myOverrides.Add("VAD_DebounceOn", "4");             // Set the Debouncer to 4 samples.

    cti.SetCallProgressTemplate(dev, "UK-Default", myOverrides); // Override the United Kingdom Default Template with my own settings
    int call_analysis = 2; // 2 is the value to initiate call analysis.
    DialResult dialResult = cti.Dial(dev, dialstr, call_analysis, maxtime, originating_phone_number);
...
}
HMPElements endeavors to give you total control over your templates and settings. This gives you the ability to tune call progress for numbers you know ahead of time will go to different countries or for number that go to a particular cell phone provider. In doing so, you can increase your accuracy rates to near 99%.
Call Analysis Templates
The Default Template
Basic call analysis templates are defined in the HMPElementsServer.exe.config file. Each template has a name and you can define as many templates as you desire.
The ‘default’ template is also defined and can be found in your HmpElementsServer.exe.config file. If you specify the AnalyzeCallDefaultTemplate and do not subsequently define that template, HMPElements will use the first defined template as the default template.
<setting name="AnalyzeCallDefaultTemplate" serializeAs="String">
  <value>US-Default</value>
</setting>
Elements of a Template
The basic elements of a template definition include:
- Frequency Detection
- Overtones
- Second Harmonic Differentials
- Single and Dual Tone Detection Parameters
- Tone Definitions
- Debouncing Parameters
- Dual Tone Forward and Reverse Twist
- Voice Detection Parameters
- Minimum Levels for Voice
- Debouncing Parameters
- Timer Definitions
- No Ringback Timer
- Maximum Time For Detection
- Connection to Detection Fail Time
- Cadence Break Timer
HMPElements attempts to expose as many parameters as possible to the end user for call analysis, WITH accompanying documentation. We believe that this is the best way to assist our customers to tune call analysis to their specific location and needs.
Frequency Detection
Detecting frequencies in a sample is usually a relatively easy process. First, we must determine the overall width of the spectrum we wish to examine. This is done by selecting the frequencies of the tones we are interested in. Here, we separate the term tone from frequency, since many of the tones we are interested in are a combination of two distinct frequencies. For example, in the United States, the ring tone is comprised of two frequencies: 440 Hz and 480 Hz.
Up higher on the spectrum, we also listen for fax tones that are at 2.1kHz. So for starters, we want to know about frequencies between 440Hz and 2.1Khz. Since we are also interested in the second harmonic (more on this later), we must also check for double the value of the highest frequency in our spectrum. So, for this case, we would look at all frequencies between 440Hz and 4.2Khz.
When looking at a sample, we look at a spectrum of frequencies that covers the lowest defined frequency, to two times the highest defined frequency.
Overtones
The second harmonic of a frequency (or overtone) is used to assist us in determining if the frequency is pure or if it is just part of a range of many frequencies. The human voice is loaded with overtones.
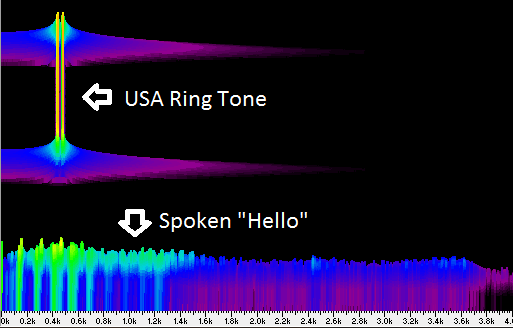
The graphic above shows two strong tight peaks that represent a ring tone in the United States. Below that is the word, “Hello”, spoken by a male voice. As you can see the spoken voice represents a wide range of frequencies. By examining the strength of the overtones, we can easily identify a “pure” frequency. If the overall strength of the primary frequency and its overtone are similar then we discard the frequency since it is not pure.
For each sample, the two strongest frequencies are first determined. The overtones of these frequencies are then examined. Frequencies with overtones are discarded.
Second Harmonic Differentials
We must define at what point to discard a frequency if it’s second harmonic strength nears the strength of the primary frequency. When two strong frequencies are present, the higher frequency is first compared with its second harmonic. If this test passes, then the lower frequency is compared with it’s second harmonic. If the second harmonic of the lower frequency is close to the primary frequency of the higher frequency, then we can get into trouble.
A good example of the kind of trouble we are talking about is in DTMF detection. (Although DTMF detection is not used in Call Analysis, this serves as a good example.)
The DTMF digit 2 is defined by the frequencies 697Hz and 1.336kHz. Doubling 697 Hz, we get 1.394kHz which is very close to 1.336kHz. So checking the second harmonic for this tone set will require some latitude.
For the higher frequency (or for a single detected frequency) there is a single setting: StandardHarmonicDifferentialDb
For the lower frequency, there are two ranges and three values that you can define to take into account how close the second harmonic of the lower frequency is to the primary frequency of the higher tone: LowerHarmonicDifferentialRange1, LowerHarmonicDifferentialDb1, LowerHarmonicDifferentialRange2, LowerHarmonicDifferentialDb2 and LowerHarmonicDifferentialDb3
If the difference between the two frequencies are within the first range, a differential less than the specified Db for the first range causes the frequency to be discarded. If the difference between the two frequencies are within the second range, a differential less than the specified Db for the second range causes the frequency to be discarded. For anything with a greater frequency spread, a differential less than the specified Db for the third causes the frequency to be discarded.
For Template Definitions: (Values shown are for the United States)
<CallAnalysisTemplate Version="1.0">
...
  <FrequencyDetection>
    <StandardHarmonicDifferentialDb>10</StandardHarmonicDifferentialDb>
    <LowerHarmonicDifferentialRange1>100</LowerHarmonicDifferentialRange1>
    <LowerHarmonicDifferentialDb1>0</LowerHarmonicDifferentialDb1>
    <LowerHarmonicDifferentialRange2>250</LowerHarmonicDifferentialRange2>
    <LowerHarmonicDifferentialDb2>8</LowerHarmonicDifferentialDb2>
    <LowerHarmonicDifferentialDb3>12</LowerHarmonicDifferentialDb3>
  </FrequencyDetection>
...
</CallAnalysisTemplate>
For Programmatic Override, use the following Name/Value Pairs (Values shown are for the United States):
| Name | Value |
|---|---|
| FrequencyDetection\StandardHarmonicDifferentialDb | 10 |
| FrequencyDetection\LowerHarmonicDifferentialRange1 | 100 |
| FrequencyDetection\LowerHarmonicDifferentialDb1 | 0 |
| FrequencyDetection\LowerHarmonicDifferentialRange2 | 250 |
| FrequencyDetection\LowerHarmonicDifferentialDb2 | 8 |
| FrequencyDetection\LowerHarmonicDifferentialDb3 | 12 |
Dual Tone Balance (Forward and Reverse Twist)
When there are two frequencies involved, we don’t want to consider a tone on if one of the frequencies is significantly higher or lower than the other. When the lower frequency has less energy than the higher frequency, this is called forward twist. Conversely, when the higher frequency has less energy than the lower one, this is called reverse twist.
The typical standard for forward twist is +4db and -8db for reverse twist.
For Template Definitions: (Values shown are for the United States)
<CallAnalysisTemplate Version="1.0">
...
  <FrequencyDetection>
    <ForwardTwistDb>4</ForwardTwistDb>
    <ReverseTwistDb>8</ReverseTwistDb>
  </FrequencyDetection>
...
</CallAnalysisTemplate>
For Programmatic Override, use the following Name/Value Pairs (Values shown are for the United States):
| Name | Value |
|---|---|
| FrequencyDetection\ForwardTwistDb | 4 |
| FrequencyDetection\ReverseTwistDb | 8 |
Overall Strength and Minimum Db Levels
Lastly we need to consider the total amount of energy that is “within” the sample as compared to the energy used by the tones. The bulk of the energy must be consumed by the tones. If this is not the case, we discard the tones. For dual tones we must consider the proximity of the frequencies. If they are close, we must use a different value for the Db spread. Typically, if the tones are within 65 Hz, we allow a total energy to tone energy window of 2.6db. If the frequency spread is greater than 65Hz, we set the spread to 2.5db. Single tones have a single value that is normally of 2.5db.
There is also a minimum db level that must be met for a frequency to be “detected”. This setting is MinimumDetectionLevelDb and it is normally -30db.
For Template Definitions (Values shown are for the United States):
<CallAnalysisTemplate Version="1.0">
...
  <FrequencyDetection>
    <DualToneToEnergySeparationRange1>65</DualToneToEnergySeparationRange1>
    <DualToneToEnergySeparationDb1>2.6</DualToneToEnergySeparationDb1>
    <DualToneToEnergySeparationDb2>2.5</DualToneToEnergySeparationDb2>
    <SingleToneToEnergySeparationDb>2.5</SingleToneToEnergySeparationDb>
    <MinimumDetectionLevelDb>-30</MinimumDetectionLevelDb>
  </FrequencyDetection>
...
</CallAnalysisTemplate>
For Programmatic Override, use the following Name/Value Pairs (Values shown are for the United States):
| Name | Value |
|---|---|
| FrequencyDetection\DualToneToEnergySeparationRange1 | 65 |
| FrequencyDetection\DualToneToEnergySeparationDb1 | 2.6 |
| FrequencyDetection\DualToneToEnergySeparationDb2 | 2.5 |
| FrequencyDetection\SingleToneToEnergySeparationDb | 2.5 |
| FrequencyDetection\MinimumDetectionLevelDb | -30 |
Tone Definitions
Tone templates for Call Analysis fall into two categories: Single Tone and Dual Tone. Single tones contain one frequency, whereas dual tones are comprised of two frequencies.
Tone templates are defined by a tone name, its associated frequencies, and debounce information.
Debouncing
Debouncing is a process for eliminating spurious noise that can lead to incorrect tone detection; especially during periods of transition. Referring to the aforementioned United States ring tone, both frequencies of 440hz and 480hz need to be on to consider a ring to be in process. At the leading edge of the tone, the strength of those frequencies are rising. As they do so, the frequency detector will fluctuate between the tone being on and the tone being off.
The debouncer requires that a tone be on for a certain number of samples before it officially reports the tone as on. Likewise, the debouncer requires the tone to be off for a certain number of samples to finally report the tone as off.
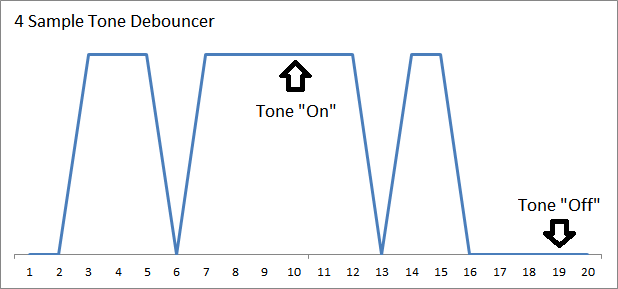
Looking at the graphic above, and setting the debouncer to require 4 sequential time periods to be on or off to determine the actual state, you can see that the debouncer does not consider the tone on until sample 10. That is the first time the tone has been on for four sequential periods. Once the tone is officially on, it takes four samples of it being off before the debouncer officially rules the tone to be off. This occurs at sample 19.
Tone Names
The following tone names have meaning to the call analysis engine:
Ring, Busy, OPI1, OPI2, OPI3, and FAX
To define and/or override a tone do one of the following (if there is only a single frequency, set the second frequency to zero:
For Template Definitions (Values shown are for the United States):
<CallAnalysisTemplate Version="1.0">
...
  <Tones>
    <Tone>
      <Name>Ring</Name>
      <Frequency1>440</Frequency1>
      <Frequency2>480</Frequency2>
      <DebounceOn>4</DebounceOn>
      <DebounceOff>4</DebounceOff>
    </Tone>
  </Tones>
...
</CallAnalysisTemplate>
For Programmatic Override, use the following Name/Value Pairs (Values shown are for the United States):
| Name | Value |
|---|---|
| Tones\Tone\Ring\Frequency1 | 440 |
| Tones\Tone\Ring\Frequency2 | 480 |
| Tones\Tone\Ring\DebounceOn | 4 |
| Tones\Tone\Ring\DebounceOff | 4 |
Tone Patterns
Note the Tone Pattern in this image of the initial ring before the call is answered.
Tone Patterns define the requisite “cadence” of a particular tone. An example is the “Busy” Tone Pattern, (as distinguished from the “Busy Tone Definition“). In the United States, the standard busy signal is 500ms on and 500ms off and it is repetitive. The tone pattern is defined by its name. Valid names for Call Analysis are: Busy, FastBusy, Ring, OPI1, OPI2, OPI3, and FAX.
Patterns definitions include the “name” of the “tone definition”. They also include the Duration and allowed Deviation for both turning on and off. Durations and deviations are in 10ms increments. Deviations are like debouncers — they allow for some leeway in just how exact the pattern must match. Lastly there is a repetition count that tells the system how many repetitions it must see before it signals the Call Analysis engine that the specified cadence has occurred.
For Template Definitions (Values shown are for the United States):
<CallAnalysisTemplate Version="1.0">
...
  <Patterns>
    <Pattern>
      <Name>FastBusy</Name>
      <Tone>Busy</Tone>
      <ToneOn>25</ToneOn>
      <ToneOnDeviation>6</ToneOnDeviation>
      <ToneOff>25</ToneOff>
      <ToneOffDeviation>6</ToneOffDeviation>
      <RepetitionCount>1</RepetitionCount>
    </Pattern>
  </Patterns>
...
</CallAnalysisTemplate>
For Programmatic Override, use the following Name/Value Pairs (Values shown are for the United States):
| Name | Value |
|---|---|
| Patterns\Pattern\FastBusy\Tone | Busy |
| Patterns\Pattern\FastBusy\ToneOn | 25 |
| Patterns\Pattern\FastBusy\ToneOnDeviation | 6 |
| Patterns\Pattern\FastBusy\ToneOff | 25 |
| Patterns\Pattern\FastBusy\ToneOffDeviation | 6 |
| Patterns\Pattern\FastBusy\RepetitionCount | 1 |
Voice Detection Parameters
For all practical purposes any detected audio that is not considered a “tone” must be considered voice activity. Voice activity is also detected with a debouncer, to avoid small spike of noise being interpreted as voice. Likewise, voice must also surpass a minimum level of loudness before it is counted as voice.
Debouncing Parameters
For Template Definitions (Values shown are for the United States):
<CallAnalysisTemplate Version="1.0">
...
  <VAD>
    <DebounceOn>4</DebounceOn>
    <DebounceOff>4</DebounceOff>
  </VAD>
...
</CallAnalysisTemplate>
For Programmatic Override, use the following Name/Value Pairs (Values shown are for the United States):
| Name | Value |
|---|---|
| VAD\DebounceOn | 4 |
| VAD\DebounceOff | 4 |
Minimum Levels for Voice
For Template Definitions (Values shown are for the United States):
<CallAnalysisTemplate Version="1.0">
...
  <VAD>
    <VoiceActivityThresholdDb>-30</VoiceActivityThresholdDb>
  </VAD>
...
</CallAnalysisTemplate>
For Programmatic Override, use the following Name/Value Pairs (Values shown are for the United States):
| Name | Value |
|---|---|
| VAD\VoiceActivityThresholdDb | -30 |
Timer and Miscellaneous Definitions
Within call progress analysis there are a number of critical timers and other definitions. Each timer is explained in detail below. Values are in 10ms increments unless otherwise noted.
No Ringback Timer
If no ring tone is detected and there is no voice activity, this timer will return “No Ringback” to the application after this interval. If at least one ring is detected, then this timer will never fire. For international calls, this should be increased. This value must be greater than 3 seconds.
Parameter name: NoRingbackMs
Default value: 20000 (20 seconds)
Maximum Time For Detection
Maximum time the call progress analysis engine should attempt to classify a connection before returning. If this timer expires, call progress analysis fails and returns a DialResult of “Error.”
Parameter name: MaximumTimeForDetectionMs
Default value: 120000 (120 seconds)
Connection to Detection Fail Time
Maximum time to detect the connection type after a call has connected. This timer begins after the called party has answered. If this timer expires without a connection type being determined, a DialResult of “Connected” is returned.
Parameter name: ConnectionToDetectionFailTimeMs
Default value: 15000 (15 seconds)
Cadence Break Timer
Maximum amount of silence, after ringback tone has been detected, to allow before a DialResult of “CadenceBreak” is returned.
Parameter name: CadenceBreakMs
Default value: 7000 (7 seconds)
Machine Length
The maximum amount continuous voice audio to consider before a DialResult of “MachineDetected” is returned. This timer starts when voice audio is detected.
Parameter name: MachineLengthMs
Default value: 1500 (1.5 seconds)
VAD Length
The minimum amount of continuous voice audio which must be present before it can be considered a voice answer. This timer begins when voice audio is detected and ends when there is silence. If this timer expires before “MachineLengthMs,” a DialResult of “HumanDetected” is returned.
Parameter name: VadLengthMs
Default value: 600 (0.6 seconds)
Examples
public void MakeCall(string phone_number, ref VoiceElements.Client.ChannelResource outbound_channel)
{
    outbound_channel.CallProgress = VoiceElements.Common.CallProgress.AnalyzeCall;
    outbound_channel.CallProgressTemplate = "US-Default";
    cpoverrides.Add("NoRingbackMs", "120000");
    cpoverrides.Add("MaximumTimeForDetectionMs", "120000");
    cpoverrides.Add("ConnectionToDetectionFailTimeMs", "15000");
    cpoverrides.Add("CadenceBreakMs", "7000");
    cpoverrides.Add("MachineLengthMs", "1500");
    cpoverrides.Add("VadLengthMs", "600");

    outbound_channel.CallProgressOverrides = cpoverrides;

    var dr = outbound_channel.Dial(phone_number);
    switch(dr)
    {
    case VoiceElements.Common.DialResult.HumanDetected:
        break;
    case VoiceElements.Common.DialResult.MachineDetected:
        break;
    case VoiceElements.Common.DialResult.CadenceBreak:
        break;
    case VoiceElements.Common.DialResult.Connected:
        break;
    }
}