
Voice Elements application hosting is a service which allows customers to develop and test their applications in their own environment, and then deploy the application to Inventive Labs servers for production. This is possible owing to the fact that Voice Elements applications can be very lightweight themselves as all the heavy lifting is performed by the telephony server. There are a few requirements for using the application hosting service; none of them is too onerous, but customers need to be aware of them:
-
- Application projects must target the .NET Core in their settings.
- Application projects must install at least Voice Elements client version 9.1.1-pre via NuGet.
- Currently, applications must connect to Inventive Labs Voice14 cloud server.
Once your application is properly prepared, it can be deployed to the Application Hosting service servers. This guide will walk you through the process of preparing your project and deploying and managing it via the Voice Elements Customer Portal.
Getting Your Project Ready
Targeting .NET Core in Your Project
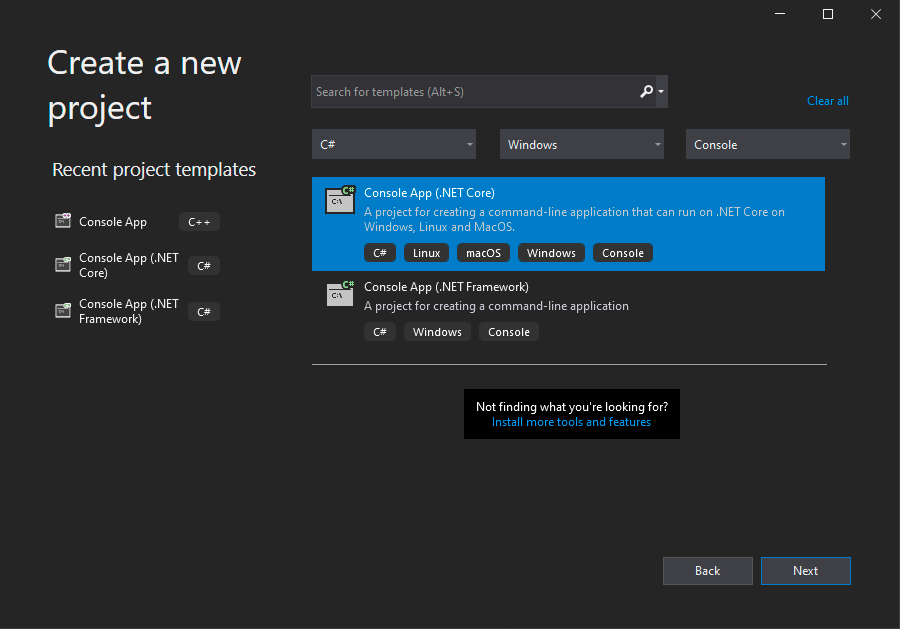
When you create your new project using Microsoft Visual Studio, you can select the target framework. Traditionally, for Voice Elements projects, you would select .NET Framework, and then pick a specific version. However, since the Application Hosting service leverages .NET Core for cross-platform support, projects must now target it.
Installing the Voice Elements Client
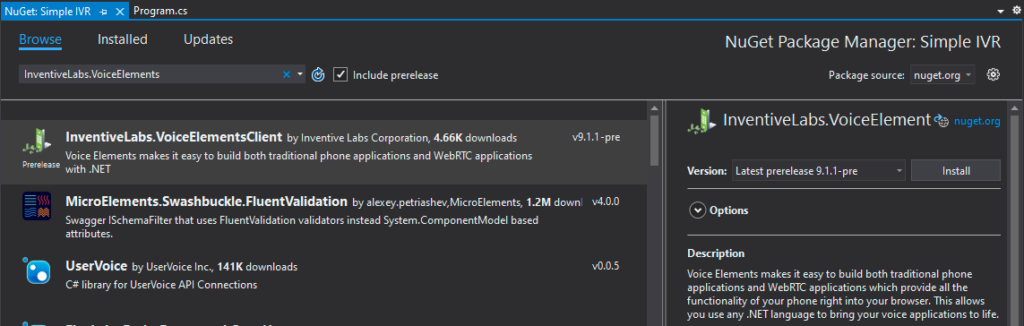
To utilize Voice Elements in your .NET Core project, you must install version 9.1.1-pre, or newer, of the InventiveLabs.VoiceElements client via NuGet. To do so:
-
- Open your solution in Visual Studio;
- Right-click your project in the Solution Explorer and select “Manage NuGet Packages…”;
- Select the Browse tab and search “InventiveLabs.VoiceElements” (ensure “Include prerelease” is selected;
- Select version 9.1.1-pre or newer from the Version selector.
- Click Install.
Connecting Your Application to Voice14
When using Inventive Labs cloud servers in the past, applications typically created a connection using a URI along the lines of: “gtcp://vecloud.voiceelements.com:54331”. However, applications targeting the Application Hosting service should connect to “tcp://voice14.voiceelements.com:54332”
tserver = new TelephonyServer("tcp://voice14.voiceelements.com:54332",
                              "username",
                              "password");
Note: You will need to ask Voice Elements support to point your telephone number (DID) to Voice14. This can be an existing DID on your account or by adding a new DID via the Customer Portal, under Settings -> DIDs -> Add New Number. You can also port in any telephone number that you own from another service. Once you have identified which DID you wish to use, contact support@voiceelements.com. Send them the telephone number (DID) and that you would like it pointed to Voice14 for .NET Core application use.
Deploying to the Application Hosting Service Servers
Using the Voice Elements Customer Portal
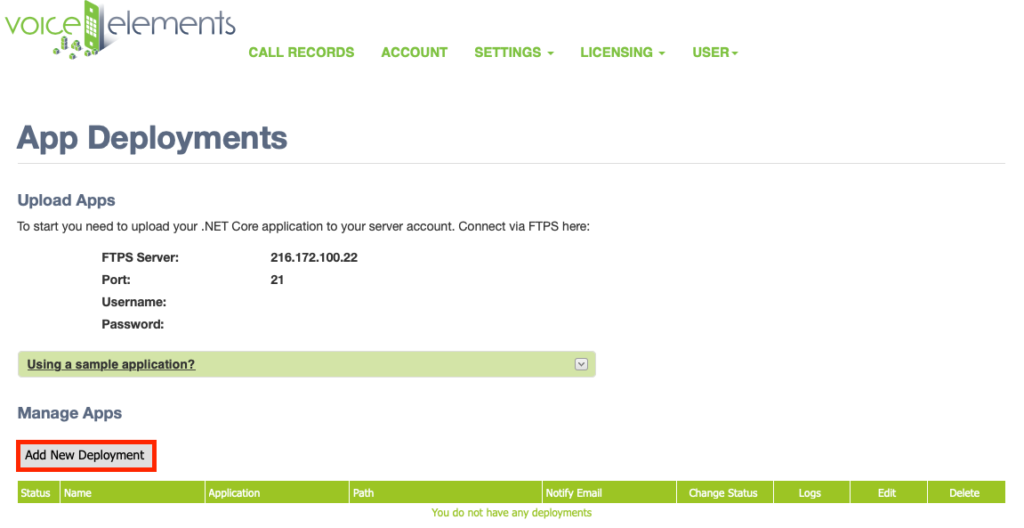
Applications can be deployed by browsing to the Voice Elements Customer Portal. Once logged in, select “App Deployments” from the “Settings” menu. This page displays the following:
-
- The FTPS server to which your application(s) should be uploaded, and the connection information you can use to access it.
- Instructions describing how to deploy any of Inventive Labs’ sample .NET Core applications.
- A list of your current applications deployments.
Uploading the Application
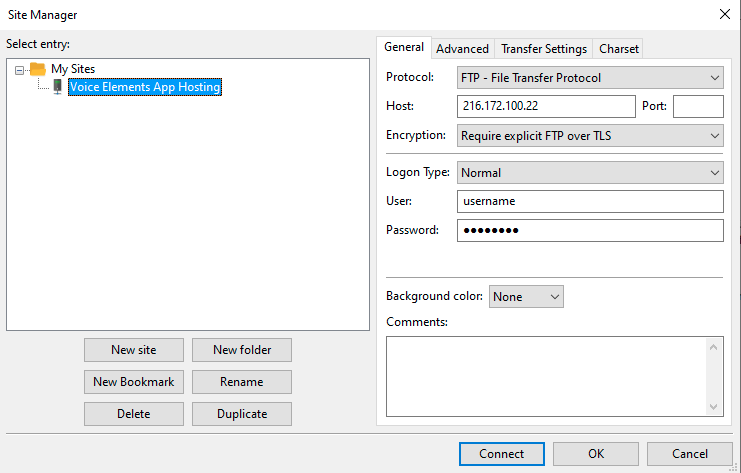
To deploy a new application, open a connection to the FTPS server above using a client which supports FTP over SSL. A number of popular clients support this, including FileZilla and WinSCP. For example, to create a connection using FileZilla, you would need to configure the following:
-
- Protocol – “FTP – File Transfer Protocol”
- Host – Use the IP address listed at the top of the App Deployments page.
- Port – Leave blank, or specify 21.
- Encryption – “Require Explicit FTP over TLS”
- Username and Password – Use the values from the App Deployments page.
Once you have established the connection, the client will show you the root of your private storage on the deployment server. This is where you’ll create the directory for your application and upload its files. To upload your application:
-
- Create a new directory for your application in the root folder. The process for doing this varies by client; for FileZilla, right-click in an empty area of the directory and click “Create directory.”
- Navigate to the new directory by double-clicking it (in FileZilla, other clients will have similar functionality).
- Upload your application’s files to this directory. If you’ve just compiled your application, the files will be located in the .\bin\Debug\netcoreapp3.1 directory of your project directory. Otherwise, if you’ve published your application, the files will be located in the location you specified. In either case, upload the entire contents of this directory, including any sub-directories.
Deploying the Application
Once the application has been uploaded to the deployment server, return to the App Deployments page on the Voice Elements Customer Portal. Click the “Add New Deployment” button:
A dialog box will open prompting for several pieces of information:
-
- App Name – Enter a friendly name for the application. This is for your reference to help you distinguish it from your other deployed applications.
- Compiled File – Enter the filename of your application’s DLL file (not the EXE file).Example: VoiceApp1.dll
- Path – Enter the path to the file name specified in step 2.This is generally the directory you created in step 2 of “Uploading the Application.” The path must have leading and trailing forward slashes. Example: /VoiceApp1/
- Notify Email – An e-mail address to which notifications will be sent in the event that the application stops responding.
After entering the information above, click the “Add” button to complete deployment.
Managing the Application
Once the application has been successfully deployed, you have several options available for managing it:

-
- Status – Shows the current running status of the application; green indicates that it is running and red indicates that it is stopped.
- Name, Application, Path, Notify Email – Shows the values you entered in steps 1-4 of “Deploying the Application.”
- Change Status – Allows you to start or stop the application, depending its current running state.
- Logs – Allows you view the logs for the application’s service on the server. These logs are separate from those generated by your application and will be of primary benefit of Inventive Labs support personnel.
- Edit – Allows you to modify the friendly name and notification e-mail address for your application. Note: If you need to modify other details for the application, you must delete and re-add it.
- Delete – Allows you to delete the application deployment information. This does not delete our application files from the server. If the application files need to be deleted or updated, this must be done via FTPS access.
Multiple applications may be uploaded to the server and deployed, there is no arbitrary limit set for this. However, the total storage space all of your applications consume on the deployment server is limited to 250 MB currently.
Questions?
If you have any questions or experience any issues, please contact support.