
Background on QoS Settings
DSCP tags in packets are useful for letting network appliances know how to prioritize traffic. For example, it’s common that RTP traffic (audio) in a VoIP call gets a DSCP tag of 46. This allows you to set up custom traffic shaping rules that would prioritize your voice traffic and increase your overall call quality.
Prior to Windows Vista / Server 2008, Windows allowed software developers to set the Quality of Service (QoS) tags on traffic. However, if packets weren’t tagged correctly it could cause issues for network administrators that suddenly found that they were prioritizing file sharing applications instead of bandwidth sensitive applications such as VoIP.
With the release of Vista / Server 2008, Microsoft began to overwrite any DSCP values that were set by applications and set them to 0, basically it didn’t trust software to set those values. Because of this there are some settings that you need to modify so that your traffic gets tagged appropriately.
For more information, see Microsoft’s Quality of Service (QoS) Policy
Modify QoS Registry Settings
If you use a Windows PC that is not connected to a domain, you should follow the instructions in this step.
Modifying this registry setting will allow you to specify the QoS setting that will be used based on Group Policy settings that you configure.
HKEY_LOCAL_MACHINE > CurrentControlSet > Services > tcpip > QoS
The QoS Key may not exist. If it does not, then you’ll need to right click on tcpip and select “New Key“. Type in the name as “QoS“.
Once complete, select the QoS key and if it doesn’t already exist then create a new string value called “Do not use NLA“. Set the value to “1“.
It should look like the image below:
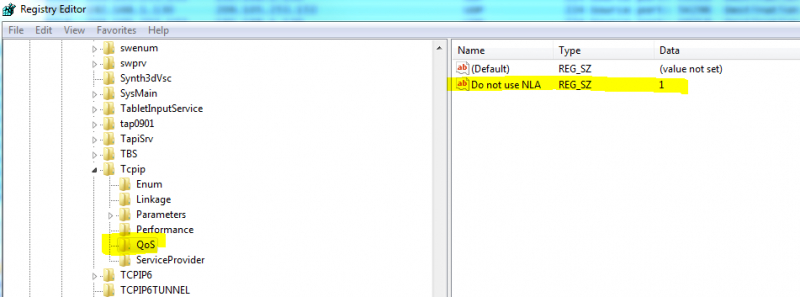
Registry Editor Example for QoS Settings
Reboot Your System
After you complete the registry changes, you will need to reboot for the settings to take effect.
Set Up QoS Group Policy Rules
You control the QoS settings that are used for certain applications by designing different Group Policy rules.
To open up the Group Policy rules, go to a command line and type “gpedit.msc”
This will bring up the local group policy editor. Under Computer Configuration select “Policy Based QoS Settings“, right click and select “Create New Policy“. You will then run through a wizard interface to configure the QoS rules to use.
On the first screen you will be prompted to enter a Policy Name and specify a DSCP value.
Put “HMP Elements” as the Policy name, and specify a DSCP value of “46“, and click “Next“.
In the second screen, you are prompted to determine which applications the policy applies to.
Select “Only applications with the executable name” and enter “HmpElementsServer.exe“, and select “Next“.
In the third screen you can limit both the source and destination IP address.
You may not need to enter any settings here. Once complete click “Next“.
In the fourth and final screen, you’ll want to select the protocol that the QoS applies to.
Most users will limit this to UDP. If you aren’t certain, select “TCP and UDP”.
Additionally, you can select different port ranges on this page. This can be useful, because you could set up one DSCP rule for SIP traffic (typically DSCP 26), and another for the RTP range.
Once complete your rules should look something like this:
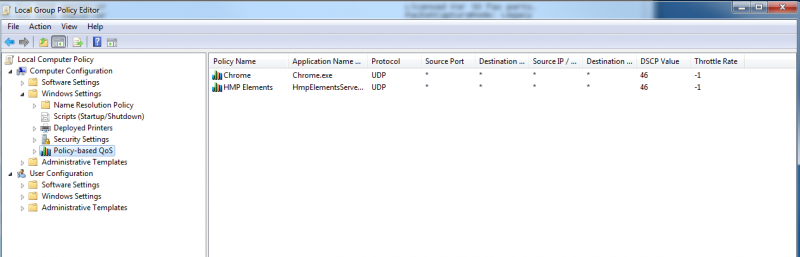
Local Group Policy Editor QoS Settings
Please note that I created an additional rule for Chrome so that UDP packets sent by the browser were tagged with a DSCP value of 46 this is so that WebRTC packets get prioritized. You may not need to modify these settings.