
What is WebRTC?
WebRTC allows audio and video Real Time Communication (RTC) to work inside web pages by allowing direct peer-to-peer communication.
Try our free WebRTC demo!
You’ll want to contact support@inventivelabs.com and let them know that you are interested in demoing the WebRTC functionality in Voice Elements. You can download a sample WebRTC application here.
Our support team will need to give you the following information:
-
- Username
- Password
- CustomerId
They will also set you up with an account so that you can connect to our cloud based servers and test your WebRTC application.
Quick Start Guide
Download the Visual Studio Solution
You can download a sample WebRTC applicationWebRTC application here.
There are two projects in this solution:
Voice App
Voice App contains all of your application logic. This is where you will edit the .NET code that controls the voice functionality of your WebRTC Application.
WebServer
WebServer contains the html files for the web based functionality of your WebRTC Application. It also runs a web server from your local application to serve up the html files in this project.
You can read about these projects in greater detail in the sections below.
Required Changes
Change the Username / Password
You will need to right click on the VoiceApp Project, select Properties, and click on the Settings tab to change the credentials to use. We recommend using webrtctest.voiceelements.com as the TelephonyServer. The username and password should be the username and password that were given to you.
Rename the folder in the content directory
In the WebServer project project there is a directory named “1602” inside of the content folder in the WebServer project. You will need to rename this folder to your customer id. For example, if your customer is 2313, you would simply rename this to 2313.
Begin Debugging
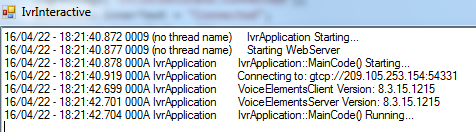
Go ahead and run the project with the debugger attached ( Debug > Start Debugging). As you start up your application in debug mode, you will get security warnings from network shell — this occurs when the web server is starting. Make sure you accept the warnings. You should see a form that opens up that logs the relevant information. Once it’s connected, like in the screenshot below, you will want to open a browser window.
When you start your project in debug mode, you will need to access the page by opening up a CHROME browser instance and using the url:
Below are the instructions for determining what address in your browser to access:
By default the web server listens on port 8181.
http://localhost:8181/{customerId}/{webpage.html}
For example, if your customer id was 1602, and the web page was basicauthentication.html, the url would be:
http://localhost:8181/1602/basicivr.html
Once the web page has loaded, you should be able to start testing WebRTC functionality.
Read below for additional information that will help you better understand how to modify this application and build your own.
Additional Information
Voice App
This demo uses the Voice Elements Skeleton project as a base for building out this project. In the IvrApplication.cs file you will see a few key pieces:
Connecting to the telephony server
// UPDATE YOUR SERVER ADDRESS HERE
System.Net.IPAddress[] ips = System.Net.Dns.GetHostAddresses(Properties.Settings.Default.TelephonyServer);

if (ips == null || ips.Length == 0) throw new Exception("Error: Could not resolve Telephony Server specified!");

string sIpaddress = @"gtcp://" + ips[0].ToString() + ":54331";

Log.Write("Connecting to: {0}", sIpaddress);

// CHANGE YOUR USERNAME AND PASSWORD HERE
s_TelephonyServer = new TelephonyServer(sIpaddress, Properties.Settings.Default.Username, Properties.Settings.Default.Password);
You will need to Right click on the VoiceApp Project, select Properties, and click on the Settings tab to change the credentials to use. We recommend using webrtctest.voiceelements.com as the TelephonyServer. The username and password should be the username and password that were given to you.
Subscribing to a new call event
// SUBSCRIBE to the new call event.
s_TelephonyServer.NewCall += new VoiceElements.Client.NewCall(s_TelephonyServer_NewCall);
s_TelephonyServer.RegisterDNIS();
s_TelephonyServer.RegisterWebRtcUrl();
Here you tell Voice Elements which method you would like it to call when a new call comes in. This will handle both normal telephone calls as well as WebRTC calls.
The RegisterDnis() and RegisterWebRtcUrl() tell Voice Elements that you want this instance of the application to handle all calls that it receives to the dnises and urls that are related to your account respectively.
Handling Calls
Inside of the new call event, you will want to add logic to determine how your application handles the call. In this application, if the call is not a WebRTC call, we hangup.
WebRtcChannel webRtcChannel = e.ChannelResource as WebRtcChannel;
if (webRtcChannel == null)
{
    Log.Write("Answering...");

    e.ChannelResource.Answer();
    e.ChannelResource.VoiceResource.PlayTTS("Hello.  Please call back using WEB R. T. C.  Good bye.");
    e.ChannelResource.Disconnect();
    return;
}
The application then checks the URL to determine how to handle the call:
if (e.ChannelResource.Dnis.ToLower().EndsWith("basicivr.html"))
{
    BasicIvr basicIvr = new BasicIvr(e.ChannelResource);
    basicIvr.RunScript();
    return;
}
else if(e.ChannelResource.Dnis.ToLower().EndsWith("basicauthentication.html"))
{
    BasicAuthentication basicAuthentication = new BasicAuthentication(e.ChannelResource);
    basicAuthentication.RunScript();
    return;
}
else
{
    webRtcChannel.Answer();
    webRtcChannel.VoiceResource.PlayTTS("I'm sorry we couldn't find your application. Goodbye!");
    return;
}
The code in the BasicIvr class contains many of the functions you would want to perform on a WebRTC Call.
The code in the BasicAuthentication class shows how you would authenticate a user (perhaps for a call center system).
WebServer
WebRTC has very strict encryption policies that can make it difficult for newcomers to begin testing their own application. However, if you use localhost to run your HTML pages it will allow insecure origins — basically this means that you can use HTTP to serve up your pages.
This web server project uses an open source project called NancyFX to run an in-process web server. This will allow you to focus on building out your HTML page rather than concerning yourself with configuring and setting up SSL certificates.
When you deploy your application, you may want to consider using a different technology to host your web pages.
Please note that if you would like to do anything more advanced with NancyFX than what is in this project, we would be unable to assist you. However, there are a number of good resources online if you choose to use it for production applications.
Nancy.cs
This contains all of the logic for configuring the web server.
The Start method configures which addresses you would like to listen to HTTP traffic on.
The GetRootPath method tells it which windows path to use for serving files.
By default, this will listen on port 8181 for serving HTTP content.
content directory
This is the directory where static files will be served from. As you can see there is a subdirectory named 1602. You will need to rename this directory to your Customer ID so that WebRTC calls are forwarded correctly to your application.
basicivr.html
This contains the HTML code for setting up a WebRTC call from html. We provided several css and javascript files that may assist you in your development, but the only file that you need is the InventiveWebRTC.js file. This contains all of the logic for setting up a WebRTC session. This page is associated with the basicIvr class in the VoiceApp project.
basicauthentication.html
This is a very simple web page that shows you how to establish a WebRTC session, and how you would authenticate a user. This page is associated with the basicAuthentication class in the VoiceApp project.