
This tutorial is a walk-through explanation of the IVR with Transfer sample solution that can be downloaded from the dashboard of your demo dashboard.
(If you haven’t already, sign up for a demo account and get 100 minutes of free call time for the next 30 days with the Voice Elements servers.)
Table of Contents
IVR with Transfer Tutorial
This IVR with Transfer tutorial explains how to download the sample solution and test the client demo. This sample solution demonstrates how a call transfer is completed via an IVR, as well as recording the call.
Download the Sample Solution
Sign In to the Voice Elements Customer Portal.
If you are not brought directly to the Dashboard screen, click on Dashboard in the top navigation links.
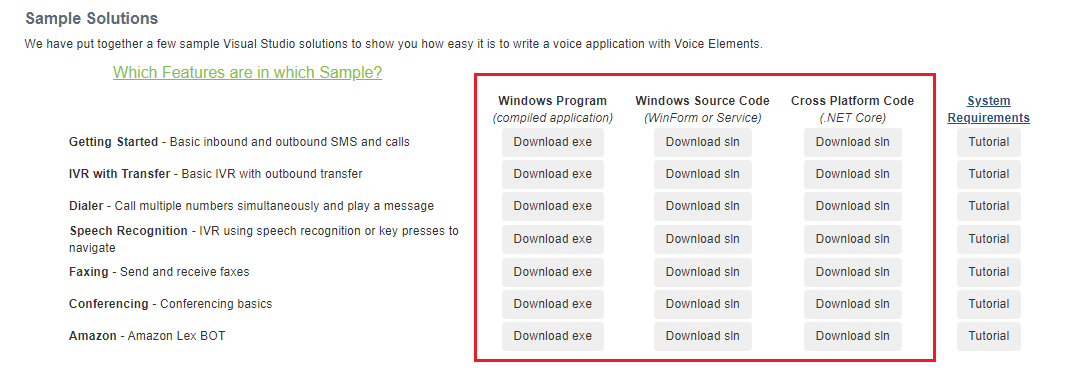
Sample Solutions Available in Three Download Formats
We offer three download formats for running the Sample Solutions: Windows Executable Program, Windows Source Code Download, or .NET Core Cross Platform Code. You can download any option and run them as often as you like.
Choosing to Download the Windows Executable Program
If you are not a programmer, if Visual Studio is not installed on the device or machine you are currently using for the demo, or if you just want to jump straight to seeing Voice Elements in action, then you’ll enjoy this user friendly option.
Select the Windows Program button ‘Download exe’. The ZIP file will be downloaded to your machine’s Downloads folder. You might also find it in the tray at the bottom of your browser window. Unzip the folder and extract the files to your chosen location. Look for the application named VoiceApp and run it.
Choosing to Download the Windows Source Code
If you are a programmer and have Visual Studio loaded on the device or machine you are using, you may enjoy downloading the Windows Source Code and seeing it in action from that perspective. Not only will you see how easy it is to program the code, you will also see how simple it is to create your telephony application.
Select the Windows Source Code button ‘Download sln’. Unzip the folder and extract the files to your chosen location. Run the Microsoft Visual Studio Solution “IVR With Transfer’.
Choosing to Download the .NET Core Cross Platform Solution
This download format is designed for Linux or Windows You will need a .NET Core compatible compiler to run the solution.
Run Anyway and Allow Access
Your device might recognize the file as an unrecognized app with an unknown publisher and ask if you are sure you want to run it. Select the option that will confirm that you want to run the application anyway.
Your firewall might prompt you to confirm access to the app. Select the option that allows access.
Once you have removed the obstacles, the application will run.
IVR with Transfer Client Application
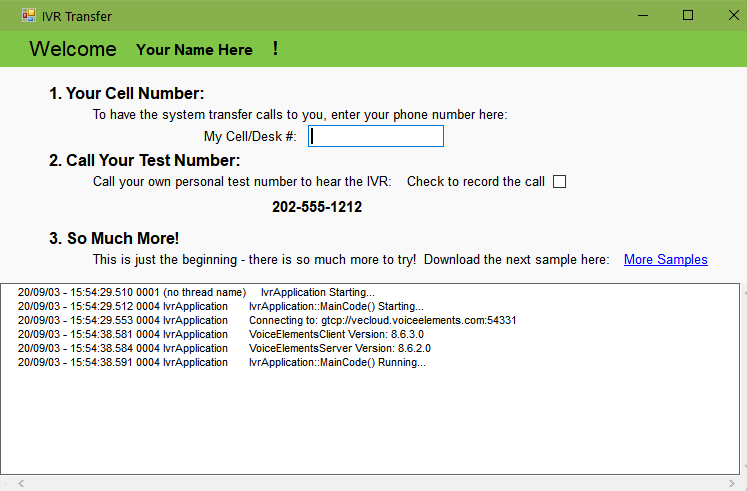
You will call your test number from one phone, and your call will be transferred to the number you place in the empty field.
When you call, you will hear text-to-speech IVR options. Select any option to see how it works, and call back to test each one if you like.
If you check the box to record the call, you will find the .wav file in the folder where you extracted the files.
See how easy it is to set up an IVR in Voice Elements, handle call traffic and record the calls? Use our source code to begin building your own application.
Ready to try more Sample Solutions?
You can click on More Samples within the app, or go back to your browser and log in to the Voice Elements Customer Portal. We have a tutorial for each sample solution to guide you through running each sample.
You must close the current sample before running another one.
If you want to run the Sample Solution again, you might consider moving the folder out of downloads to your desktop or a location where you want to store all the Sample Solutions.
We hope you try all our Sample Solutions to really see how comprehensive and robust Voice Elements is.
Understanding the Source Code
For more detailed information about the Voice Elements Classes and Methods, explore our Class Library documentation at Voice Elements Developer Help. We’ve linked a few classes and methods in the sections below to encourage you to take advantage of this treasure-trove of knowledge from our developers.
This project contains three main classes that you should pay attention to: IvrApplication, InboundCall, and TransferCall.
Also explained are the Voice Elements API Methods featured in this sample.
IvrApplication Class
The core class of this project is IvrApplication. This class contains a lot of logic that sets up the application as a windows service so you can ignore a lot of the code in it for now. The most important method here is MainCode().
The MainCode() Method
When the application is run, it starts a new thread which runs MainCode(). This connects to the Voice Elements servers in the cloud and then quietly sleeps, occasionally checking for new tasks to run and handling shutdown when the application is preparing to exit.
Log.Write() Calls
Note that Log.Write() is used frequently to log call progress and help with debugging. It is recommended that you continue to do this as you program your own Voice Elements applications.
The first thing MainCode() does is connect to the Voice Elements servers. This is done by constructing a new TelephonyServer object passing in server IP, username, and password as parameters. These values have already been generated for your account but you can change them in your Settings.settings file.
MainCode() also sets the CacheMode on the TelephonyServer object. ClientSession mode means that the server will stream and cache the files to and from your client machine. In this mode the files are flushed after you disconnect. Server Mode means that the files reside on the server and will use the full path name to find them there. Note that Server mode can only be used on your own dedicated Voice Elements server.
After connecting to the server and setting its cache mode the new call event is subscribed to. This sets a method to be called when an incoming call is received. In this example, TelephonyServer_NewCall() is the method to be called on new incoming call events.
RegisterDNIS() Calls
RegisterDNIS() is called on the TelephonyServer object to tell the server which phone numbers the application will handle. This method can be called with no parameters to instruct Voice Elements to handle calls from all phone numbers on your account. Otherwise you can specify specific numbers as parameters.
try
{
    Log.Write("Connecting to: {0}", Properties.Settings.Default.PhoneServer);

    m_telephonyServer = new TelephonyServer("gtcp://" + Properties.Settings.Default.PhoneServer, Properties.Settings.Default.UserName, Properties.Settings.Default.Password);

    // CHANGE YOUR CACHE MODE HERE
    m_telephonyServer.CacheMode = VoiceElements.Interface.CacheMode.ClientSession;

    // SUBSCRIBE to the new call event.
    m_telephonyServer.NewCall += new VoiceElements.Client.NewCall(TelephonyServer_NewCall);
    m_telephonyServer.RegisterDNIS();

    // Subscribe to the connection events to allow you to reconnect if something happens to the internet connection.
    // If you are running your own VE server, this is less likely to happen except when you restart your VE server.
    m_telephonyServer.ConnectionLost += new ConnectionLost(TelephonyServer_ConnectionLost);
    m_telephonyServer.ConnectionRestored += new ConnectionRestored(TelephonyServer_ConnectionRestored);
}
InboundCall Class
The InboundCall class is designated to handle most of the logic for an inbound call. When an inbound call event is generated and the TelephonyServer_NewCall method in IvrApplication is called.
The RunScript() Method
An object of the InboundCall class is constructed with the TelephonyServer and ChannelResource objects as parameters. The RunScript() method is then called on the new InboundCall object.
static void TelephonyServer_NewCall(object sender, VoiceElements.Client.NewCallEventArgs e)
{
    try
    {
        Log.Write("NewCall Arrival! DNIS: {0} ANI: {1} Caller ID Name: {2}", e.ChannelResource.Dnis,
        e.ChannelResource.Ani, e.ChannelResource.CallerIdName);

        if (string.IsNullOrEmpty(TransferNumber))
        Log.Write("WARNING - You have not entered a transfer number so the call will go to voicemail!!");

        // Handle The New Call Here
        InboundCall inboundCall = new InboundCall(m_telephonyServer, e.ChannelResource);
        inboundCall.RunScript();
    }
    catch (Exception ex)
    {
        Log.WriteException(ex, "IvrApplication::NewCall");
        e.ChannelResource.Disconnect();
        e.ChannelResource.Dispose();
    }
}
The RunScript() method contains the logic for handling each inbound call. This method first checks to see if the number that is calling is blocked.
The RejectCall() Method
If so then the RejectCall() method is called. If the call is not rejected the method proceeds to answer the call and play a recorded message.
The StartTransfer() and RecordVoicemail() Methods
The code will either choose to transfer the call to another number by calling StartTransfer() or to record a voicemail using the RecordVoicemail() method.
try
{
    // Reject calls from blocked numbers
    if (string.IsNullOrEmpty(m_channelResource.Ani) || m_channelResource.Ani == "0000000000")
    {
        RejectCall();
        return;
    }

    // Answer the call
    Log.WriteWithId(m_channelResource.DeviceName, "Answering...");
    m_channelResource.Answer();

    // Play a recorded message
    Log.WriteWithId(m_channelResource.DeviceName, "Playing prompt...");
   m_voiceResource.Play("..\\..\\AudioFiles\\MainMenu.wav");

    // If the entire message played to the end, play a tone so the user knows they are at the end of the message
    if (m_voiceResource.TerminationCodeFlag(TerminationCode.EndOfData))
        m_voiceResource.PlayTone(1000, 100, 500);

    // Get digits from the caller
    string digits = ReceiveDigits();


    // If no phone number was entered on the form yet, we can't transfer the call
    // so we will send it to voicemail instead
    if (string.IsNullOrEmpty(IvrApplication.TransferNumber))
    {
        Log.WriteWithId(m_channelResource.DeviceName, "No phone number has been entered on the form yet, so call will go to voicemail");
        RecordVoicemail();
        return;
    }

    // If a number was entered, we will handle the option selected by the caller
    switch (digits)
    {
        case "1":
            StartTransfer(false);
            break;
        case "2":
            StartTransfer(true);
            break;
        case "3":
            RecordVoicemail();
            break;
    }
}
The RejectCall() Method
The RejectCall() method makes use of the RouteHalf() and RouteFull() API Methods to route to a voice resource and play a file before disconnecting with a 503 SIP result.
private void RejectCall()
{
    Log.Write("Rejecting call...");

    // Half route the channel to the voice resource
    m_channelResource.RouteHalf(m_voiceResource);

    Log.Write("Playing busy");
    // Play a busy sound file
    m_voiceResource.Play("..\\..\\AudioFiles\\Busy.wav");

    // Disconnect the call
    m_channelResource.Disconnect(503);

    // Route the channel back to its voice resource
    m_channelResource.RouteFull(m_voiceResource);

    Log.Write("Call rejected");

    return;
}
TransferCall Class
Let’s look at how transferring a call with Voice Elements works.
StartTransfer()
The InboundCall class contains the StartTransfer() method which, when called, constructs a new TransferCall object, passing in the TelephonyServer, ChannelResource, VoiceResource, and playMusicOnHold as parameters.
ToPhone()
The TransferCall class contains all of the logic for handling call transfer. The ToPhone() method is then called on the new TransferCall object passing in the phone number to be transferred to and the server phone number as parameters.
private void StartTransfer(bool playMusicOnHold)
{
    Log.WriteWithId(m_channelResource.DeviceName, "Transferring call...");

    // We will create a new instance of the TransferCall and let it
    // handle the transfer
    TransferCall call = new TransferCall(m_telephonyServer, m_channelResource, m_voiceResource, playMusicOnHold);
    call.ToPhone(IvrApplication.TransferNumber, Properties.Settings.Default.TestPhoneNumber);
}
ToPhone() contains all of the logic for transferring a phone call.
try
{
    // Subscribe to the disconnect events so e
    m_outboundChannelResource.Disconnected += new Disconnected(OutboundChannelResource_Disconnected);
    m_parentChannelResource.Disconnected += new Disconnected(ParentChannelResource_Disconnected);

    // Get the outbound voice resource
    m_outboundVoiceResource = m_outboundChannelResource.VoiceResource;

    if (m_playMusicOnHold)
    {
        // Start playing music on hold to the caller
        m_musicOnHold = new MusicOnHold(m_parentVoiceResource, "..\\..\\AudioFiles\\Music.wav");
        m_musicOnHold.Start();
    }
    else
    {
        // If we aren't playing music, we will route early so the caller can hear ringing
        m_parentChannelResource.RouteFull(m_outboundChannelResource);
    }

    m_outboundChannelResource.CallProgress = CallProgress.WaitForConnect;
    m_outboundChannelResource.OriginatingPhoneNumber = callerID;

    // Limit the amount of time for the phone to answer
    m_outboundChannelResource.MaximumTime = 60;

    // Place the call
    m_dialing = true;
    DialResult dr = m_outboundChannelResource.Dial(phone);
    m_dialing = false;

    Log.Write("The dial result for {0} was: {1}", phone, dr);

    switch (dr)
    {
        case DialResult.Connected:
        case DialResult.HumanDetected:
        case DialResult.MachineDetected:
        case DialResult.Successful:
            connected = true;
            break;
        default:
            // If it wasn't answered properly, we won't let it continue
            m_terminateCall.Set();
            break;
    }

    // If we were playing music on hold, stop playing and route the
    // two calls together
    if (m_playMusicOnHold && connected)
    {
        m_musicOnHold.Stop();
        m_musicOnHold = null;

        // This will let both legs hear each other
        m_outboundChannelResource.RouteFull(m_parentChannelResource);
    }


    // If record the call is selected, we will start the recording now
    if (IvrApplication.RecordCall)
    {
        string filename = "RC_" + DateTime.Now.ToString("yyMMddhhmmss") + m_outboundChannelResource.DeviceName + ".wav";

        // Start recording the conversation
        m_recordConversation = new RecordConversation(m_telephonyServer, m_parentChannelResource, m_outboundChannelResource, filename);
        m_recordConversation.Start();
    }


    // Let the call run until one of the channels disconnects
    m_terminateCall.WaitOne();
}
Voice Elements API Methods Featured in This Sample
RouteHalf(), and RouteFull()
These metthods are used to route the channel to the voice resources. Alternatively these methods can also route the channel to another channel or to other routable resources.
The TerminationCodeFlag()
The TerminationCodeFlag() method is called on the VoiceResource to determine how the last the voice resource operation completed. Since the termination code is a bitmask, it allows you to check the termination code for a specific code.
ReceiveDigits()
The ReceiveDigits() method accepts numeric input from the inbound caller and returns that input as a string. The first step to getting numeric input is to instruct the VoiceResource object not to clear the digit buffer on the next voice function. In this way, if the user began pressing digits during the previous play, those digits will not get lost.
You must then instruct the VoiceResource object as to how many digits to return. In this case the maximum number of digits that will be recorded is 1. You can then set a maximum wait time for the digits to be input. You can also set a termination digit that when pressed no more digits will be recorded.
GetDigits()
You then call the GetDigits() method on the VoiceResource object. This will record the input digits into the DigitBuffer of the VoiceResource object when the above conditions are met. You can then store this string into a variable to be returned after instructing the VoiceResource object to start clearing the digit buffer again.
private string ReceiveDigits()
{
    string digits = string.Empty;

    // Use the log file often to help with debugging.
    Log.Write("Receiving digits...");

    // Instruct the voice resource NOT to clear the digit buffer on the next voice function.
    // In this way, if the user began pressing digits during the previous play, those digits will not get lost.
    m_voiceResource.ClearDigitBuffer = false;

    // Instruct the voice resource to return a maximum of 1 digit
    m_voiceResource.MaximumDigits = 1;

    // Only wait 5 seconds to get digits
    m_voiceResource.MaximumTime = 5;

    // Instruct the voice resource to terminate the next voice function on just a "#" DTMF digit.
    // If the user presses this key, it will not be included in the digit buffer.
    m_voiceResource.TerminationDigits = "#";

    // Wait until the above condition are met.
    m_voiceResource.GetDigits();

    digits = m_voiceResource.DigitBuffer;
    // Log the response
    Log.Write("Digits Returned: " + m_voiceResource.DigitBuffer);

    // On the next voice function, clear the digit buffer.
    m_voiceResource.ClearDigitBuffer = true;

    return digits;
}
RecordVoicemail() and PlayTTS()
The RecordVoicemail() method contains the basic structure for recording a voice mail. The caller is first prompted to record a message with the PlayTTS() method. A filename is also created and stored as a string.
The TerminationDigits property can be set. This sets the next voice function to terminate on the input of any of these digits.
The MaximumTime property can also be set. This sets the recording to terminate after a set amount of time.
Record()
The Record() method is then called on the VoiceResource with the desired file name as a parameter.
At this point the program is recording and will stop recording when on of the TerminationDigits is pressed by the caller.
private void RecordVoicemail()
{
    Log.WriteWithId(m_channelResource.DeviceName, "Playing voicemail prompt...");

    // Play voicemail prompt
    m_voiceResource.Play("..\\..\\AudioFiles\\VoiceMail.wav");

    string filename = "VM_ " + DateTime.Now.ToString("yyMMdd.hh:mm:ss") + m_voiceResource.DeviceName + ".wav";

    // Log Often
    Log.WriteWithId(m_channelResource.DeviceName, "Recording to " + filename);

    // On the next voice function, stop on any DTMF digit.
    m_voiceResource.TerminationDigits = "ANY";

    // Let the voicemail record for up to 3 minutes
    m_voiceResource.MaximumTime = 180;

    // Record the caller's message to the local hard disk
    m_voiceResource.Record(filename);

    // On the next voice function, clear the digit buffer
    m_voiceResource.ClearDigitBuffer = true;
}
For a deeper dive into coding Voice Elements and our Class Library, explore: